
Specifications


Chapter 3: Working with Real-Time Plug-Ins 29
To change plug-in settings using the Next (+) and
Previous (–) Settings buttons:
■ Press the Plus (+) or Minus (–) buttons to select
the next or previous plug-in settings file. The
next (or previous) settings file are enabled, and
the Librarian menu changes to reflect the new
setting.
Editing Settings on Unlinked Multi-
Mono Plug-ins
When a multi-mono plug-in is unlinked, im-
porting, copying, pasting, or bypassing settings
affects only the currently selected channel.
To apply an operation to all channels of an
unlinked plug-in:
■ Hold down the Alt key (Windows) or Option
key (Macintosh) while performing the com-
mand.
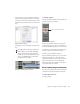
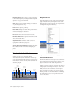
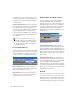
Plug-In Settings Dialog
(Pro Tools 6.7 and Higher Only)
The Plug-In Settings dialog lists the settings files
for the current plug-in type. From this list, you
can select a new setting, or audition a series of
settings. Auditioning plug-in settings is espe-
cially useful for selecting patch names for virtual
MIDI instrument plug-ins or trying out different
effects types applied to your audio.
The Plug-In Settings dialog includes the follow-
ing:
Folder This pop-up menu lets you switch be-
tween session settings located in root or session
folders (and any available subfolders)
Patch Field This field displays the name of the
active (highlighted) setting.
Increment Patch Every X Sec This option lets
you audition contiguous plug-in settings on-
the-fly by automatically scrolling through them
for a specified number of seconds.
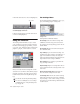
To change plug-in settings using the Plug-In
Settings dialog:
1 Click the Settings Select button.
2 From the dialog list, select the desired plug-in
setting.
– or –
Use the Arrow keys to scroll through the avail-
able settings.
3 Click Done.
Plug-In Settings dialog
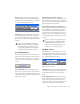
Plug-in header settings
To switch between settings folders, press
Control (Windows) or Command (Macin-
tosh) and use the Up/Down Arrow keys.
Settings
Select