
Specifications


Chapter 4: Working with AudioSuite Plug-Ins 37
Dither Plug-in AudioSuite plug-ins always create
files that inherit the session’s bit depth. With
the Dither Plug-In pop-up menu you can choose
the dither algorithm used for dithering higher-
bit source files during AudioSuite processing.
Edit Settings Accesses options for the currently
selected Default Dither plug-in. In the case of
the Digidesign Dither plug-in, this lets you to
turn noise shaping on or off.
Bit Depth Selects the default bit depth used by
the dither function during AudioSuite process-
ing. Bit depth can be set to 16-, 18-, 20-, or 24-
bit.
AudioSuite Buffer Size Selects the size of
Pro Tools memory buffer for processing and pre-
viewing AudioSuite plug-ins. Choices are Mini,
Small, Medium, Large, or Jumbo. In general,
choosing a smaller buffer speeds up AudioSuite
previewing functions. Choosing a larger buffer
speeds up AudioSuite processing of audio files.
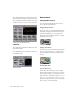
To configure the AudioSuite Buffer Size:
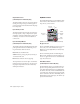
1 Choose Setups > Preferences.
2 Click Processing.
3 Select an AudioSuite Buffer Size.
Though the default setting will work well for
most situations, you may want to set the buffer
according to your current task. Before you audi-
tion an AudioSuite plug-in, set this buffer to
Mini or Small. Then, when you are ready to pro-
cess a file, reset it to Large or Jumbo.
4 Click Done.
TC/E Selects the Time Compression & Expan-
sion plug-in and default settings used when ed-
iting with the Time Trimmer tool. If you own a
compatible third-party time compression and
expansion plug-in, you have the option of using
it for Pro Tools time compression and expan-
sion processes by selecting it here.
See “Noise Shaping” on page 59 for more
information.
For an explanation of dither, See “Dither”
on page 58.
Refer to the Pro Tools Reference Guide for
more information about the Time Trimmer
tool.