
Datasheet


Basys 3™ FPGA Board Reference Manual
Copyright Digilent, Inc. All rights reserved.
Other product and company names mentioned may be trademarks of their respective owners.
Page 5 of 19
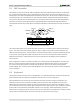
2.1 JTAG Programming
The Xilinx Tools typically communicate with FPGAs using the Test Access Port and Boundary-Scan Architecture,
commonly referred to as JTAG. During JTAG programming, a .bit file is transferred from the PC to the FPGA using
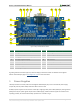
the onboard Digilent USB-JTAG circuitry (port J4) or an external JTAG programmer, such as the Digilent JTAG-HS2
attached to port J5 (located below port JA). You can perform JTAG programming any time after the Basys 3 has
been powered on regardless of what the mode jumper (JP1) is set to. If the FPGA is already configured, then the
existing configuration is overwritten with the bitstream being transmitted over JTAG. Setting the mode jumper to
the JTAG setting (seen in Fig. 3) is useful to prevent the FPGA from being configured from any other bitstream
source until a JTAG programming occurs.
Programming the Basys 3 with an uncompressed bitstream using the on-board USB_JTAG circuitry usually takes
around five seconds. JTAG programming can be done using the hardware server in Vivado. The demonstration
project available at digilentinc.com provides an in-depth tutorial on how to program your board.
2.2 JTAG Programming
When programming a nonvolatile flash device, a bitstream file is transferred to the flash in a two-step process.
First, the FPGA is programmed with a circuit that can program flash devices, and then data is transferred to the
flash device via the FPGA circuit (this complexity is hidden from the user by the Xilinx Tools). After the flash device
has been programmed, it can automatically configure the FPGA at a subsequent power-on or reset event as
determined by the mode jumper setting (see Fig. 3). Programming files stored in the flash device will remain until
they are overwritten, regardless of power-cycle events.
Programming the flash can take as long as one or two minutes, which is mostly due to the lengthy erase process
inherent to the memory technology. Once written, however, FPGA configuration can be very fast – less than a
second. Bitstream compression, SPI bus width, and configuration rate are factors controlled by the Xilinx Tools that
can affect configuration speed.
Quad-SPI programming can be performed using Vivado.
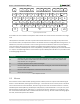
2.3 USB Host Programming
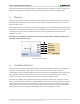
You can program the FPGA from a pen drive attached to the USB-HID port (J2) by doing the following:
1. Format the storage device (Pen drive) with a FAT32 file system.
2. Place a single .bit configuration file in the root directory of the storage device.
3. Attach the storage device to the Basys 3.
4. Set the JP1 Programming Mode jumper on the Basys 3 to "USB".
5. Push the PROG button or power-cycle the Basys 3.
The FPGA will automatically be configured with the .bit file on the selected storage device. Any .bit files that are
not built for the proper Artix-7 device will be rejected by the FPGA.
The Auxiliary Function Status, or "BUSY" LED (LD16), gives visual feedback on the state of the configuration process
when the FPGA is not yet programmed:
When steadily lit, the auxiliary microcontroller is either booting up or currently reading the configuration
medium (pen drive) and downloading a bitstream to the FPGA.
A slow pulse means the microcontroller is waiting for a configuration medium to be plugged in.
In case of an error during configuration, the LED will blink rapidly.