
Data Sheet


PYNQ-Z1 Board Reference Manual
Copyright Digilent, Inc. All rights reserved.
Other product and company names mentioned may be trademarks of their respective owners.
Page 7 of 25
Stage 2
The last stage is the execution of the user application that was loaded by the FSBL. This can be any sort of program,
from a simple “Hello World” design, to a Second Stage Boot loader used to boot an operating system like Linux. For
a more thorough explanation of the boot process, refer to Chapter 6 of the Zynq Technical Reference manual.
The Zynq Boot Image is created using Vivado and Xilinx Software Development Kit (Xilinx SDK). For information on
creating this image please refer to the available Xilinx documentation for these tools.
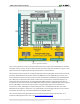
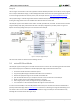
The PYNQ-Z1 supports three different boot modes: microSD, Quad SPI Flash, and JTAG. The boot mode is selected
using the Mode jumper (JP4), which affects the state of the Zynq configuration pins after power-on. Figure 3.1
depicts how the Zynq configuration pins are connected on the PYNQ-Z1.
Figure 3.1. PYNQ-Z1 configuration pins.
The three boot modes are described in the following sections.
3.1 microSD Boot Mode
The PYNQ-Z1 supports booting from a microSD card inserted into connector J9. The following procedure will allow
you to boot the Zynq from microSD with a standard Zynq Boot Image created with the Xilinx tools:
1. Format the microSD card with a FAT32 file system.
2. Copy the Zynq Boot Image created with Xilinx SDK to the microSD card.
3. Rename the Zynq Boot Image on the microSD card to BOOT.bin.
4. Eject the microSD card from your computer and insert it into connector J9 on the PYNQ-Z1.
5. Attach a power source to the PYNQ-Z1 and select it using JP5.
6. Place a single jumper on JP4, shorting the two top pins (labeled “SD”).
7. Turn the board on. The board will now boot the image on the microSD card.
In order to boot the PYNQ-Z1 into the PYNQ software environment, the microSD card must be formatted with a
specially created disk image. Refer to www.pynq.io for instructions on obtaining this image file and flashing it to a
microSD card. Once the microSD card has been flashed with the image, the PYNQ-Z1 can be booted with it by
following the instructions above starting at step 4.