
Instruction manual
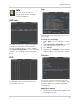


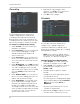
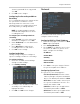

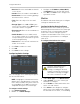
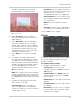
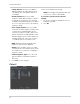
Table Of Contents
- Getting Started
- Basic Setup
- Front Panel
- Rear Panel
- Remote Control
- Using the System
- Setting the Time
- Recording
- Search (Playback)
- Backup
- Using the Main Menu
- FLIR SyncroIP NVR Central Management Software
- System Requirements
- Prerequisites
- Installing FLIR SyncroIP NVR CMS
- Adding a NVR from the Local Area Network (LAN)
- Adding a NVR using a DDNS address
- Using Alarm Rec (Event Search)
- Using Playback Mode
- Configuring Monitoring Tasks and Projects
- Using E-Map
- Configuring the CMS
- Adding User Accounts to the CMS
- Multi-Monitor Support
- Remote Viewing on Internet Explorer
- Mobile Connectivity
- Appendix A: System Specifications
- Appendix B: Setting up Remote Viewing
- Appendix C: Auto Port Forwarding Wizard
- Appendix D: Setting Up DDNS Service
- Appendix E: Remote Firmware Upgrade
- Appendix F: Hard Drive Installation
- Appendix G: Connecting an External Monitor
- Troubleshooting

Connecting to your system
After you have port forwarded the required
port, created a DDNS account, and enabled
DDNS on your system, you must enter the
DDNS URL into Internet Explorer to access
your NVR.
The DDNS URL must include http:// , the
name of your DDNS URL, followed by a
colon, then the HTTP port of your NVR.
For example:
http://tomsmith.
myddns-flir.com:80
DDNS URL
HTTP Port
NOTE: If you change your HTTP port
number (port 80) to a different port, you
must enter your port number after the
DDNS address.
27
Using the Main Menu
Configuring Email Alerts
You can configure the system to send out email
alerts for motion detection or other events.
NOTE: To send out motion detection alerts,
y
ou must enable the Send Email option for
motion detection on each camera. For
details, see “Configuring Motion Detection
Events” on page 28.
To configure Email Alerts:
1. From live view, right-click and select Main
Menu. Log in if prompted.
2. Click Setting>Network.
3. Click Netw
ork Sett
ing.
Click Network
Setting
4. Check Email. Double-click Email.
Check Email
and then
double-click
Email
5. Configure the following:
• SMTP Server: Enter the SMTP server
address.
• Port: Enter the port used by the SMTP
server.
• Anonymous: Check if your server supports
anonymous log ins. Otherwise, leave this
unchecked.
• User Name: Enter the SMTP user name.
• Password: Enter the SMTP password.