
Instruction manual
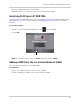

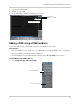
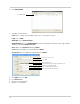
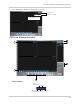
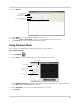
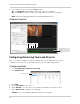
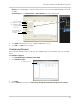
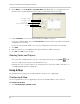
Table Of Contents
- Getting Started
- Basic Setup
- Front Panel
- Rear Panel
- Remote Control
- Using the System
- Setting the Time
- Recording
- Search (Playback)
- Backup
- Using the Main Menu
- FLIR SyncroIP NVR Central Management Software
- System Requirements
- Prerequisites
- Installing FLIR SyncroIP NVR CMS
- Adding a NVR from the Local Area Network (LAN)
- Adding a NVR using a DDNS address
- Using Alarm Rec (Event Search)
- Using Playback Mode
- Configuring Monitoring Tasks and Projects
- Using E-Map
- Configuring the CMS
- Adding User Accounts to the CMS
- Multi-Monitor Support
- Remote Viewing on Internet Explorer
- Mobile Connectivity
- Appendix A: System Specifications
- Appendix B: Setting up Remote Viewing
- Appendix C: Auto Port Forwarding Wizard
- Appendix D: Setting Up DDNS Service
- Appendix E: Remote Firmware Upgrade
- Appendix F: Hard Drive Installation
- Appendix G: Connecting an External Monitor
- Troubleshooting

44
2. Click Manual Add.
Click Manual Add
3. Configure the following:
• Title: En
ter a name for your NVR of your choice (e.g. home or office).
• Type: Select NVR.
• Add Type: Select Domain Name.
• Domain Name: Enter the Domain Name from the confirmation email after your registered for
DDNS, followed by .myddns-flir.com.
• Port: Enter the Client Port (default: 35000).
• User: Enter the NVR’s user name (default: admin).
• Password: Enter the NVR’s password (default: 000000).
4. Click Ad
d, then
click OK.
5. Click Devic
e List.
6. Click + next t
o No Group.
7. Double-click the NVR.
Enter name of your choice
Select NVR
Select Domain name
Enter Domain Name, followed by .myddns-flir.com
Enter TCP Port (default: 35000).
Enter User Name (default: admin).
Enter Password (default: 000000).
tomsmith.myddns-flir.com