
Instruction manual
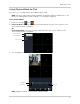
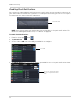
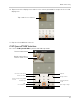
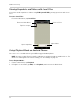
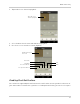


Table Of Contents
- Getting Started
- Basic Setup
- Front Panel
- Rear Panel
- Remote Control
- Using the System
- Setting the Time
- Recording
- Search (Playback)
- Backup
- Using the Main Menu
- FLIR SyncroIP NVR Central Management Software
- System Requirements
- Prerequisites
- Installing FLIR SyncroIP NVR CMS
- Adding a NVR from the Local Area Network (LAN)
- Adding a NVR using a DDNS address
- Using Alarm Rec (Event Search)
- Using Playback Mode
- Configuring Monitoring Tasks and Projects
- Using E-Map
- Configuring the CMS
- Adding User Accounts to the CMS
- Multi-Monitor Support
- Remote Viewing on Internet Explorer
- Mobile Connectivity
- Appendix A: System Specifications
- Appendix B: Setting up Remote Viewing
- Appendix C: Auto Port Forwarding Wizard
- Appendix D: Setting Up DDNS Service
- Appendix E: Remote Firmware Upgrade
- Appendix F: Hard Drive Installation
- Appendix G: Connecting an External Monitor
- Troubleshooting

77
Mobile Connectivity
3. Tap + and select a channel to playback.
Tap + and select a
channel to playback
4. Select the date then the start and end times to playback.
5. Use the on-screen controls to control playback.
Double-tap to open in
full-screen
Select previous video file
Select next video file
Play/pause
Next frame
Fast
Slow
Enabling Push Notifications
You can have the app send push notifications to the notifications area on your device when one of
your cameras detects motion. Once you have received a push notification, you can select it to open