
Instruction manual


2. Installation and Connection
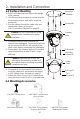
2.2 Surface Mounting
1 - Select a location that can support the weight
of the camera.
2 - Use the mounting template to create holes for
the mounting screws and cable. Insert the
anchors(4).
3 - Run the cables through the cable hole and
connect the cables as shown in
{2.4.5 Connection Diagram} on page 11.
Caution: Do not connect power to the
camera before completing the entire
installation.
4 - Remove the dome cover. Remove the
internal foam packaging. To prevent scratches,
do not remove the film on the outside of the
dome cover before completing the installation.
5 - Firmly attach the Camera Base to the surface
using the mounting screws(4) with o-rings
attached.
Caution: Make sure the o-rings are
attached to the mounting screws and
torx screws before mounting to provide
a weatherproof seal.
6 - If necessary, use the internal Dip Switches
to set the camera ID and protocol according
to {2.5 Setting Dome Camera} on page 12.
7 - Attach the Dome Cover to the Camera Base
using the torx screws(3) with o-rings attached.
2.3 Mounting Accessories
10
MNTZ36C Ceiling Mount
MNTZ36P Pole Adapter
(Requires MNTZ36W)
MNTZ36R Corner Adapter
(Requires MNTZ36W)
MNTZ36PP Parapet Mount
(Special Order)
MNTZ36W Wall Mount
Mounting
Template
Anchors(4)
Mounting
Screws(4)
Torx
Screws(3)
O-Rings(4)
O-Rings(3)
Camera
Base
Dome
Cover