Talk Master™ ii3 intercom system Software Users′ Guide For all ii3 series 10/100 Ethernet Intercoms Models ii3-m, EDB, EDW
TABLE OF CONTENTS OVERVIEW ..........................................................4 TYPICAL SYSTEM CONFIGURATIONS ..........................5 CONFIGURATION AND IP ADDRESSES .......................5 INTERCOM CONFIGURATION UTILITY.........................6 MAIN SCREEN CONTROLS ........................................8 INTERCOM LISTINGS............................................. 10 MESSAGES WAITING............................................. 10 MENU SELECTIONS ...........................................
O VERVIEW Digital Acoustics IP (Internet Protocol) Intercom modules provide a functional audio equivalent to the basic "push to talk" (PTT) intercom. Simply connect the ii3-ED Desktop intercoms to a 10/100 Ethernet connection and communicate to a host server PC by voice.
T YPICAL SYSTEM CONFIGURATIONS PC-SERVER MODE Server PC with TalkMaster™ software connected to Intercom Client array DIRECT MODE One ii3 Intercom configured as 'Server' , connected to a another as 'Client' C ONFIGURATION AND IP A DDRESSES TalkMaster™ LE software downloads are available online Access www.digitalacoustics.com/talkmaster for downloads and mode information. Quick reference: 1. 2. 3. 4.
I NTERCOM C ONFIGURATION U TILITY The Intercom configuration Utility scans your local networks and detects ii3-intercoms that are correctly installed using LAN 10/100 connections. Before you can configure your intercom system you must execute a system scan by pressing the Search button Select Client or Server Mode ii3 intercoms are normally configured as a Client. This configuration sets the intercom to search and connect to a Server (the PC running TalkMaster).
Assign IP address as Static or use DHCP Select DHCP mode to allow your network server to automatically assign the IP address, subnet, and gateway to the intercom. Your system MUST have DHCP assignment capability if you choose use this option. If you are unsure, do NOT use DHCP. After assigning DHCP, press APPLY.
M AIN S CREEN C ONTROLS Before you can use TalkMaster to communicate you must setup and configure the intercoms on your network. To setup, click Scan All to launch the TalkMaster Intercom Configuration Utility. Communicate To call an intercom listed in the intercom 'listbox" select the intercom, then press TALK. The Talk button will appear lighted (Red). To turn off your microphone and wait for a reply press 'Talk' Again. Intercom Array destination specifies which intercom is addressed on the system.
Listen mode The "Listen" button will allow the operator to turn on the audio microphone as any remote client intercom. This provides a means of creating a hands-free mode for the remote intercom or simply monitoring audio at a remote intercom site. Automatic Manual Mute Listen automatically after releasing the Talk button, ("hands-free") (Default) Client operator must press the intercom 'Talk' button to speak to the server.
Auto Response Auto-response provides a convenient method of notifying a caller that the TalkMaster station attendant is away ("no one is available" message), or talking to another party ("please wait" message). Automatic Respond to Calls Waiting with default 'busy'' message Unattended Respond to ALL calls with a 'not available' message. Off Do not play automated responses INTERCOM LISTINGS The intercom listbox displays the detected array of intercoms.
MENU SELECTIONS FILE Audio Archives View and manage audio archive files Exit Quit / Exit TalkMaster VIEW Event log Display a short list of recent program events Screen position Save current view or Reset to default Preferences Launch Preferences menu for custom configurations and options TOOLS Microphone and Speaker Levels Set and adjust your PC Microphone and Speaker levels Common IP ports A List of commonly assigned Network Ports Record program events to file Save program runtime information for support i
T ALK M ASTER P REFERENCES Ping Interval Intercoms on the system are contacted at intervals ranging from 5 to 90 seconds. In large systems, this interval can be set to the maximum amount to limit network traffic. Audio Volume Intercom volumes are adjustable at the intercom and can also be controlled using the volume slider. Use beep tones at start and end of incoming calls By default, a short audio tone is generated to indicate the stop and start of a user's call.
A UDIO MESSAGE PLAYER The Audio Message Player provides a convenient means to listen and review messages and archived audio files. Files will be automatically deleted after playback unless you UNCHECK to on-screen delete option.
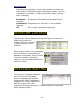
D IRECT M ODE CONNECTION AND SETUP Direct mode connects two ii3 intercoms together in a link that does not require a PC. Server-Client assignment example Server selection and setup This image show the server selected (highlighted in Blue) and shows it's configured IP address set to 192.168.0.170 Client selection and setup This image shows the client selected (highlighted in Blue). It is configured with IP address 192.168.0.144 and has its server IP pointing to the other ii3 intercom (Server IP 192.168.0.
T ROUBLESHOOTING TalkMaster requires correctly configured ii3-series intercoms installed on the network to operate correctly. A overview of hardware troubleshooting include: Verify power connections. The "Active" LED on should be on or flashing. Refer to LED Indicator section in your hardware manual for valuable diagnostic information. If you cannot detect ii3 units when you SCAN then be sure to verify that the LINK LED is on and TalkMaster is running on the SAME network.
T ALK M ASTER O NLINE U PDATES TalkMaster version updates are available for automatic installation. Use TalkMaster menu selection "Check For New Versions Online". ii3 intercom hardware is also available for operating system "OS" firmware. Contact Digital Acoustics to for additional details. T ECHNICAL SUPPORT Technical Support by email is available at: techsupport@digitalacoustics.com International telephone support numbers are available online at: www.digitalacoustics.
O RDERING I NFORMATION ii3 series models ii3-m (module) ii3-EDW-110 ii3-EDW-220 ii3-EDB-110 ii3-EDB-220 Digital Acoustics Corporation 1 Compobeach Road, Westport, CT 06880 U.S.A. This document may contain advance information. Contact factory for technical specification before product design and/or use. Design and specifications are subject to change without notice.