
User`s manual


13
2.2 Fast Start
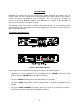
Figure 2: Basic Enhancement Setup
Fast start the MicroDAC IV as follows using Figure 2 as a guide:
1. Connect the audio source(s) to the LEFT (PRI) and RIGHT (REF) ANALOG INPUT RCA jacks
on the MicroDAC IV rear panel as shown in Table 1. Although this table assumes a live
microphone preamp connected to the input of the MicroDAC IV, the signal could come from
many types of sources such as a cassette or micro-cassette recorder, DAT recorder,
videocassette recorder, telephone tap, or radio receiver. Note that the RIGHT (REF) signal is
only used in stereo configuration and/or with the 2CH Adaptive filter.
Table 1: MicroDAC IV Input Connections
MODE LEFT (PRI) Input RIGHT (REF) Input
1CH Preamp output Unused
2CH Preamp output TV/radio output
1CH STereo Left preamp output
Right preamp
output
A-D (Mono
configurations)
Preamp output
TV/radio output, if
2CH Adaptive filter
programmed;
unused otherwise
A-D (Stereo
configurations)
Left preamp output
Right preamp
output
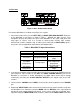
2. If you wish to record the enhanced audio, connect the line-level audio inputs (TAPE IN jacks) of
your Enhanced Tape Recorder to the LEFT and RIGHT ANALOG OUTPUT jacks on the
MicroDAC IV rear panel as shown. Alternatively, the digital output stream may be directly
recorded by connecting the 44.1KHz DIGITAL OUTPUT to the digital input of the DAT
recorder.
3. Turn the phones VOLUME control to MIN, then connect the stereo headphones to the PHONES
jack.
4. Rotate both INPUT LEVEL knobs located on the front panel fully counter-clockwise and power
the MicroDAC IV on. Switch the front panel MODE switch to BYPASS, so the signal input will
flow directly to the output without being altered. As the source audio (live or recorded) plays,
adjust the front panel INPUT LEVEL knobs clockwise until the tricolor INPUT LEVEL LEDs flash