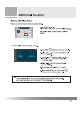
Additional Function Setting the Sleep Timer You can adjust the time for automatic system down. To set the sises timer In [Setup] menu. Press [SLEEP] button. Sleep Timer Is changed as you press [Sleep] button. 150Min— 180Min 1. Press MENU 1&1 button on the remote control. 2. Select Setup [4] menu by pressing Channel EE] button, 3. Crass Volume | Ht button, select Time’ with Channel [5/127] button and press Volume [1 button again 4. Select [Sleep Timer] by pressing Chang! Lien] button. 5.
Additional Function PIXEL SHIFT Due to its fundamental and bully-up technology of the panel, when it is turned on long time of period especially with a still Image, I can have afterimage that does not disappear even though It is turned off. During watching TV, this can affect serious Image quality problem. However, with this feature, sate pixel of panel Is shifted to right or left minutely and regularly, surely Impossible to be noticed by churn eves, to protect afterimage effect. 1.
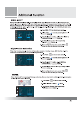
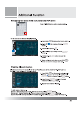
Additional Function PIP (Picture In Picture) PIP is the function to display two different Input source simultaneous. To set PIP in On Screen Display Menu, 1 . Press Volume . Set BIP to “On* with Volume [1 Press [PIP] on the remote control. [PIP] is changed as following every time you press [PIP] button. On -> Off . Press MENU 1: button on the remote control. 3 Sel ect PIP [#1 menu by pressing Shanna! br button. button and select [PIP] by pressing Channel [£33405] button. #11 button. .
Additional Function Adjusting the Size of Sub picture Press [P.SIZE] button on the remote control, The size Is changed in the following order gate press. ‘Small — DOUBLE — DOUBLE". . Press MENU &1 button on the remote control, . Select PIP [82] menu by pressing Channel FEE] bitten. . Press Volume [1+ ] button and select [Size] by pressing Channel! [i ii button. . Press Volume size. #11 button to adjust the 5. When configuration Is done, press MENU 1& button to save the changes and exit.
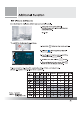
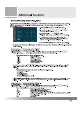
Additional Function To change the Input source In On Screen Display Menu. 1. Press MENU 1&1 button on the remote control. 2. Select PIP {#1 menu by pressing Chance! [G7] button. 3. Press Volunteer [a1 button and select [Input Secure] by pressing Shanna! “1 button and Volume [ 1 button again, 4. Press Volume [7 sauce. {To adjust the input source of Sub picture, PIP should be active.) 71 1 button to change Input 5. When configuration Is dune, press MENU Eh button to save the changes and exit.
Additional Function Swapping the main with sub picture in PIP mode Press [P.SWAP] button on the remote control. 1. Press MENU [5] button on the remote control, 2. Select PIP by pressing Channel [1 button. 3. Press Volume button. 4. Satiety [SWAP] by passing Shanna! button. 5. Pressing Volume | picture button to swap the 8. When configuration Is done, press MENU [iz] button to save the changes and exit. Viewing Closed Caption Closed Caption feature is to display On Screen Text Messages during watching TV.
Additional Function Parental Rating Control V-chip feature automatically locks TV Programs (TV Parent Guide Lines) or Movie (PAMPAS) that is considered as Inappropriate for children. To activate, deactivate or set the rating, vou should enter a PIN {Personal 1D Number}. 1. Press [MENU] button to display the menu. 2. Press Channel {7 1 button to select ‘Setup’; and then press volume | 3. Press Channel [704097 button to select “W-Chip’, and han press Volume [| 1] button, 4.
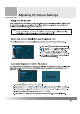
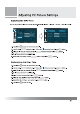
Adjusting PC Picture Settings Using as a PC Monitor This TV is designed to be used as a PC Monitor. Concerning the Maximum Resolution, please refer to specification table in Appendix. Since it has driver software implemented, you don’t have to install any additional software. Just PLUG N’ PLAY! Tp To use Monitor, your PC and TV should be connected via D-Sub Cable {15 Pin Analog) or DIV-to-HDMI cable. For details, please check the Installation section.
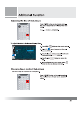
Adjusting PC Picture Settings Setting the Position of PC Picture You can adjust the position of a PC picture manually. Use this function when the picture is not centered or shifted to sides. . Press MENU 181 button on the remote control. . Press Channel [+ 71 ] button to select *[Picture]’ menu and push Volume . In [Picture] menu, select [PC] with Channel button. ii button and push Volume [ +] button. . Press Channel [£5337] button and then select ‘Position’ by pressing Volume [El button. .
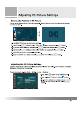
Adjusting PC Picture Settings Adjusting the Color Tone You can adjust the color tone of the PC Picture. (Normal — Warm — Warm? — Custom + Cool + Cull) an 1. Press MENU | B81 button on the remote control. 2. Press Channel [£0300] button to select ‘[Picture]’ [81] menu and push Volume 3. Select [Color Tone] by pressing Channel [13/131] button and press Volumes [| 4, [Color Temperature] Menu will display. 5. Adjust RGB by pressing Channel [7 11 button and Volume [: Customizing the Color Tone .
Adjusting PC Picture Settings Adjusting the Frequency / Phase Use this function to adjust the Frequency range or Phase. To adjust the Frequency by using On Screen Display Menu. 1. Press MENU [31 button on the remote control, 2. Select Picture run by pressing Channel a] button. 3. Press Volume | button in Picture [5] Menus and then, select manipulating Channel | 4. Press Volume [ 21] button. 5. Press Channel JE button to select [Frequency] or [Phase]. 6.