Appendix 6.
FCC Compliance Statement This equipment has been tested and found to comply with the limits for a Class B digital device, pursuant to Part 15 of FCC Rules. These limits are designed to provide reasonable protection against harmful interference in a residential installation. This equipment generates, uses, and can radiate radio frequency energy and, if not installed and used in accordance with the instructions, may cause harmful interference to radio communications.
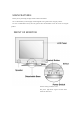
MAIN FEATURES Thank you for purchasing our high resolution TFT LCD monitor. We recommend that you thoroughly read through this user's guide before using the product. It is also recommended to safely store the guide in times of immediate need in the course of using the product. FRONT OF MONITOR Uesd in turning on/off the screen. The power light shows regular and safe mode functions with colors.
Ventilator(Caution!) Do not block the ventilator Hole for wall hanging Detachable Base Detachable for other equipments (VESA ARM) and wall hanging use. Connector to External Functions Connects signals with external equipments and PCs. FUNCTIONS Although regular monitors for PCs use CDT as a medium for display, the TFT LCD Monitor is a Flat Panel Display based on digital technology, and was originally used only for laptops PCs.
COMPONENTS After discarding the package and wrapping of the LCD PC, check for the following components in the box. Components LCD PC, Power Adapter, User’s Guide, Signal Cable, Power Cable, Battery (AA) 1.5V x 2 PRECAUTIONS IN INSTALLING Install on safe ground, : There ’s possibility of damage of the product or harming people. Always cover the product or keep in a well ventilated place.
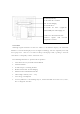
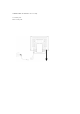
CONNECTION TO YOUR PC for 17” Only 1.12V DC Jack 2.
PC FUNCTION SETTING Information Information of the screen Menu → Information → Select → Control with → Menu Yon can see the information of the screen. Input Source TV or changing to another mode Menu → Input → Select → Control with → Menu Yon can change input mode. (TV – Composite – S-VHS – Component – PC) OSD Control Vertical Position of OSD Menu → OSD Control → H Position → Select → Control with → → Control with → Menu Yon can adjust horizontal position of OSD.
Adjust Vertical Position Menu → Adjust → V Position → Select → Control with → Menu Yon can adjus t the vertical position of the screen Horizontal Position Menu → Adjust → H Position → Select → Control with → Menu Yon can adjust the horizontal position of the screen Clock Adjust Menu → Adjust → Clock Adj. → Select → Control with → Menu → Control with → Menu → Control with → Menu Yon can adjust the clock Phase Adjust Menu → Adjust → Phase Adj. → Select Yon can adjust the phase.
Power saving Mode If your computer system features a display power management function, the Monitor enters into the power saving modes as follows. When it is used with a computer system equipped with DPMS(VESA) this Monitor provides an EnergyStar compliant function. If your computer does not feature display power management, please sourc e an optional DPMS software program. Power saving modes greatly reduce power consumption w h e n the computer is temporarily not in use.
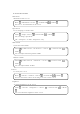
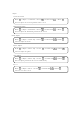
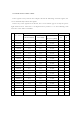
STANDARD SIGNAL TIMING CHART If the signals conveyed from the computer match the following standard signals, the screen automatically controls the signals. Conversely, if the signals do not match, the screen will not appear or only the power light would activate. Therefore it is important that you first set as the following, with reference to the Video Card Guide. Frequency Resolution Horizontal(Khz) Vertical(Hz) Polarity Clock Frequency(MHz) H V 1 640x350 31.5 70.0 25..175 + - 2 640x400 31.
PRECATIONS The below precautions should be carefully followed for the effective function of the product and safety of users. Do not use damaged plugs Do not expose the product or worn out outlets. to severe impacts. (Danger of electrocution) (This could occur damage) Do not try to disassemble, In weather conditions of thunder repair, renovate the product and/or lightening, or when you will without expert assistance.
TROUBLE SHOOTING When failure or problems occur, refer to the following. For further assistance, contact our customer support centers. The power dose not Check whether the plug is in place and try to reconnect it. Trun on (refer to pg5,pg6) "Check signal cable" Check if the signal cable is properly connected to the sign appears computer or video card and try to reconnect it (refer to pg4) “Out of range” Set appears on the screen. monitor.