
Specifications


4–3Troubleshooting
Introduction
This chapter contains procedures for troubleshooting printer malfunctions.
Diagnostic test procedures are covered in this chapter, but basic printer
operation is not. Since you must operate the printer to check its performance,
have the Operator‘s Guide or User‘s Manual at the printer site.
Fault Messages
This section contains troubleshooting tables for fault messages that can
appear on the Liquid Crystal Display (LCD).
Two kinds of faults can appear on the LCD:
♦ Operator correctable faults
♦ Faults requiring the attention of a field service technician—indicated
with an asterisk (*) after the fault message
IMPORTANT
Test printer operation after every corrective action, and stop
troubleshooting when the symptom disappears. Always press the
CLEAR switch after correcting a fault indicated by a fault message.
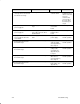
48 Volt Failed *
Instruction Indication Yes No
1. Cycle power: Turn printer off.
Wait 15 seconds. Turn printer
on.
“48 Volt Failed * ” message. Go to step 2. Return printer to
normal operation.
2. Press the CLEAR switch.
“48 Volt Failed * ” message. Go to step 3. Return printer to
normal operation.
3. Turn printer off. —
Go to step 4.
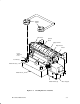
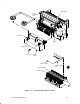
4. Disconnect CCB/Mech
Driver cable from connector
J2 on the controller board
and connector J6 on the
mech driver board.
—
Go to step 5.
—