
Specifications

4–30 Troubleshooting
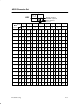
Hex Code Printout
Hex dumps list all ASCII character data received from the host computer
with their corresponding two–digit hexadecimal codes. (The ASCII character
set is on page 4–31.) You can use hex dumps to troubleshoot printer data
reception problems. Printable characters print as the assigned symbol;
nonprintable characters are indicated by the period symbol (.). The letter p
before a hex code indicates an active Paper Instruction (PI) line. A blank
space before a hex code indicates an inactive PI line.
To make a hex printout:
1. On the control panel, press the ON LINE switch to place the printer
off–line. “Off–line Emulation” displays.
2. Raise the printer cover.
3. On the control panel, press the and switches simultaneously.
“ENTER Switch Not Locked” briefly displays. (If “Locked” displays,
press and again.)
4. Press the switch. The current emulation displays.
5. Press the or switch until “Emulation Hex Dump” displays.
6. Press ENTER. “Emulation Hex Dump * ” displays, indicating hex dump
mode is now active.
7. Press ON LINE. The display indicates the printer is ready to print in hex
dump mode: “On–Line Hex Dump”
8. Send data from the host — the data print in hex dump format. (Any data
remaining in the buffer will print before the hex code printout starts.)
9. To stop the hex dump, press ON LINE. The display reads “Off–line Hex
Dump”.
10. Press CLEAR. “Off–Line Emulation” displays.
11. Press once, then press until the emulation you want to use displays.
12. Press ENTER, then press the and switches simultaneously.
13. Close the printer cover and press ON LINE to place the printer on–line.