
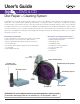
User Manual
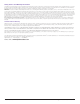

A slight radial pattern left
on the disc is normal
after repairing process
is complete.
(Image of
disc before and after)
8
When not in use, the drying
cloth, felt buffing square, and
rejuvenating fluid can be stored
conveniently inside the back of
the repair unit.
Note: SkipDr
®
Disc Repair System repairs surface scratches on discs. No system can repair gouges and deep
scratches reaching down to a disc’s reflective layer, label-side damage, or warping.
Directions for replacing the FlexiWheel
™
:
The FlexiWheel
™
will repair up to 25 discs.
Once it has worn, the FlexiWheel
™
can easily be replaced.
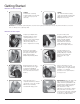
1.
If a disc is in the unit, remove it first before replacing FlexiWheel
™
so as not to damage disc.
2.
Gently pull worn FlexiWheel
™
from repair device by pulling wheel away from the wheel hub
with fingers. Lift out of repair device once wheel is detached from hub.
3.
Insert new FlexiWheel
™
into repair device, ensuring that side with protruding center faces
INWARD toward device (wheel cap will face outward). Rotate wheel to align hub prongs
with wheel openings and press very firmly against the repair device to ensure that the
FlexiWheel
™
is completely seated on hub.
Available Accessories:
Go to
www.digitalinnovations.com
for the latest in available accessories for all of your Digita
l Innovations’ products:
4090300 SkipDr
®
for DVD & CD Disc Repair + Cleaning System Replacement Accessory Kit
1 - FlexiWheel
™
1 - Buffing Square
1 - Drying Cloth
1 - SkipDr
®
Rejuvenating Fluid
1 - CleanDr
®
Disc Cleaning Solution
Tips
Digital Innovations’ SkipDr
®
Disc Repair Systems are trusted by over 8 million loyal customers, and are recognized as the
smartest solution to repairing scratched discs. We have put together the following helpful hints and tips to ensure the optimal
results to your disc repair. If after following and reviewing this information, you have additional questions or are not completely
satisfied, please call us at 1-888-SMART-58.
• �It is very important to keep discs wet during the resurfacing process, or discs may become damaged.
• �The final buffing step will help prevent new problems and ensures best repair results. You can buff as hard as you want, as
it will not harm the disc. A slight radial pattern left on the disc is normal after the repairing process is complete.
• �Be sure to wipe and buff your disc in a radial pattern (from the inside center to the outside rim of the disc in a straight line),
do not wipe or buff in a circular or circumferential pattern. Store buffing square as recommended to keep it clean and free
from debris which could cause scratches. Replacement buffing squares are available from your local retailer or directly from
Digital Innovations at wwww.digitalinnovations.com
• �If the disc is not completely repaired on the first try, repeat until completely fixed or no further improvement is evident. If the
disc still skips, your disc player may need cleaning or repair. Test with a disc that you know is not damaged.
• �The same disc can be repaired multiple times without worry of reaching the data layer of the disc.
• �Circumferential scratches (curved scratches that lie in a direction around the disc) are more likely to cause problems than
radial scratches (that run from inside center to outside rim of disc).
• �A disc’s play-side is usually the “shiny” side and the label-side is the “dull” side or “graphics” side.
• �Discs with label-side damage cannot be repaired by any method. Scratches visible on the label-side of a disc are always
due to label-side damage, but the reverse is not always true. Label-side damage can look like play-side damage when
viewed straight-on from the play-side. Here’s how to check for label-side damage:
Method #1- Hold the disc a foot or so from a light source with the play-side facing you. If you can see through a scratch,
that scratch is definitely on the label-side. If you can’t see through the scratch, it is probably on the play-side. Use Method
#2 to be sure.
Method #2- Tilt disc so you are looking at the scratch from an angle If the scratch has a reflection in the surface of the
disc then the scratch is on the play-side. If not, the scratch is on the label-side.
• �Store the SkipDr
®
Disc Repair System in a dust-free environment at room temperature. If it is stored in a warmer or cooler
temperature, allow it to return to room temperature before using.
• �If the unit starts to run slowly when using batteries, replace the batteries and start repair process from the beginning. If
attempting to repair 30 or more discs consecutively, it is recommended to use the AC power adapter available for the
SkipDr
®
Disc Repair System
www.digitalinnovations.com |
3Model #4070300
Before After
FILE NAME: 030910_4070300_SkipDr Disc Repair DVDCD_UserGuide_Web.ai
DIE: 8.5 in W x 11 in H (dielines in cyan)
APPLICATION: Adobe Illustrator CS3
DATE: 03/09/2010 JV
Digital Innovations, 3436 Kennicott Ste 200, Arlington Heights, IL 60004
Tel: (847) 463-9051 Fax: (847) 463-90002
4 COLORS: