
User's Manual


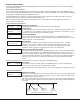


Table Of Contents
- 9000 Series Wireless Keypads
- Description
- What is Included
- Keypad Serial Number
- Programming the Transmitter in the Panel
- Selecting the Proper Location (LED Survey Operation)
- Installing the Keypad
- Standby Battery
- Card Reader
- Panic Key Options
- Internal Speaker Operation
- Backlighting
- Backlit Keyboard and Logo
- End-User Options
- Entering Alpha Characters
- Entering Non-Alphanumeric Characters
- Installer Options Menu
- Additional Programming
- User’s Guide
- Keypad Arming and Disarming
- Keypad Entry Delay
- FCC Information
- Specifications
- Compatibility
- Patents
- Accessories

9000 Series Installation Guide Digital Monitoring Products
5
Installer Options Menu
All keypads provide Keypad Option and Keypad Diagnostic menus to allow installing and service technicians to congure
and test keypad operation.
Accessing Installer Options
Access the Installer Options Menu through the User Options function. Hold down the Back Arrow and COMMAND keys for
two seconds to display SET BRIGHTNESS. Enter the code 3577 (INST) and press COMMAND. The display changes to KPD OPT
(keypad options) KPD DIAG (keypad diagnostics) and STOP.
The Keypad Options menu allows you to set the keypad address, select Supervised or Unsupervised mode, change the
default keypad message, selectively enable the 2-button Panic keys.
Note: All programming options display on all keypads, however, actual operation for some programming options is
restricted to the listed keypads.
Programming Keypad Options
Kpd Kpd
Opt diag StOp
Keypad Options (KPD OPT)
To program keypad options, press the left Select key under KPD OPT.
CUrrent Keypad
addreSS: 01
Keypad Address
Set the keypad address from 01 to 04 with the XTL panel. The factory default address is set at
01. To change the current address, press any Select key and enter the new address. It is not
necessary to enter a leading zero for addresses 01 to 04.
deFaULt Keypad
MSg:
Default Keypad Message
Enter a custom message of up to 16 characters to appear on the keypad display top line
whenever that line is not used for any other purpose. Press any Select key to clear the current
message and enter a new custom display.
arM paniC KeyS:
*pn *eM *Fi
Arm Panic Keys
Use this option to congure the top row Select keys as 2-button Panic keys. To enable
or disable a Panic, press the Select key under the appropriate display: PN (Panic), EM
(Emergency), and FI (Fire). Once the panic is enabled, an asterisk displays next to the
description. Refer to the Panic Key Options section earlier in this document.
aLL?: nO yeS
deLay: 2
Arming/Disarming Wait Time (9063)
Select the number of seconds (1-9) the keypad should wait when an area system displays ALL?
NO YES during arming/disarming or a HOME/SLEEP/AWAY system waits during arming only. If
NO or YES, or HOME, SLEEP, or AWAY is not manually selected before the delay expires, the
keypad automatically selects the YES or the AWAY key. Select zero (0) to disable this feature.
This delay only occurs when any credential is presented for arming the Home/Sleep/Away
system.
The following options are for programming the proximity credential for the Model 9063 only.
Card OptiOnS
dMp CUStOM
Card Options
Select DMP to indicate the reader sends a 26-bit DMP data string. To save the DMP option,
press the left top row Select key under DMP. Default is DMP.
Select CUSTOM if using a non-DMP credential. To select CUSTOM press the right top row Select
key.
Custom Card Definitions
Wiegand COde
Length: 26
Wiegand Code Length
When using a custom credential, enter the total number of bits to be received in Wiegand code
including parity bits. Press any top row Select key to enter a number between 0-255 to equal
the number of bits. Default is 26 bits.
Typically, an access card contains data bits for a site code, a user code, and start/stop/parity
bits. The starting position location and code length must be determined and programmed into
the keypad.
01110101101101010001100111
First Bit
Received
Position = 0
Site Code
Position = 1
Length = 8
User Code
Position = 9
Length = 16
Last Bit
Received
Position = 25
In this example the Wiegand Code Length = 26 bits.