
User's Manual


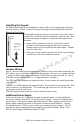


Table Of Contents
- Models 7860, 7863, 7870, 7873
- Touch Screen LCD Keypads
- DMP Keypad Features
- Touchscreen Display
- Micro SD Card
- Select Areas
- Installing the Keypad
- Harness Wiring
- Additional Power Supply
- Card Readers
- Door Strike Relay Specifications
- Zone 2 Door Contact with Soft-Shunt™
- Zone 3 Request to Exit
- Keypad Backlighting
- AC Power/Armed LED Operation
- Panic Icons
- Internal Speaker Operation
- End-User Options
- Keypad Options Menu
- Additional Programming
- User’s Guide
- Keypad Arming and Disarming
- Keypad Door Strike
- Keypad Entry Delay
- FCC Information
- Wiring Specifications for Keypad Bus
- Keypad Specifications
- Specifications
- Compatibility
- Listings and Approvals
- Accessories

2 7800 Series Keypad Installation Guide
PRELIMINARY
Touchscreen Display
The 7800 Series have an integrated LCD with a touchscreen user interface. The
display can be set up two different ways.
The 7800 Series can be set up to display a custom image for the home screen. See
Home Screen section below. Or alternatively, the display can be programmed to turn
off (blank screen) during periods when the keypad is not in use. See Backlighting
Brightness under End-User Options.
Home Screen
To display a custom image on the home screen, format a bitmap image to the
specication outlined below. Once formatted, load the image onto a micro SD card
and insert into the keypad before applying power.
Image Specications:
The 7800 Series keypad accepts bitmap images only for display. The image must be
formatted as 272 pixels tall by 360 pixels wide or less.
The name of the image must be set to custom.bmp for the keypad to recognize.
Cleaning the Touchscreen Display
Clean the touchscreen using a water dampened soft lint-free cloth. Apply the water
onto the cloth, do NOT apply directly onto the touchscreen. After cleaning, wipe the
touchscreen dry with a dry soft lint-free cloth.
Micro SD Card
The 7800 Series keypads have a Micro SD card slot on the right edge of the keypad
housing. This is used to load custom home screen image and for the end-user to have
a scrolling picture display when the keypad is not in use.
Select Areas
There are four Select Areas in the display.
These Select Areas are one of the features
that make the system so easy to operate.
They allow you to make selections by
touching the area over each key, icon, or
other selection to operate the keypad.
Warning: DO NOT use any sharp objects to
operate the touchscreen such as a pen or
pencil.
SLEEP
HOME
AWAY
Micro SD
Card slot
32-Character Display
Select Area 1
Select Area 2
Select Area 3
Select Area 4