
Programming Guide

1132 Installation and Programming Guide | Digital Monitoring Products 3
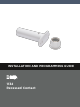
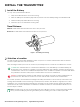
INSTALL THE TRANSMITTER
1
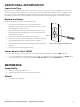
Install the Battery
Use only 3.6V 1/2 AA Lithium batteries.
1. Grasp the PCB and remove it from the housing.
2. Place the battery into the battery tray with the positive end of the battery facing the transmitter PCB.
3. Slide the battery tray and PCB into the housing.
4. Install the cap on the transmitter housing tube.
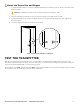
Travel Distance
Faulted—A fault will be detected when the door is at 2 1/2 inches.
Restored—The fault will be restored when the door is at 1 1/2 inches.
Figure 1: Assembling the Housing
2
Selection a Location
The 1132 provides a Survey LED capability to allow one person to confirm communication with the wireless
receiver or panel while the cover is removed.
Move the magnet within 1/2 inch of the contact or pull it away from the contact to send data to the receiver.
Confirmed: If communication is confirmed, the LED blinks once, immediately on and immediately o.
Repeat this test to confirm five separate consecutive LED blinks. Any indication otherwise means proper
communication has not been established. Repeat this test to confirm five separate consecutive LED blinks.
Any indication otherwise means proper communication has not been established.
Faulty: If communication is faulty, the LED remains on for about 8 seconds or flashes multiple times in
quick succession. Relocate the contact or receiver until the LED confirms clear communication.
For contact operation, the transmitter and magnet assembly should have no more than 1/2 inch between the
housings after installation. When mounting on metal (ferrous) surfaces, this distance is slightly less. For door
installations, it is recommended the transmitter be mounted in the door frame and the magnet assembly be
mounted in the door. If the transmitter is installed in a metal door frame, the communication distance to the
receiver may be reduced.
Note: The LED will go to sleep to save battery life. If the LED does not turn on while performing an LED
survey, reset the battery by removing the battery and re‑installing it in order to wake up the LED.