
User manual

6
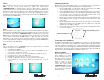
Movie
This is the function used to play a movie clip. On the Main Menu select Movie and
Enter. On the second screen select the media (the media named
“MEMORY/NAND” is internal memory). Press the Enter button to activate the
media. The third screen shows the name of the clips on the selected media. Press the
Enter button to Play. The clip will begin to play. Press the Play/Pause button to pause
the clip. A screen will temporarily appear over the clip confirming the clip was
paused along with the pause time; same when play resumes. Press the Menu button to
end and return to the Main Menu.
Text
This is the function used to play text files (.txt). These are files which are readable in
ASCII format. On the Main Menu select Text and Enter. On the second screen select
the media (the media named “MEMORY/NAND” is internal memory). Press the
Enter button to activate the media. The third screen shows the name of each text file
on the selected media. Press the Enter button to Play. The will show the text
information on the screen Use the Up and Down buttons to navigate through lines,
and the right and left arrow buttons to navigate through pages. Press the Menu button
to end and return to the Main Menu.
Edit
This is the function used to Copy/Delete files from external memory to internal
memory as follows: Go to the Main menu.
1. Select EDIT, press ENTER.
2. Select the media which you want to copy from, and then press ENTER. Use UP or
Down arrows to navigate thru your files.
3. Select the files you want to copy by pressing the Right arrow. (Marked by a paw)
4. Press the Left arrow to return to the Media menu.
5. Highlight the device the images are to be copied to and press Enter.
6. Press the Copy/Del button, select the copy option (briefcase) and press Enter
7. You should then see a message saying “Finished!” Press Enter once you see this
message.
3
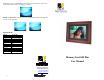
Changing the Frame
MemoryVue
tm
supports changeable frames so you can change the look of the frame as
the décor changes. Use the following instructions to change the frame:
1. Lay the digital frame on a flat surface with the screen facing down. Make
sure the surface is flat and protected to avoid scratches.
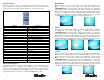
2. Using a #6 Philips head screwdriver and the illustration below, remove the 4
screws that fasten the frame to the unit. Lift the digital frame unit up, turn it
over, and lay it down in another area. The frame should be left on the
protected surface. Note the location hole in the matte.
3. Lift the removed frame form the surface. Replace this frame with the new
frame, making sure the orientation of the hole in the new frame is the same
as the other.
4. Lift the digital frame unit up, turn it back over, and place it over the frame,
aligning the mounting holes, and making sure the optical sensor on the unit
and the hole on the matte are aligned.
5. Use the four screws that were removed to fasten the new frame. The unit is
now ready for display.
.
Connecting to the USB Ports
The MemoryVue 1040 Plus has both a USB Port for connection to a PC and a Port for
connection to other devices such as thumb drive, USB card reader, and camera. When
connected to the PC you can drag-n-drop content to internal memory using PC exploring
tools to locate the unit, and will appear as additional drive letters, including internal and
external memory. You can also delete content from internal memory. The other USB port
supports devices such as thumb drives, card readers, cameras, etc.
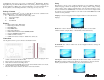
On Screen Menu
The Main Menu contains the
major functions for control.
Use the navigation buttons on
the remote control to locate the
desired function. Use the Enter
button to select. A second
screen is presented for media
control (the media named
“MEMOY/NAND” is internal
memory). A third screen may
be presented to view and select
the media content.
Frame Mounting Screw
Frame Mounting Screw
Rear View