TM Model MF-8000, MF-8104, MF-8115 Premium Edition User Manual (rev 2)
Product Introduction Congratulations! You are the proud owner of a MemoryFrameTM Wireless Digital Picture Frame. Boasting highquality image resolution the MemoryFrameTM is the perfect product for displaying your favorite digital images, video files, or listening to your favorite MP3’s. The MemoryFrameTM includes a patented changeable frame capture system. This allows you to use a standard 8x10 and 15” frame so your MemoryFrameTM never goes out of style.
Connectivity – USB and Media Cards MemoryFrameTM is equipped with both USB port types for complete USB connectivity. One USB port is used to connect to the PC. In this manner content can be sent to the frame from the PC. In Explorer, the frame will be identified as an external storage device. The other USB port is for connecting devices such as cameras and thumb drives. A CF slot is provided for CF cards and CF adapters. A MMC/SD slot is provided for MMC/SD.
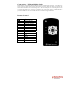
Replacing Remote Control Battery
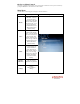
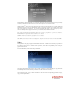
On Screen Menu Controls This feature is included so that content can be managed and controlled. The menu system is activated by pressing the Menu button. The Main Menu is shown below. Main Menu The Main Menu is the starting point to navigate to the desired function. Function Description Picture User can play a picture slideshow. User can specify the source location for picture files and can select specific pictures to play.
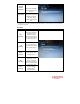
Search wireless network Stop music Search for available wireless networks in the area Stops music playback. If music is playing selecting “Stop music” will end the music. *A WMV Converter utility is included with the MemoryFrameTM CD to allow users to convert different video formats into WMV. Pictures Function Description Play slideshow Play picture slideshow and specify source location. Playback functions support Play All, Choose Individual, or Pictures by date.
Play Slideshow When Play Slideshow is selected, the user can specify the location of the picture files. Note – The entire list of media sources may not be displayed. MemoryFrameTM will only display the removable media types which are inserted and have media files. Picture Selection When a source location is selected, the user can specify playing all the pictures found or individual photo selections.
Photo Sharing MemoryFrameTM is web enabled; allowing content to be retrieved over the Internet if a network connection is available. The MemoryFrameTM Premium Edition is also capable of sharing pictures to another MemoryFrameTM Premium Edition. MemoryFrameTM is pre-configured to be compatible with several popular photo sharing sites such as Flickr, FrameChannel, Microsoft Live Space, and Webshots. As other sites are integrated, updates will be posted at www.dsicentral.com.
MemoryFrameTM will automatically save connection settings for the networks which have been previously accessed, so that the user will not need to re-enter them every time a connection is made. If MemoryFrameTM does not have the selected network cached, it will prompt the user to specify additional information such as the type of authentication which is required to connect to the wireless access point and an encryption key, if necessary.
Note: Video playback over a network is not currently supported. Video files must originate from internal memory or removable media inserted into MemoryFrameTM. Music MemoryFrameTM can play MP3 and WMA music files. From the Main Menu, select Music and press ENTER. The Music Menu features the option to create a song list, as well as the ability to copy music files into MemoryFrame’sTM internal memory or delete music files from internal memory.
The procedures to play, copy, or delete music files are the same as the corresponding procedures to play, copy, or delete picture files. Playing Background Music during Picture Slide Show While a song list is being played, the user can resume the previous picture slideshow by pressing the PLAY button on the remote control. Volume can be adjusted using the Vol+ and Vol- buttons on the remote control.
Function Description Resume slideshow Exits the Settings menu and resumes playback of previous picture slideshow Frame orientation Toggles between landscape (horizontal) and portrait (vertical) display settings Slideshow settings Sets slideshow preferences, including slide duration, transition type, picture order, music options, and auto-updates for photo sharing Set time Sets the date and time.
Set time zone Language Configure Photo Sharing Network Info Specify the local time zone Specify the language. Enter User Account information for photo sharing site. User may enter more than 1 account. User may also input RSS Feeds by imputing RSS URL.
Check Updates Checks if a software update is available. This feature requires an Internet connection. Copyright & about Click on “About” to get frame ID information Register your frame To register your frames go to http://aol.memor yframe.com and sign up for a free account. This allows pushing albums/pictures to the frame from the “My MemoryFrame” photo sharing site.
Auto check update Toggles Auto Update checking. Press Enter to toggle between On/Off. Set standby time Set the time duration in which the frame will go to ‘sleep mode’.
Bluetooth Allows Bluetooth connectivity to either Accept all pictures (Default), Reject all pictures, or by prompt upon receipt. Network Requirement: If your home network already has a wireless router, you are set. If your home network has a regular router, you need to purchase a wireless access point. Please refer to the manufacturer of the router and access point to configure them.
• • • • • Go to the folder ‘Auto Configuration’ Double click Setup.exe to install Auto Configuration to your computer. Follow the instructions to complete the installation After the installation is complete, go to ‘Start’ menu in your computer, ‘Auto Configuration – Digital Spectrum Inc’, and launch ‘Auto Configuration – Digital Spectrum Inc’. Follow the instruction in the tool to configure your Digital Picture Frame.
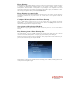
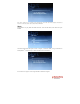
• • • Login to http://aol.memoryframe.com using the username and password of the person sending the photos. After logging in, locate the registered MemoryFrameTM along the right and select “Share” as indicated in picture below. Enter the username of the person that will receive the picture sharing. Once this is done, the user will now be able to share photos with the added user. y Frame receiving photos • Start a slideshow on the MemoryFrameTM that will receive the picture stream.
Configure Digital Picture Frame: With slideshow playing: • Press ‘Menu’ on the remote control to go to the main menu Or at the main menu: • Select ‘Settings’ and press ‘Enter’ on the remote control • Select ‘Configure photo sharing’ and press ‘Enter’ on the remote control Select ‘Set Webshots site info’ and press ‘Enter’ on the remote control. • Select ‘Add new id’ and press ‘Enter’ on the remote control • Enter your Webshots User ID. Use the ‘left’, ‘right’, ‘up’, ‘down’ buttons to navigate the keyboard.
If you don’t have an account with Flickr, go to http://www.flickr.com to create your account. Once you have an account, upload your pictures.
See example on how to upload pictures.
Configure Digital Picture Frame: With slideshow playing: • Press ‘Menu’ on the remote control to go to the main menu Or at the main menu: • Select ‘Settings’ and press ‘Enter’ on the remote control • Select ‘Configure photo sharing’ and press ‘Enter’ on the remote control • Select ‘Set Flickr site info’ and press ‘Enter’ on the remote control • Select ‘Add new id’ and press ‘Enter’ on the remote control • Enter your Flickr User ID. Use the ‘left’, ‘right’, ‘up’, ‘down’ buttons to navigate the keyboard.
With slideshow playing: • Press ‘Menu’ on the remote control to go to the main menu Or at the main menu: • Select ‘Pictures’ and press ‘Enter’ • Select ‘Play Slideshow’ and press ‘Enter’ • Select ‘Photo Sharing website’ and press ‘Enter’ • Select ‘From Flickr’ and press ‘Enter’ on the remote control • Choose your album by pressing ‘Enter’ on the remote control to select/deselect it.
• Your Digital Picture Frame is now ready to retrieve pictures from Windows Live Space photo sharing site Retrieve your Pictures: With slideshow playing: • Press ‘Menu’ on the remote control to go to the main menu Or at the main menu: • Select ‘Pictures’ and press ‘Enter’ • Select ‘Play Slideshow’ and press ‘Enter’ • Select ‘Photo Sharing website’ and press ‘Enter’ • Select ‘From Windows Live Space’ and press ‘Enter’ on the remote control • Choose your album by pressing ‘Enter’ on the remote control to se
• • • • Once, you are done entering your Framechannel username, select ‘NEXT’ on the keyboard, and press ‘Enter’ button on the remote control to go to Enter your PIN screen Enter your Framechannel PIN (created previously). Use the ‘left’, ‘right’, ‘up’, ‘down’ buttons to navigate the keyboard. Once the key is highlighted, press ‘Enter’ button to select the character. If you enter the wrong character, select ‘BS’ to clear the character.
• • • • Select ‘From WinXP or Vista’ and press ‘Enter’ on the remote control A list of media servers, discovered in your network will be displayed.’ Select the one of your choice and press ‘Enter’ on the remote control A list of option will be displayed Pictures by tag: • • • • • All pictures will be organized by tags. For WinXP, only the ‘No Keyword’ tag is supported. Choose your tag and press ‘Enter’. A list of pictures that are identified by the tag will be displayed.
In the next screen: • To play slideshow from internal memory, select ‘Internal memory’ and press ‘Enter’ • To play slideshow from memory cards, select your memory card (CF, USB, SD/MMC) and press ‘Enter’ • To copy pictures, select your memory card (CF, USB, SD/MMC) and press ‘Enter’ • To delete all pictures, select ‘Delete all pictures from memory’ and press ‘Enter’ • To delete selected pictures, select ‘Delete selected pictures from memory’ and press ‘Enter In the next screen: • To play all pictures, selec
Or at the main menu: • To play music, copy music or delete music, select ‘Music’ and press ‘Enter’ In the next screen: • To play music, select ‘Play music’ and press ‘Enter’ • To copy music, select ‘Copy music file(s) to memory’ and press ‘Enter’ • To delete music, select ‘Delete music file(s) from memory’ and press ‘Enter’ In the next screen: • To play previous song list, select ‘Play previous song list’ and press ‘Enter’ • To play new song list, select ‘Select new song list’ and press ‘Enter’ • To toggle
• Once the photo has been transferred, if the Bluetooth setting on the MemoryFrameTM is set to “Prompt me”, the user will be presented with a prompt to accept the photo. If set to “Accept all pictures”, the frame will automatically display the transferred photo. Press “Menu” to close the transferred photo and return to the main menu. Display the Time: While the slideshow is playing, press ‘Clock’ on the remote control to display the current time.
To Set the Slide Transition: With slideshow playing: • Press ‘Menu’ on the remote control to go to the main menu Or at the main menu: • Select ‘Settings’ and press ‘Enter’ on the remote control • Select ‘Slideshow settings’ and press ‘Enter’ on the remote control • Select ‘Slide transition’ and press ‘Enter’ on the remote control • Select the transition of your choice and press ‘Enter’ on the remote control • (Optional) Press ‘Play’ to play the previous slideshow To Toggle Picture order (Sequential or Rand
• • • • • • • • • • • • • Select ‘Set Time’ and press Enter on the remote control.
• • • • If the update is available. Select ‘OK’ and press ‘Enter’ will download the updates Depending on the network speed, traffic, and the size of the updates, it might take a few minutes to download the updates If the update is available and you do not want to update at this time, select ‘Not at this time’ and press ‘Enter’ Once the download is complete, the frame will upgrade the software and reboot upon completion.
Or at the main menu: • Select ‘Settings’ and press ‘Enter’ on the remote control • Select ‘Enable standby - yes’ or ‘Enable standby - no’ and press ‘Enter’ on the remote control • If standby is disabled, the Digital Picture Frame will not turn off at preset standby time.
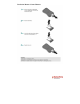
• • • • Connect your computer to the Digital Picture Frame using the USB cable. Click on ‘Explore’ to view the file contents of the Digital Picture Frame. To drop media to internal storage, double click on the drive letter that pertains to the picture frame. You can drag and drop media in here. The internal storage capacity is 256Mb, of which 40Mb is reserved. There is roughly 216Mb of user space.
Specifications: Model Unit Size H x W x D Display Area Resolution Colors Brightness Contrast ratio Viewing angle Input voltage: Operating Temperature Unit Weight Formats Media Max Image Size Default Start Mode Photo Playback Mode Music Playback Mode Video Playback Mode Accessories MF-8000 Premium 8.5” x 10.5” x 2” 4.8” H x 6.4” W MF-8104 Premium 8.5” x 10.5” x 2” 6.5” H x 8.5” W MF-8115 Premium 13” x 15.625” x 2.25” 9.125” H x 12” W 800x600 800x600 1024x768 262,144 250cd/m2 max.
Notes
Notes
Notes
Digital Spectrum Solutions, Inc. Irvine, CA 92614 www.dsicentral.com Contact us at support@dsicentral.