User’s Instructions HDTV DIGITAL RECEIVER DST-HD1100E Digital STREAM Technology, Inc. Keumbok BLDG. 45-2 Songpa-ku Bangee-dong Seoul, Korea Tel : + 82 2 415 6500 Fax: + 82 2 415 6540 e-mail : sales@dstreamtech.com © Copyright Digital STREAM Technology, Inc.
HDTV DIGITAL RECEIVER DST-HD1100E WARNING: TO REDUCE THE RISK OF ELECTRONIC SHOCK DO NOT REMOVE COVER ( OR BACK ). NO USER SERVICEABLE PARTS INSIDE. REFER TO QUALIFIED SERVICE PERSONNEL. THE LIGHTNING FLASH WITH ARROWHEAD SYMBOL, WITHIN AN EQUILATEARL TRIAAGLE, IS INTENDED TO ALERT THE USER TO THE PRESENCE OF UNINSULATED ”DANGEROUS VOLTAGE” WITHIN THE PRODUCT’S ENCLOSURE THAT MAY BE OF SUFFICIENT MAGNITUDE TO CONSTITUTE A RISK OF ELECTRIC SHOCK TO PRESONS.
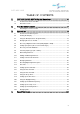
DST-HD1100E HDTV DIGITAL RECEIVER TABLE OF CONTENTS 1. DST HD 1100E: HDTV Digital Receiver ............................. 4 1.1 Front Panel Controls and LEDs ............................................................................. 4 1.2 Rear Panel Jacks ................................................................................................... 5 2. The Remote Control .......................................................... 7 2.1 3. 4. Reviewing the Remote Control ...................
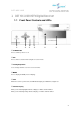
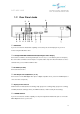
HDTV DIGITAL RECEIVER DST-HD1100E 1. DST HD 1100E: HDTV Digital Receiver 1.1 Front Panel Controls and LEDs ① ② ③ ④ ⑤ ⑥ ①STANDBY/ON Press to turn the power on or off. ②SEL Press to make a selection when using the on-screen menus. ③Left/Right/Up/Down Use to change channels or to move on-screen menus. ④MENU Press to display the OSD(on-screen display). ⑤LED When the receiver is powered on, the LED indicator lights green. Otherwise, it lights red.
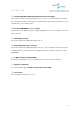
HDTV DIGITAL RECEIVER DST-HD1100E 1.2 Rear Panel Jacks ① ④ ⑤ ③ ② ⑥ ⑦ ⑧⑨ ⑩ ⑪ ⑫ ⑬ ① VIDEO OUT If your TV or monitor has Audio/Video capability, connect this jack to the AV Input jack on your TV or monitor using an Audio/Video cable. ② Left/Right ANALOG-AUDIO OUTPUTS(with Digital Video Output) Connect these terminals to the analog audio inputs of a TV set (i.e., to a TV that has jacks for L/R inputs). Or, connect these terminals to the L/R inputs of a separate audio component.
DST-HD1100E HDTV DIGITAL RECEIVER ⑦ Left/Right ANALOG-AUDIO OUTPUTS(with Analog Video Output) Connect these terminals to the analog audio inputs of a TV set (i.e., to a TV that has jacks for L/R inputs). Or, connect these terminals to the L/R inputs of a separate audio component. Recommended to use these terminals when you use analog for video.
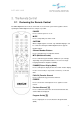
HDTV DIGITAL RECEIVER DST-HD1100E 2. The Remote Control 2.1 Reviewing the Remote Control The HDTV Digital Receiver remote control and on-screen menu system work together to make operating the HDTV Digital Receiver as simple as possible. POWER Press to turn the power on or off. MUTE Press to temporarily cut off the sound. CAPTION When a digital signal is received, only available languages can be selected. Currently the HDTV Digital Receiver supports English caption.
HDTV DIGITAL RECEIVER DST-HD1100E CH+, CH- (Channel Up and Down) Press to change channels. Minor Channel UP/DOWN( , ) Press to increase or decrease the minor. SEL While using the on-screen menus, press to activate (or change) a particular item. Otherwise press SEL to display information about the current box settings and program: Channel number, Time, Program title, Program duration, Caption, Digital picture grade, and MTS language.
DST-HD1100E HDTV DIGITAL RECEIVER 3. Operation 3.1 The On-Screen Menu System The seven menu controls are located in the center of the remote control: MENU, UP(Channel Up), DOWN(Channel Down), LEFT, RIGHT, SEL(SEL), ESC(Previous Menu). 3.2 Viewing the Display You can quickly check the status of many of the HDTV Digital Receiver features and options by pressing the SEL button. The Display shows: • The major channel number and the minor channel number if you are viewing a digital channel.
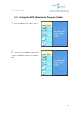
DST-HD1100E 3.3 1 2 HDTV DIGITAL RECEIVER Using the EPG (Electronic Program Guide) Press the MENU on the remote control. Press the UP or DOWN on the remote control to highlight the “EPG” icon and press SEL.
DST-HD1100E 3 HDTV DIGITAL RECEIVER Press the Arrow buttons on the remote control repeatedly to move to the channel with program information. 4 You may now: • Obtain additional program details: By pressing the UP, DOWN, RIGHT or LEFT button to highlight a program title and press SEL. NOTES You can quickly switch to a GUIDE mode by pressing the “Program Guide( )” button on the remote control.
DST-HD1100E 3.4 HDTV DIGITAL RECEIVER Changing the Screen Format Your selection in the Screen Format menu depends on the type of TV or monitor you are using with your HDTV Digital Receiver. 1 Press the MENU button on the remote control. 2 Press the UP or DOWN button on the remote control to highlight the “A/V” icon and press SEL.
DST-HD1100E 3 HDTV DIGITAL RECEIVER Press the UP or DOWN button on the remote control to highlight the “Display Mode” icon and press SEL. 4 Press the UP or DOWN button on the remote control to select your Monitor Type either 4:3 or 16:9 and press the RIGHT button to highlight “Display Mode” 5 Press the UP or DOWN button on the remote control to select a “Display Mode” among ‘Normal’,’ Wide’ or ‘Zoom’.
DST-HD1100E HDTV DIGITAL RECEIVER With a 4:3 Ratio TV or Monitor If you are using a 4:3 ratio TV or monitor and receive an image with a 16:9 ratio, you need to specify how the image is displayed. Wide(Letter box) Choose this when receiving a 16:9 image and you want to see the original wide format. Letter boxing shrinks the picture so the entire image will fit on the screen. Blank panels appear at the top and bottom of the screen.
DST-HD1100E 3.5 HDTV DIGITAL RECEIVER Choosing a Digital Sound Format (Dolby Digital or PCM) Both audio and digital sound are available from the rear-panel connectors of the HDTV Digital Receiver. The digital audio output is an optical connector labeled “SPDIF Output.” After connecting the optical digital-audio component, you must specify the transmission format (PCM or Dolby Digital, as appropriate to your particular equipment). 1 Press the MENU button on the remote control.
DST-HD1100E 3 HDTV DIGITAL RECEIVER Press the UP or DOWN button on the remote control to highlight the “Digital Audio” icon and press SEL. 4 Press the UP or DOWN button on the remote control to highlight “Dolby Digital” or “PCM” and press SEL to save the format.
HDTV DIGITAL RECEIVER DST-HD1100E 3.6 Setting Up Captions (On-screen Text Messages) How to Activate or Deactivate the On-screen Captions 1 2 Press the CC button on the remote control. Press the CC button repeatedly to alternate between “English” and “Off”. * The current HDTV Digital Receiver supports ‘English’ only. (Note: Availability of captions depends on the particular program being broadcast.) 3.7 1 2 Choosing a Sound “Multitrack” Press the MTS button on the remote control.
DST-HD1100E 3.8 HDTV DIGITAL RECEIVER Selecting “Input Type”(Air or Cable) You can select 'Air' for terrestrial broadcast and 'Cable' for cable. 1 Press the MENU button on the remote control. 2 Press the UP or DOWN button on the remote control to highlight the “Channel” icon and press SEL.
DST-HD1100E 3 HDTV DIGITAL RECEIVER Press the UP or DOWN button on the remote control to highlight the “Input Select” icon and press SEL. 4 Press the UP or DOWN button on the remote control to highlight “Air” or “Cable” and press SEL to save the type.
DST-HD1100E 3.9 HDTV DIGITAL RECEIVER Memorizing Channels Before you can use any of the special channel buttons (CH+,CH-, FAV-CH), the available channels must first be scanned and memorized. To memorize channels: 1 Press the MENU button on the remote control. 2 Press the UP or DOWN button on the remote control to highlight the “Channel” icon and press SEL.
HDTV DIGITAL RECEIVER DST-HD1100E 3 Press the UP or DOWN button on the remote control to highlight the “Auto Scan” icon and press SEL then “Scan” icon will be highlighted. 4 Press the SEL button on the remote control then HDTV Digital Receiver will scan and store all of the digital (DTV) channels that are available in your local area automatically. NOTES The HDTV Digital Receiver MUST be connected to an antenna in order to receive digital TV signals.
DST-HD1100E HDTV DIGITAL RECEIVER 3.10 Adding and Deleting Channels To add channels that were not memorized (or to delete unwanted channels from the memory): 1 Press the MENU button on the remote control. 2 Press the UP or DOWN button on the remote control to highlight the “Channel” icon and press SEL. 3 Press the UP or DOWN button on the remote control to highlight the “Channel Edit” and press SEL then Channel Edit window will appear.
DST-HD1100E 4 HDTV DIGITAL RECEIVER Press the Arrow buttons repeatedly to change a highlighted channel. If you want to delete a highlighted channel then press the CH-DEL button. Press the CH-ADD button when you want to restore deleted channels.
DST-HD1100E HDTV DIGITAL RECEIVER 3.11 Setting Your Favorite Channels This menu item helps to memorize your favorite channel into the memory and to select the channel quickly. "Auto Scan" is needed before using this function. 1 Press the MENU button on the remote control. 2 Press the UP or DOWN button on the remote control to highlight the “Channel” icon and press SEL.
DST-HD1100E 3 HDTV DIGITAL RECEIVER Press the UP or DOWN button on the remote control to highlight the “Favorite Channel” and press SEL then Favorite Channel window that is located in the right side of OSD(On-Screen Display) will be shown. 4 that you want to delete and press SEL. Press the UP or DOWN button on the remote control to highlight the channel that you want to add and press SEL then the channel will be saved in “Favorite Channel” list.
HDTV DIGITAL RECEIVER DST-HD1100E 3.12 Changing Channels Number buttons Press the number buttons (0 – 9) to enter channel numbers. NOTES 1 Press the SEL button after you select the channel to search “minor” channels then, the list of the minor channels will be displayed on the screen. To select one of them, press Left/Right buttons and press SEL. NOTE 2 You can also select minor channels by pressing minor channel buttons( , ) on the remote control.
DST-HD1100E HDTV DIGITAL RECEIVER 3.13 Checking Digital-Signal Reception 1 Press the MENU button on the remote control. 2 Press the UP or DOWN button on the remote control to highlight the “Channel” icon and press SEL. 3 Press the UP or DOWN button on the remote control to highlight the “Signal Strength” icon.
DST-HD1100E 4 HDTV DIGITAL RECEIVER If the signal strength meter indicates “weak”(in red color), physically adjust your antenna to increase the signal strength. Continue to adjust the antenna until you find the best position with the strongest signal.
DST-HD1100E HDTV DIGITAL RECEIVER 3.14 Fine Tune This function is for analog channels only. 1 Press the MENU button on the remote control. 2 Press the UP or DOWN button on the remote control to highlight the “Channel” icon and press SEL. 3 Press the UP or DOWN button on the remote control to highlight the “Fine Tune” icon and press SEL. Pressing the RIGHT or LEFT button repeatedly until you find the best watching conditions.
DST-HD1100E HDTV DIGITAL RECEIVER 3.15 Setting Up Time and Date You can set current time and date in this menu. Only when you are watching a digital channel and time information is being transmitted by TV station, you can select "Auto". 1 Press the MENU button on the remote control. 2 Press the UP or DOWN button on the remote control to highlight the “Time” icon and press SEL.
DST-HD1100E 3 HDTV DIGITAL RECEIVER Press the UP or DOWN button on the remote control to highlight the “Date/Time” icon and press SEL. *Select “Auto” by pressing the UP or DOWN button, and press SEL then both date and time will be set up automatically. To enable this function, you need to set your time zone first in the “Time Zone” menu. *You set your time manually in the “Manual” mode.
DST-HD1100E HDTV DIGITAL RECEIVER 3.16 Using the Auto Turn-On 1 Press the MENU button on the remote control. 2 Press the UP or DOWN button on the remote control to highlight the “Time” icon and press SEL. 3 Press the UP or DOWN button on the remote control to highlight the “Auto Turn-On” icon and press SEL.
DST-HD1100E HDTV DIGITAL RECEIVER *In case of not using “Auto Turn-On”, select ‘Off’. *Select ’Everyday’ or ‘Once’ by pressing the UP or DOWN button, and press the RIGHT button to set up the time by pressing the NUMBER buttons. You must press SEL before exit to save the setting.
DST-HD1100E HDTV DIGITAL RECEIVER 3.17 Using the Auto Turn-Off 1 Press the MENU button on the remote control. 2 Press the UP or DOWN button on the remote control to highlight the “Time” icon and press SEL.
DST-HD1100E 3 HDTV DIGITAL RECEIVER Press the UP or DOWN button on the remote control to highlight the “Auto TurnOff ” icon and press SEL. *In case of not using “Auto Turn-Off”, select ‘Off’. *Select ’Everyday’ or ‘Once’ by pressing the UP or DOWN button, and press the RIGHT button to set up the time by pressing the NUMBER buttons. You must press SEL before exit to save the setting.
DST-HD1100E HDTV DIGITAL RECEIVER 3.18 Using the Sleep Timer 1 Press the MENU button on the remote control. 2 Press the UP or DOWN button on the remote control to highlight the “Time” and press SEL. 3 Press the UP or DOWN button on the remote control to highlight the “Sleep Timer ” icon and press SEL. Select any time on the menu and press SEL to save the setting. *In case of not using “Sleep Timer”, select ‘Off’.
DST-HD1100E HDTV DIGITAL RECEIVER 3.19 Setting Up the Time Zone 1 Press the MENU button on the remote control. 2 Press the UP or DOWN button on the remote control to highlight the “Time” icon and press SEL. 3 Press the UP or DOWN button on the remote control to highlight the “Time Zone ” icon and press SEL. By pressing the UP or DOWN button, you can select the region where you live. Press SEL to save the setting.
DST-HD1100E HDTV DIGITAL RECEIVER 3.20 Using the Daylight Saving 1 Press the MENU button on the remote control. 2 Press the UP or DOWN button on the remote control to highlight the “Time” icon and press SEL. 3 Press the UP or DOWN button on the remote control to highlight the “Daylight Saving ” icon and press SEL. By pressing the UP or DOWN button, you can select either ‘On’ or ‘Off’. Press SEL to save the setting.
DST-HD1100E HDTV DIGITAL RECEIVER 3.21 Setting Up the OSD Transparency 1 Press the MENU button on the remote control. 2 Press the UP or DOWN button on the remote control to highlight the “Function” icon and press SEL. 3 Press the UP or DOWN button on the remote control to highlight the “OSD Transparency” icon and press SEL.
DST-HD1100E 4 HDTV DIGITAL RECEIVER Press the UP or DOWN button to highlight your favorite OSD transparency and press SEL 40
DST-HD1100E HDTV DIGITAL RECEIVER 3.22 Setting Up the V-chip Lock This menu item can lock or unlock the programs according to MPAA ratings and TV parental guidelines. 1 Press the MENU button on the remote control. 2 Press the UP or DOWN button on the remote control to highlight the “Function” icon and press SEL.
DST-HD1100E 3 HDTV DIGITAL RECEIVER Press the UP or DOWN button on the remote control to highlight the “V-Chip” icon and press SEL then Enter PIN window will appear. (*PIN =Personal Identification Number) 4 Enter your PIN number by pressing the NUMBER buttons on the remote control and press SEL 5 Press the UP or DOWN button on the remote control to highlight the “V-Chip Lock” icon and press SEL.
DST-HD1100E 6 HDTV DIGITAL RECEIVER If you want to unlock the rating controls temporarily, select “Unlock”. Select “Lock” when you want to return to pre-stored rating controls.
DST-HD1100E HDTV DIGITAL RECEIVER 3.23 Setting Up the Rating Control This menu item helps you set the detailed control of MPAA ratings and TV parental guidelines. 1 Press the MENU button on the remote control. 2 Press the UP or DOWN button on the remote control to highlight the “Function” icon and press SEL.
DST-HD1100E 3 HDTV DIGITAL RECEIVER Press the UP or DOWN button on the remote control to highlight the “V-Chip” icon and press SEL then Enter PIN window will appear. 4 Enter your PIN number by pressing the NUMBER buttons on the remote control and press SEL 5 Press the UP or DOWN button on the remote control to highlight the “Rating Control” icon and press SEL. then Rating Control Setting window will appear.
MPAA Ratings : G All ages admitted PG Some material may not be suitable for children PG-13 Some material may be inappropriate for children under 13 R Under 17 requires accompanying parents or adult guardian NC-17 No one 17 and under admitted X Adults only TV Guidelines TV-Y This program is designed to be appropriate for all children. TV-Y7 This program is designed for children age 7 and above.
DST-HD1100E HDTV DIGITAL RECEIVER 3.24 Changing PIN You can change your PIN in this menu item. 1 Press the MENU button on the remote control. 2 Press the UP or DOWN button on the remote control to highlight the “Function” icon and press SEL. 3 Press the UP or DOWN button on the remote control to highlight the “V-Chip” icon and press SEL then Enter PIN window will appear.
DST-HD1100E 4 HDTV DIGITAL RECEIVER Enter your PIN number by pressing the NUMBER buttons on the remote control and press SEL 5 Press the UP or DOWN button on the remote control to highlight the “Change PIN” icon and press SEL. then Change PIN menu will appear. 6 Enter and re-enter your new PIN by pressing the NUMBER buttons on the remote control continuously and press SEL to save the new PIN.
HDTV DIGITAL RECEIVER DST-HD1100E 4.