
User Manual


WEBVIEWER*
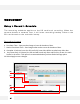
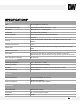
S e t u p > R e m o t e B a c k u p T a b
T h e M E G A p i x S e r i e s a l l o w s y o u t o b a c k u p y o u r S D c a r d l o c a l l y t o y o u r
c o m p u t e r w i t h o u t t h e n e e d t o r e m o v e i t f r o m t h e c a m e r a .
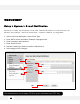
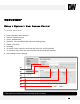
1. Go to the Remote Backup Tab in the camera’s Setup menu.
2. On the calendar, select the date for remote backup.
a. Days with recorded data will be indicated in BOLD.
b. Hours with recorded data on them will be indicated by the pink line in the time bar.
3. Select the Backup Start Time and Backup End Time.
4. Select the Target Drive. The Target Drive is where the remote backup will be saved.
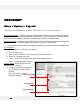
5. You can also use the interactive time bar.
a. Right-click on the time you want to set as Start Time.
b. Left-click on the time you want to set as End Time.
c. The time frame you have selected will appear in BLUE.
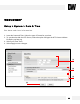
6. Select Backup Start. To cancel a backup in progress, select Backup Cancel.
42
[1]
[2]
[4]
[5]
[3]
[6]