
User Manual

Network Setup -
Setup Case A, B
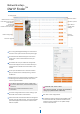
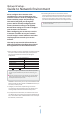
Configure your IP Camera’s TCP/IP properties
as follows :
1. Network Type : STATIC (even though you have Dynamic IP from
your ISP, use STATIC on the IP Camera)
2. Internet Address : A private IP address such as
192.168.0.200 (Example)
3. Subnet Mask : 255.255.255.0 (Example)
You must use the same subnet mask as the one you noted under
‘Current TCP/IP Settings’.
4. Default Gateway : 192.168.0.1 (Example)
5. Preferred DNS Server : Use the 1st DNS Server from ‘Assigned IP
Address from My ISP’.
6. DDNS Server : Use the DDNS server.
7. Web Port : 8888
You need to assign an IP address to the IP Camera just as you do
with PC.
The IP address you assign must be unique to your network and
match your network as well. For information on how to choose
a unique IP and match your network, read the FAQ.
The IP address you assign must be a private IP. For information
on how to choose a private IP please, read the FAQ.
If you did not receive any IP addresses from your ISP, contact
the ISP and acquire the IP address of their DNS server.
This IP address must be the IP address of your router.
(private or LAN side)
Use the same Default Gateway you noted under ‘Current TCP/IP
Settings’.
This is the same site you will register later to accommodate
dynamic IP from your ISP.
Do not use the default port 80 as this number must be changed.
You may select any number between 1025 ~ 60000.
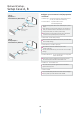
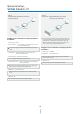
Case A:
Dynamic IP +
Personal Router [Most SOHO]
Camera
PC
Personal Router
W/Intergrated Switch
Phone Line
or CATV
Cable/xDSL Modem
(ISP Provided)
Internet
Case B:
Static(Fixed) IP +
Personal Router [Efficient]
Camera
PC
Personal Router
W/Intergrated Switch
Public Line
Gateway or Router
at ISP
Internet
18