
User Manual


OSD
-
FUNCTION SETUP > PRESET SETUP
37
1
FUNCTION SETUP
Configure 5 special functions with this menu.
PRESET SETUP - Undefined
127 presets (1 ~ 128) can be assigned excluding the number
95, which is reserved for menu.
PRESET NO.
If a selected preset is already defined, camera moves to pre-defined
position, and preset characteristics such as label and relay outputs
appear on monitor. (Refer to screen ) If a selected preset is not
defined, UNDEFINED will appear on monitor.
<EDIT SCENE>
Redefine the current preset scene position (i.e. PTZ).
1 ~ 128 (Excluding 95)
1 ~ 128 (Excluding 95)
GENERAL / SPECIAL
- - - - ~ 1 2 3 4
PRESET SETUP
If the preset is defined, the information will be shown on the
OSD menu with the setting, and the alarm device (if defined)
will be activated.
PRESET NO.
<EDIT SCENE>
<LABEL>
Edits Label to show on the monitor when the preset runs.
Maximum 10 characters are allowed.
CAM ADJUST
- WB(White Balance) and AE(Auto Exposure) can be set
independently for each preset.
- GENERAL: WB or AE can be set completely and simultaneously for all
presets in “ROOT MENU > CAMERA SETUP” menu.
- SPECIAL: WB or AE can be set independently or separately for each
preset in each preset setup menu.
- Each special WB/AE value should be activated correspondingly
when camera arrives at each preset location. During jog operation,
general WB/AE value should be applied.
- The special WB/AE value should not be changed when the general
WB/AE value is changed. If SPECIAL is selected, the menu to set
the special WB/AE appears on the monitor.
ALARM OUT
The status of four alarm outputs can be freely controlled in conjunction
with preset run. The character “-” means the alarm output is OFF, and
the number representing the alarm means ON.
Ex. “ - 2 3 - ” means output relay 2 and 3 will be ON, and 1 and 4 will be
be OFF, when you run this preset.
EDIT SCENE
1. Using thejoystick, move camera to the desired position.
2. By pressing Near key, save the current PTZ data.
3. Press Far key to cancel.
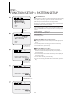
FUNCTION SETUP
- - - - - - - - - - - - - - - - - - - - - - - - - - -
<PRESET SETUP>
<SCAN SETUP>
<PATTERN SETUP>
<GROUP SETUP>
<SCHEDULE SETUP>
BACK
EXIT
PRESET SETUP
- - - - - - - - - - - - - - - - - - - - - - - - - - -
PRESET NO.
<
EDIT SCENE>
BACK
EXIT
1
UNDEFINED
PRESET SETUP
- - - - - - - - - - - - - - - - - - - - - - - - - - -
PRESET NO.
<
EDIT SCENE>
<LABEL>
CLR PRESET
CAM ADJUST
ALARM OUT
BACK
EXIT
1
CANCEL
GENERAL
- - - -
> > >
EDIT SCENE -PRESET1
- - - - - - - - - - - - - - - - - - - - - - - - - - -
MOVE TO TARGET POSITION
[NEAR:SELECT/FAR:CANCEL]
0/0/x1/E
Press
Near/Enter
Key
Press
Near/Enter
Key
Select <EDIT SCENE>,
Press Near/Enter Key
1
2
4
3
2
3
4
4