
Technical data


Installing Expansion Boards
7-10
Installing Expansion Boards
The following sections describe how to install ISA and PCI expansion boards.
Detailed procedures on running the SCU before installing ISA expansion boards
and after installing PCI expansion boards are also included.
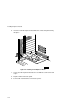
Adding ISA Expansion Boards
Perform the following steps before installing ISA expansion boards:
1. Start the SCU using one of the three methods described in Chapter 2,
“Starting the SCU.”
2. Select “Step 2: Add and Remove Boards,” and update the list of
expansion boards and options to include any ISA expansion boards you
are going to install in your server.
3. Select “Step 3: Change Configuration Settings,” to view or change the
configuration settings for any ISA expansion board you are going to
install in your server.
4. Select “Step 4: Save Configuration,” to save your configuration settings
to CMOS and to a backup file (.CMS file).
5. Select “Step 5: View Switch/Jumper Settings,” to view manufacturer’s
instructions about setting switches and jumpers and to run the
necessary utilities to ensure the correct configuration of each expansion
board.
6. Select “Step 6: Exit,” to exit the SCU.
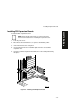
7. Turn off your server and install the ISA expansion boards, manually
setting the necessary switches and jumpers.
Refer to “Installing ISA Expansion Boards.”