
Technical data
2.5 Manual Tape Loading
To load tape manually, proceed as follows:
1. Place the drive in the operator access position (procedure described in Chapter 5).
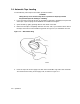
2. Make sure the tape is completely wound on the reel; and, if you intend to write data to
the tape, ensure that a write-enable ring (shown in Figure 2–2) is installed on the reel.
3. Place the tape reel on the supply hub with the write-enable ring side of the reel down.
The reel must lie evenly on the supply hub.
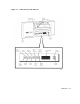
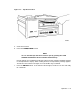
4. While pressing the manual release switch (shown in Figure 2–1), rotate the supply hub
clockwise until the hub locks. The hub has three pawls that raise and hold the tape reel
in place.
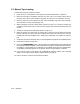
5. Thread the tape along the tape path shown in Figure 2–4.
6. Move the packer arm away from the take-up hub. Wrap the tape clockwise around the
take-up hub until the end of the tape is held by the next layer, and then turn the hub
clockwise at least five complete turns. Gently place the packer arm against the take-up
hub.
7. Check that the tape is seated correctly in the tape guides and against the read/write head.
8. Close the front door and top cover.
9. Press the LOAD REWIND switch. While loading, the Load/Rewind indicator flashes and
the message LOADING appears on the alphanumeric display. The Write-Enable indicator
also lights if a write-enable ring is installed. If the loaded reel of tape has recorded data,
a tape density message appears on the display when the tape loading is complete.
10. If the manual load is unsuccessful, the Load/Rewind indicator flashes and a message
appears on the alphanumeric display. Repeat steps 1 through 11.
11. Return the drive to the normal operating condition.
2–10 Operation