
Technical data

5.1 Tools and Materials
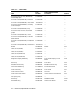
Table 5–2 lists the special tools and materials necessary to service the TSZ07 Tape Drive.
Table 5–2: Special Tools and Materials
Item Part Number
Tape, Master Skew FD-11319-01
Glyptol 90-09536-00
Loctite 601 90-09321-00
Lubriplate —
Tape, Cleaning Kit 22-00012-00 (TUC01-00)
Tape, Crimping Tool 47-00038-00
Interlock Disable Tool 29-28408-01
5.2 Opening the Tape Drive to the Operator Access Position
The operator access position provides access to the tape path. There are two procedures for
obtaining operator access to the drive, as follows:
• Operator Access for the Rack-Mount Drive
• Operator Access for the Table-Top Drive
5.2.1 Operator Access for the Rack-Mount Drive
To place the tape drive in the operator access position, proceed as follows:
WARNING
Before performing Step 1, ensure that the cabinet is stabilized by extend-
ing its support legs fully before pulling the drive out of the cabinet on its
slides.
1. If the drive is mounted in the H9642 style cabinet, remove the shipping bracket from the
rear of the drive next to the SCSI cable connector. Otherwise, proceed to step 2.
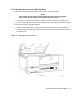
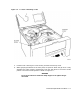
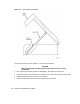
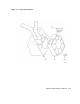
2. Reach underneath the left front corner of the front panel and squeeze the rack latch. See
Figure 5–1 for location of rack latch.
3. Pull the drive outward until the slide locks engage.
4. Raise the top cover and place the cover retainer arm in the recess next to the tape path.
See Figure 5–1 for location of the cover retaining arm.
To reinstall the drive into the cabinet or rack, proceed as follows:
1. Fold the cover retaining arm out of the way and then close the top cover.
2. Press the slide locks inward and push the drive into the cabinet.
5–4 Removal/Replacement Procedures