Bedienungsanleitung D IMPERIAL DABMAN 100 E IMPERIAL DABMAN 100 DAB+ & FM Radio
Inhalt 1. EINLEITUNG . . . . . . . . . . . . . 3 1. 1. Vorwort . . . . . . . . . . . . . . . . . 3 1.2. Service und Support . . . . . . 4 D 2. Sicherheitshinweise . . . . . . 4 2.1. Grundlegende Sicherheitshinweise . . . . . . . . . . . 4 2.2. Erläuterung der Sicherheitshinweise . . . . . . . 6 3. Lieferumfang . . . . . . . . . . . . . 6 4. Abbildungen und . . . . . . . . . . . . Beschreibung . . 7 4.1. Fernbedienung . . . . . . . . . . . 7 4.2. Front-/Rückansicht DABMAN 100 . . . . . . . . . . .
1. EINLEITUNG D 1. 1. Vorwort Vielen Dank, dass Sie sich für unser DAB+/UKW-Radio IMPERIAL DABMAN 100 entschieden haben. Wenn Sie das Radio zum ersten Mal verwenden, lesen Sie bitte diese Anweisungen sorgfältig durch, und bewahren Sie diese für zukünftige Gelegenheiten zum Nachschlagen auf. Wenn Sie die Anweisungen befolgen, können Sie optimal die volle Funktionsvielfalt des Radios genießen.
1.2. Service und Support D Sollte ihr Radio nicht richtig funktionieren, muss nicht gleich ein Defekt vorliegen. Bitte schicken Sie das Gerät nicht gleich ein, rufen Sie uns an! Technische Hotline für Deutschland: 02676 / 9520101 Gerne können Sie auch eine E-mail an service@telestar.de oder ein Fax an 02676 / 9520159 senden.
• Beachten Sie bitte, dass die Stromquelle (Steckdose) leicht zugänglich ist. • Knicken oder quetschen Sie keine Kabelverbindungen. • Wenn das Netzkabel beschädigt ist, müssen Sie das Radio von Fachpersonal reparieren lassen bevor Sie es erneut verwenden. Es besteht sonst die Gefahr D eines Stromschlags. • Lassen Sie Kinder niemals unbeaufsichtigt das Radio benutzen. • Überlassen Sie Wartungsarbeiten stets qualifiziertem Fachpersonal. Andernfalls gefährden Sie sich und andere.
Der richtige Umgang mit Batterien • Batterien können Giftstoffe enthalten. Achten Sie darauf, dass Batterien nicht in die Hände von Kindern gelangen. Kinder könnten Batterien in den Mund nehmen und verschlucken. Sollte eine Batterie verschluckt werden, nehmen Sie bitte soD fort ärztliche Hilfe in Anspruch. • Auslaufende Batterien können Beschädigungen an der Fernbedienung verursachen. Wenn das Radio längere Zeit nicht benutzt wird, nehmen Sie die Batterien raus. • Batterien können Giftstoffe enthalten.
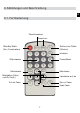
4. Abbildungen und Beschreibung D 4.1.
4.2. Front-/Rückansicht DABMAN 100 LCD Display D Teleskopantenne (max.
5. Installation Bitte entnehmen Sie die Teile vorsichtig der Verpackung. Prüfen Sie, ob alle Teile D vorhanden sind. Ziehen Sie nun den Plastiksicherungsstreifen an der Unterseite der Fernbedienung vorsichtig aus dem Batteriefach, sodass die Stromversorgung der Fernbedienung hergestellt ist. Hinweis: Das Radio kann sowohl über die Gerätetasten als auch die Fernbedienung gesteuert werden. Die Steuerung über die Fernbedienung ist die komfortablere und einfachere Art, den DABMAN 100 zu bedienen.
6. Allgemeines D 6.1 Betriebsmodi Beim DABMAN 100 stehen verschiedene Betriebsmodi zur Verfügung, die wiederrum unterschiedliche Funktionen unterstützen. Über die Modus-Taste kann zwischen folgenden Betriebsmodi ausgewählt werden: • DAB (Digitalradio, Kapitel 7) • FM (UKW-Radio, Kapitel 8) • AUX (Wiedergabe von extern angeschlossenen Geräten, Kapitel 9) 6.2 Menü In allen Betriebsmodi steht das Hauptmenü zur Verfügung.
6.2.1 Manuell Tunen (nur DAB+) In diesem Menüpunkt lassen sich im DAB+ Modus die Empfangsfrequenzen individuell einstellen. Hierzu gehen Sie wie folgt vor: • Schalten Sie zunächst den DABMAN 100 auf den DAB+ Modus. • Wählen Sie nun über die Zifferntasten oder die ◄► Tasten den Sender aus, den Sie manuell einstellen möchten. • Drücken Sie die Menü-Taste auf der Fernbedienung. • Navigieren Sie mit Hilfe der ◄► Tasten zum Punkt "Manuell Tunen". • Drücken Sie zur Bestätigung die Enter-Taste. 6.2.
6.2.3 Equaliser D Über den Equaliser lässt sich der Klang des DABMAN 100 individuell anpassen. Hier können Sie aus vordefinierten Klangprofilen wählen. Zum Aufrufen des Equaliser-Menüs gehen Sie wie folgt vor: • Drücken Sie die Menü-Taste auf der Fernbedienung. • Navigieren Sie mit Hilfe der ◄► Tasten zum Punkt "Equaliser". • Drücken Sie zur Bestätigung die Enter-Taste. • Es stehen folgende Auswahlmöglichkeiten zur Verfügung: Normal, Flat, Pop, Jazz, Rock, Classic.
• Drücken Sie zur Bestätigung die Enter-Taste. • Betätigen Sie erneut die Enter-Taste, wenn Sie einen Werksreset durchführen möchten. • Nachdem der Reset durchgeführt wurde, erscheint im Display der Hinweis "Werkseinstellungen OK", das Radio startet automatisch im DAB+ Modus neu und beginnt mit einem Sendersuchlauf. Hinweis: wenn Sie einen Reset durchführen, gehen alle individuell gespeicherten Daten (DAB+ und UKW Favoritenlisten, Weckzeiten) verloren und müssen neu eingestellt werden. 6.2.
D • Das Radio verfügt über einen Favoritenpeicher für 10 Radiosender. zum Abspeichern eines Senders schalten Sie wie oben beschrieben auf den zu speichernden Sender. • Nun drücken und halten Sie die Zifferntaste (1 - 10, siehe Abb. 4.1), auf der Sie den Sender speichern möchten, ca. 2 Sekunden gedrückt. Im Display erscheint die Meldung, dass der Sender unter dem gewählten Favoritenplatz gespeichert wurde.
durch den Sendersuchlauf nicht beeinträchtigt. 7.4 Lautstärkeregelung und Stummschaltung • Mit Hilfe der +/- Tasten (siehe Abb. 4.1) bzw. dem Lautstärkeregler (siehe Abb. 4.2) regeln Sie die Lautstärke der Wiedergabe (mit + erhöhen Sie die Lautstärke, mit - verringern Sie die Lautstärke). Regeln Sie die Lautstärke, erscheint im Display eine Lautstärkepegelanzeige. • Über die Stumm-Taste (siehe Abb. 4.1) können Sie den Lautsprecher des Radios aus- und durch erneutes Drücken wieder einschalten.
8.2 manuelle Sendersuche und Feintuning D Sie können auch manuell nach Sendern suchen. Hierzu gehen Sie wie folgt vor: • Durchsuchen Sie im FM-Modus den Frequenzbereich durch Drücken der ◄► Tasten nach Sendern. Mit der ◄ Taste durchsuchen Sie den Empfangsbereich nach unten, mit der ► Taste durchsuchen Sie den Empfangsbereich nach oben. • Halten Sie hierzu die ◄ Taste bzw. die ► Taste gedrückt, der Suchlauf beginnt und endet, sobald ein Radiosender empfangen wird.
8.4 Info • Im FM Modus können Sie Hintergrundinformationen zum empfangenen ProD gramm abrufen (z.B. Titelname, Interpret), aber auch weitere Informationen (z.B. Signalstärke, Übertragungsqualität etc.) aufrufen, die dann im Display angezeigt werden. • Drücken Sie hierzu im Betrieb die Info-Taste (siehe Abb. 4.1) ggf. mehrmals, um sich die gewünschten Informationen auf dem Display anzeigen zu lassen.
• D Nun können Sie Musik vom externen Gerät wiedergeben. Die Steuerung (Titel vor, zurück, Stop, Play) erfolgt hierbei über das extern angeschlossene Gerät, die Wiedergabe-Lautstärke kann über die +/- Tasten (siehe Abb. 4.1) bzw. den Lautstärkeregler (siehe Abb. 4.2) des DABMAN 100 oder über das externe Gerät geregelt werden. 10. Weckfunktion Der DABMAN 100 verfügt über eine Weckfunktion, die bequem über die Fernbedienung gesteuert werden kann.
11.
11. Technische Daten D Stromverbrauch 0,7W (Standby); 4W (Betrieb) Maße und Gewicht Maße (inkl. Bedienelement, Antenne und Füßen) BxHxT: 225mm x 132mm x 120mm Gewicht ca. 1.
12. Fehlersuchhilfe Problem Keine Displayanzeige, Radio reagiert nicht auf Bedienung mögl.
12. Fehlersuchhilfe D Problem AUX Wiedergabe funktioniert nicht Wecker funktioniert nicht richtig mögl. Ursache Lösungsvorschlag Sender nicht sauber eingestellt Justieren Sie die Frequenz manuell nach (siehe Kapitel 8.1.
D Ihr Gerät trägt das CE-Zeichen und erfüllt alle erforderlichen EU-Normen. Hiermit erklärt die TELESTAR DIGITAL GmbH, dass sich das Gerät IMPERIAL DABMAN 100 in Übereinstimmung mit den grundlegenden Anforderungen und den übrigen einschlägigen Bestimmungen der Niedrigspannungsrichtlinie 2006/95/EG, der EMV Richtlinie 2004/108/EG, der RoHS Richtlinie 2011/65/EG, sowie der ErP Richtlinie 1275/2008/EG befindet. Die Konformitätserklärung für dieses Produkt erhalten Sie auf: www.digitalbox.
Operating Manual E IMPERIAL DABMAN 100 24
E 25
1. INTRODUCTION . . . . . . . . . 27 1.1. SERVICE and SUPPORT . 27 2. SAFETY NOTICES . . . . . . . . 28 2.1. Basic Safety Instructions 28 D E 2.1. Basic Safety Instructions 29 2.2. Explanation of safety notices . . . . . . . . . . . . . . . 30 3. ITEMS SUPPLIED . . . . . . . . 30 4. ILLUSTRATIONS AND DESCRIPTIONS . . . . . . . . . . . . 31 5. INSTALLATION . . . . . . . . . . 33 6. OPERATION . . . . . . . . . . . . . 34 6.2.7 Language . . . . . . . . . . . . . 40 7. DAB . . . . . . . . . . . . . . 42 7.
1. INTRODUCTION Thank you for choosing our DAB+/FM Radio IMPERIAL DABMAN 100. When opeE D rating the radio for the first time, please read this operating manual carefully, and keep it close to hand for future reference. If you follow the instructions, you will be able to enjoy the many functions of your radio optimally. This operating manual will assist you with the correct safe optimal use of the IMPERIAL DABMAN 100.
2. SAFETY NOTICES D E Please read the safety notices carefully before operating the radio. Please note all warnings and instructions both on the product and in the operating manual. 2.1. Basic Safety Instructions In case of operating problems, disconnect the radio from the power source. To avoid the risk of fire or the danger of an electrical shock, do not expose the radio to rain or to very humid, wet conditions.
2.1. Basic Safety Instructions Never allow children to use the radio without supervision. Always leave maintenance or repair work to qualified personnel. Ignoring this may endanger yourself and others. In case of operating problems, disconnect the radio from the power supply. Oain spare parts exclusively from the manufacturer. Changes to the product will result in a termination of liability by the manufacturer. Remove protective foils/films. Note! Note on disconnecting from mains supply.
used for an extended period, remove the batteries. D E Batteries may contain poisonous substances. Batteries must be disposed of in accordance with current legal regulations and with consideration for the environment. Do not dispose of batteries in your domestic waste. Do not expose batteries to open flames or extreme heat, as they may explode. Always replace batteries by the same type. 2.2.
4. ILLUSTRATIONS AND DESCRIPTIONS E D 4.
E D LCD Display telescopic antenna Scan key Info key Alarm menu Menu key Mode key Volume Power-Key Preset 3 Preset 2 Preset 1 Presetmenu connection for mains adapter AUX IN for external audio devices USB Charging Connection 32
5. INSTALLATION Please carefully remove the parts from the packaging. Check whether all parts are D present. Now carefully pull the plastic safety strip from the battery compartment E on the underside of the remote control, so that the power supply for the remote control is established. Note: The radio can be controlled both via the keys on the unit and via the remote control. Using the remote control is the more convenient and easier way of controlling the DABMAN 100.
5. INSTALLATION E D 6. OPERATION 6.1 Operating modes The DABMAN 100 provides various operating modes, which in turn support different functions. Use the Mode key to select from the following operating modes: DAB (digital radio, Chapter 7) FM (radio, Chapter 8) 6.2 System The menu item „System“ is available in all operating modes. To call this up, proceed as follows: Press the Menu key on the remote control. Use the ◄► keys to navigate to the item "System". Confirm by pressing the Enter key.
6. OPERATION You can navigate through the system settings and the respective sub-menus using the Menu key, the ◄► keys, the Enter key as well as the Back key. The subitems are explained in more detail below. 6.2.1 Sleep Use the sleep timer to set the time period after which you want the radio to switch off automatically. The options available are "off" (no automatic switch-off), 15 minutes, 30 minutes, 45 minutes, 60 minutes and 90 minutes.
6. OPERATION E D 6.2.2 Wake-up alarm The wake-up option of the DABMAN 100 supports to independently programmable wake-up timers. Both wake-up timers are set in accordance with the same procedure. Proceed as follows: Press the Menu key on the remote control. Use the ◄► keys to navigate to the item "System". Confirm by pressing the Enter key. Use the ◄► keys to navigate to the item "Wake-up alarm". Confirm by pressing the Enter key.
6. OPERATION from 1 to 10), use the ◄► keys to select the desired station, confirm by pressing the Enter key. In the next step you can select the frequency of the alarm. Here, the following options are available: Weekdays (alarm is activated for Monday to Friday, Once (alarm is activated only once), Weekend (alarm is active only on Saturday and Sunday). Use the ◄►keys to select the desired option, confirm by pressing the Enter key.
6. OPERATION E Confirm by pressing the Enter key. D The following options are available for selection: , Normal, Classic, Jazz, Pop, Rock, Flat. Make your selection using the ◄►keys, confirm by pressing the Enter key. 6.2.4 Time This menu item allows you to individually set the time and date, and to adjust the display in accordance with your preferences, generally it will not be necessary to make a manual adjustment, as the radio automatically reads the time via DAB+ resp. FM.
6. OPERATION 6.2.5 Illumination D E This option will set the background illumination of the display. The display can be dimmed in 3 steps (high = full brightness, medium = medium brightness and low = low brightness). Proceed as follows: Press the Menu key on the remote control. Use the ◄► keys to navigate to the item "System". Confirm by pressing the Enter key. Use the ◄► keys to navigate to the item „Illumination". Confirm by pressing the Enter key.
6. OPERATION E Press the Menu key on the remote control. D Use the ◄► keys to navigate to the item "Passive standby". Confirm by pressing the Enter key. Use the ◄► keys to select the desired time interval. Confirm by pressing the Enter key. Note: the passive standby mode can be used to reduce the power consumption of the radio, as it will switch automatically to standby mode if no operating procedures are carried out for a specified time. 6.2.
6. OPERATION 6.2.8 Works default setting D E Use this menu item to return the radio to the default works settings set when you purchased the radio. This may become necessary if manual settings made in the menu result in the radio no longer working as it should. Note: calling up the default setting will result in all individually made settings, e.g. saved station lists, being lost! To call up the factory default settings proceed as follows: Press the Menu key on the remote control.
7. DAB E In DAB mode you will receive radio stations broadcast using the DAB+ digital D radio standard To set the DAB mode, proceed as follows: While in operating mode, press the Mode key on the remote control, repeatedly if necessary, until the display shows the word „DAB“ below the time. DAB+ reproduction will start with the station most recently selected, resp. when switching on for the first time it will start with the first station found on the station list. 7.1 Operation 7.1.
7. DAB 7.1.2 Information D E While in DAB mode, you can call up background information on the programme being received (e.g. title name, artist), as well as additional information (e.g. signal strength, broadcast quality etc.) which will then be shown on the display. To do this, press the Info key while in this operating mode (see Fig. 4.1), if necessary repeatedly, to show the desired information on the display.
7. DAB E 7.1.5 Wake-up alarm and Snooze key D While in operating mode, press the Alarm key on the remote control. The wake-up timer menu will open. To set the wake-up timer, proceed as described in Chapter 6.2.2. If the wake-up alarm goes off, you can press the Snooze key to switch off temporarily. The alarm will go off again after approximately 10 minutes. 7.2 DAB Menu Settings can also be made in the DAB Menu. This can involve general settings to be made via the menu item "System" (see Chapter 6.
7. DAB D become available Basically this menu item corresponds with the same function as E the station scan (see Chapter 7.1.3). To start the complete station scan, proceed as follows: While in DAB mode press the Menu key (on the remote control or on the radio), you will be taken to the DAB menu. Use the ◄► keys to navigate to the item "Complete scan". To confirm press the Enter key, the station scan will begin, and a progress bar will appear on the display.
7. DAB E 7.2.3 DRC - Dynamic Range Control D The DRC dynamic range control will reduce the difference in volume between the loudest and the least loud signal of a transmission – in practice this means that quiet tones will be reproduced relatively more loudly, and loud notes will be played relatively less loud. Switch the DRC on or off in accordance with your listening preferences, as follows: While in DAB mode press the Menu key (on the remote control or on the radio), you will be taken to the DAB menu.
8. FM In FM mode, the IMPERIAL DABMAN 100 will receive analogue radio signals in the FM band (between 87.5 and 108 MHz) as well as RDS signals, where these are broadcast. To ensure optimum reception, please extend the telescopic antenna to its full extent before switching on the radio. While operating the radio, press the Mode key on the remote control, if necessary repeatedly, until the message „FM“ appears on the display below the time. The radio will start playing the station most recently selected.
9. OPERATION E 9.1 Operation D 9.1.1 Automatic station scan To perform a station scan proceed as follows: While in FM mode, press the Scan key (see Fig. 4.1). The FM scan will start with the highest FM frequency (108 MHz) and will run backward. The scan will stop automatically at the first FM station received. Press the Scan key again to continue the scan. Continue tin this manner until you receive the desired FM station. 9.1.2 Manual station scan and fine tuning You can also scan for stations manually.
9. OPERATION D Now press down the numeric key (1 - 10, see Fig. 4.1), on which you wish to save E the station, for approx. 2 seconds, the display will show the message that the station has been saved under the favourites slot selected. If stations have been stored in the favourites memory, you can call these up by pressing the appropriate numeric key. Or While in FM mode press the Preset key (see Fig. 4.1) to call up the favourites list.
9. OPERATION E 9.1.6 Wake-up alarm and Snooze key D While in operating mode, press the Alarm key on the remote control. The alarm timer menu will be opened. To set the wake-up timer, proceed as described in Chapter 6.2.2. When the alarm switches on, you can interrupt the alarm by pressing the Snooze key. This will then go off again after a preset interval (approx. 10 minutes). 9.2 FM Menu Settings can also be made in the FM menu. These include both general settings via the item "System" (see Chapter 6.
9. OPERATION To confirm press the Enter key, you will be taken to the sub-menu. Use the ◄► keys to select the option „only strong stations“ or „all stations“. Confirm your selection by pressing the Enter key, you will be returned to the FM mode. Note: the default option is „only strong stations“. This is the preferred option, as only this guarantees the best possible reception quality. 9.2.
10. AUX E D If you have connected an external device like MP3 Player via cable with the AUX Input of DABMAN 100, you can use the DABMAN 100 for playing music from this external device. • Connect your external device with DABMAN 100, by using a 3,5 mm stereo jack cable. (not included in delivery content) • Press the MODE Key on the remote control, as teh circumstances requiremore than one time until the display shows "AUX". • Now, you can start playing musik from the external device.
11.
11. TECHNICAL DATA E D Size and weight Dimensions (incl. controls, antenna and stand WxHxD: 225mm x 132mm x 120mm Weight approx. 1.
12. TROUBLESHOOTING GUIDE Problem Cause Solution No message on display.
13. CE Marking E Your radio bears the CE mark, and complies with all required EU standards. CE mark for European markets The CE mark on the product IMPERIAL DABMAN 100 gives you the assurance that the product complies with the regulations of directive for low-voltage equipment (2006/95/EC), with the electromagnetic compatibility directive (2004/108/EC), with the RoHS directive (2011/65/EC) and with the directive ErP (1275/2008/EC) The conformity declaration for this product can be obtained at: www.