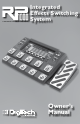
Integrated Effects Switching System Owner’s Manual 1
WARNING FOR YOUR PROTECTION READ THE FOLLOWING: KEEP THESE INSTRUCTIONS The symbols shown above are internationally accepted symbols that warn of potential hazards with electrical products. The lightning flash with arrowpoint in an equilateral triangle means that there are dangerous voltages present within the unit. The exclamation point in an equilateral triangle indicates that it is necessary for the user to refer to the owner’s manual.
Table of Contents Section One - Introduction.............1 Getting Acquainted...........................................................1 Included Items....................................................................1 About the RP1000............................................................1 Preset Mode and Pedalboard Mode........................1 Bypass ...........................................................................1 Amp/Cabinet Bypass .................................................
Warranty We at DigiTech® are very proud of our products and back up each one we sell with the following warranty: 1. The warranty registration card must be mailed within ten days after purchase date to validate this warranty. 2. DigiTech warrants this product, when used solely within the U.S., to be free from defects in materials and workmanship under normal use and service. 3.
Section One - Introduction Getting Acquainted Congratulations on your purchase of the RP1000. The RP1000 Integrated Effects Switching System takes your tone to the next level giving you the control that you need over your external amp and stompboxes while packing in the power of a multi-effects processor. Use the RP1000 to control and spice up your tone without any compromises. The RP1000’s vast pallet of stompboxes, effects, amps and cabinets allow you to get any sound imaginable and then some.
Amp/Cabinet Bypass You can also turn off the internal amps and cabinets for all the presets in the RP1000. This is really useful when you just want to add effects processing to your own core amplifier sound. So basically the RP1000 becomes a straight multi-effects box when you do this, and only Wah, Compressor, Distortion, Equalizer, Noise Gate, Chorus/FX, Delay, and Reverb are used. To bypass amp/cabinet modeling in all presets, press the Amp/Cabinet Bypass button.
Amp Gain/Effect Parameter (Knob 4) This knob adjusts the Gain (distortion) for the selected Amp (not available for Acoustic) and is also used to adjust parameters of other effects in the matrix. The amplifier and cabinets can’t be adjusted when the Amp/Cabinet Bypass button is enabled. Amp Level/Effect Parameter (Knob 5) This knob adjusts the Level (volume) of the selected amp and adjusts other effect parameters in the matrix. Amp Level can’t be adjusted when the Amp/Cabinet Bypass button is enabled.
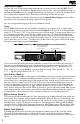
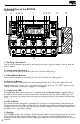
A Guided Tour of the RP1000 Front Panel 1 2 345 6 7 8 9 10 11 12 13 1. Tap Tempo Footswitch Step on this footswitch repeatedly in time with your music to get the delay to sync up with the music’s rhythm. 2. Stomp Loop Footswitch This footswitch enables and disables the mono stompbox effects loop. 3. Edit Up/Down Buttons These buttons navigate up and down the rows of the matrix for editing presets. 4. Amp Loop Button This button enables and disables the external Amp/Preamp loop.
8. Knobs 1-6 (From left to right) These six knobs perform various functions, depending on which mode is currently active and what (if anything) is being edited. The functions are listed below: Tone Library (Knob 1) 1. In Performance mode, this knob selects from a library of preset amp tones. 2. When editing a preset, this knob changes the Amp or Effect model for the selected row and pressing the knob will turn the effect row on or off.
3. select the Wah row to adjust this parameter when USB is connected to the RP1000. When the Expression row is selected, this knob selects the LFO waveform. LFO 1or LFO 2 must first be selected with Knob 1 for this parameter to be available. Master Volume (Knob 6) 1. In Performance mode, this knob adjusts the output level of the RP1000. 2. When editing a preset, this knob modifies the parameter listed in the column directly above it for the selected Effect row. 3.
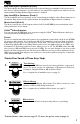
Rear Panel 1 2 3 4 5 6 7 8 9 10 11 12 13 1. Amp Loop Ground Lift This Ground Lift switch can be enabled to help prevent unwanted hum or buzz caused by ground loops between the RP1000 and external amplifiers/preamps. 2. Input High impedance 1/4” instrument input. 3. Amp Loop These 1/4” send and return jacks let you connect to an external preamp or amplifier and use the tone from these components instead of the internal amplifiers of the RP1000.
Getting Started Making Connections There are lots of ways to connect the RP1000 to amps, effects, mixers, and other equipment. Before connecting the RP1000 to anything, make sure both your amp and the RP1000 are turned off. Amp/Cabinet Bypass The RP1000 lets you bypass its amp and cabinet tones so you can apply its effects to your own amp/cabinet tone. To bypass the RP1000 amp and cabinet tones in all presets, push the Amp/ Cabinet Bypass button so it’s lit.
4. Loop: PRE AMP (post Distortion, pre Amp Model/Amp Loop send), or POST AMP (Post Amp Model/Amp Loop return). Note that the Stomp Loop button’s LED turns red when it’s pre amp, and green when it’s post amp or post FX. Store these changes using the Store procedure. Note: If you try to enable the Stomp Loop but nothing is connected to the Stomp Loop jacks, the Display will briefly read NO loop. The Stomp Loop will not enable when no connections are present at these jacks.
Mixer Connect your guitar to the RP1000’s Input. Amp/Mixer switch on 1/4" outputs is set to MIXER. OR Connect the RP1000 Mixer Outputs or 1/4” Line Outputs to the mixer channel inputs. Pan channels hard left and right for proper stereo imaging. Stereo Amps Connect your guitar to the RP1000’s Input. Amp/Mixer switch on 1/4" outputs is set to AMP. Connect the RP1000’s 1/4” Line Outputs to the Power Amp inputs.
Amp Loop with Pre-Amp In Line Connect your guitar to the RP1000’s Input. Amp/Mixer switch on 1/4" outputs is set to AMP. Connect the External Preamp Line Out to the RP1000 Amp Loop Return. Connect the RP1000’s 1/4” Line Outputs to the Power Amp inputs. Connect the RP1000 Amp Loop Send to the External Preamp Input. PREAMP POWER AMP WITH SPEAKER CABS Stomp Loop Connect your guitar to the RP1000’s Input. Amp/Mixer switch on 1/4" outputs is set to AMP.
Amp Loop using Guitar Amp’s Pre Amp Connect your guitar to the RP1000’s Input. Amp/Mixer switch on 1/4" outputs is set to AMP. Connect the RP1000 Amp Loop Send to the amp’s Input. Connect the amp’s Loop Send to the RP1000 Amp Loop Return. Connect the RP1000 Line Out to the amp’s Loop Return. Amp Loop and Stomp Loop Connect your guitar to the RP1000’s Input. Amp/Mixer switch on 1/4" outputs is set to AMP. Connect the RP1000 Amp Loop Send to the amp’s Input.
Studio Setup (Computer and Personal Monitors) Connect your guitar to the RP1000’s Input. XLR Left Out Connect the RP1000’s USB port to an available USB port on your computer.
Applying Power Before applying power to anything, set your amp(s) to a clean tone and set the tone controls to a flat EQ response (on most amps, this should be set to 5 on EQ’s to obtain the amp’s natural voicing.). Then follow the steps listed below. 1. 2. 3. 4. 5. 6. Turn your amp volume all the way down. Connect the PS0913B power supply the RP1000. Plug the PS0913B power supply into an AC outlet. Turn on the RP1000’s power switch and adjust the RP1000’s Master Level to 0.
Editing/Creating Presets The easiest way to start editing presets is with the Tone Library and Effects Library knobs. Try out some of the tones in the Tone Library and then try out some effects setups with the Effects Library knob. Use the Effects Level Knob to increase or decrease the overall Chorus/FX, Delay and Reverb levels if desired. Once you find a tone that’s pretty close to what you want, use the Edit buttons to navigate through the individual effects to make some adjustments.
To bypass amp/cabinet modeling in all presets, press the Amp/Cabinet Bypass button. When it is lit, amp/cabinet modeling is bypassed in all presets. Amp/Cabinet Bypass can be used in either Preset or Pedalboard mode. Storing/Copying/Naming a Preset When you’re done editing a preset, you should store your settings to any of the 100 User preset locations (presets 1-00). The following steps tell you how to store changes to a preset or copy a preset to a different location: 1. 2. Press the Store button once.
Section Three - Effects and Parameters About the Effects The RP1000 is like a dream collection of vintage and contemporary amplifiers with several pedalboards full of classic, modern, and boutique stompboxes all in a single programmable, portable package. With stompboxes, the order in which they are connected affects the overall sound. The RP1000 has placed the Amps and Effects in an order for optimum results. The following diagram shows the order in which they are connected.
Distortion The RP1000 includes the tones of many popular distortion stompboxes, each of which can be fully dialed in. Distortion - Knob 1 selects a Distortion. Press this knob to turn the selected Distortion on and off.
Knobs 2-6 have the following functions for the various Distortions: Distortion Knob 2 (Gain) Knob 3 (Param. 1) Knob 4 (Param. 2) Knob 5 (Param.
Amplifier The amplifiers are an assortment of popular vintage and modern amp tones. The amplifiers also include acoustic guitar simulations. Amp - By default, Knob 1 selects one of the classic, modern, and DigiTech custom Amp types. Note that when you select an Amp, the default cabinet is automatically selected. You can, however, change the cabinet after selecting an Amp to achieve different tones. Press this knob and turn it to select a cabinet.
Cabinet - Knob 1 also selects cabinets.
EQ The RP1000’s EQ helps further shape your tone with Low, Mid, and High controls. Knob 1 - Press Knob 1 to turn the EQ on and off. Low Level - Knob 2 adjusts the Low EQ level. Ranges from -12dB to 12dB. Mid Frequency - Knob 3 selects the frequency that the Mid parameter adjusts. Range Is from 300 Hz to 4000 Hz. Mid Level - Knob 4 adjusts the Mid EQ level. Range is from -12dB to 12dB. High Frequency - Knob 5 adjusts the High EQ frequency.
Knobs 2-6 have the following functions for the various Chorus types: Chorus Knob 2 (Pre/Post Amp) Knob 3 (Speed) Knob 4 (Depth) Knob 5 (Regeneration) Knob 6 (FX Level) CECHoruS Pre/Post Amp Speed Depth -- -- TCCHorus Pre/Post Amp Speed Width -- Intensity chorus Pre/Post Amp Speed Depth Waveform Level glischrs Pre/Post Amp Speed Depth -- Level Multchrs Pre/Post Amp Speed Depth Waveform Level voo doo Pre/Post Amp Speed Intensity -- -- clone Pre/Post Amp Rate Depth
Phaser A phaser splits the incoming signal, and then changes the phasing of the signal. This signal is then taken in and out of phase and mixed back in with the original signal. As the phasing changes, different frequencies get canceled resulting in a warm sort of twisting sound. The RP1000 includes the following Phaser types: phaser (the DigiTech Phaser), trigphas (the DigiTech Triggered Phaser), mx phasr (based on an MXR Phase 100), and eh phasr (based on an Electro-Harmonix Small Stone).
VibroPan (vibropan) A vibrato is an effect that modulates the pitch of the incoming signal. This will take the whole signal slightly in and out of tune at a steady pace. The DigiTech® VibroPan also incorporates an automatic panner with the vibrato effect that creates a lush chorus-like sound. Pre/Post Amp - Knob 2 determines where the effect appears in the effects chain. Turn counter-clockwise for Pre (appears before the Distortion effect), or clockwise for Post (appears after the Noise Gate effect).
Envelope Filter (eNvfiltr) The DigiTech Envelope Filter is a dynamic Wah effect that alters your sound based upon how hard you play. Pre/Post Amp - Knob 2 determines where the effect appears in the effects chain. Turn counter-clockwise for Pre (appears before the Distortion effect), or clockwise for Post (appears after the Noise Gate effect). Sensitivity - Knob 3 adjusts the sensitivity or the input signal required to trigger the Wah effect. Ranges from 0 to 99.
Vox - Knob 5 changes the characteristics of the various synth voices. Ranges from 0 to 99. Sensitivity - Knob 6 adjusts the sensitivity of the input signal required to trigger the SynthTalk effect. Ranges from 0 to 99. Balance (X-EditTM only) - adjusts the left to right balance of the wet signal, Ranges from left 99 to right 99. Step Filter (stepfltr) The DigiTech Step Filter is like an automatic “random wah” with a square waveform.
Pitch Shift (PitCH) A Pitch Shifter copies the incoming signal, then shifts the pitch of the copy to a different note. The shifted note is then mixed back with the original signal, sounding as if two guitars were playing different notes. Pre/Post Amp - Knob 2 determines where the effect appears in the effects chain. Turn counter-clockwise for Pre (appears before the Distortion effect), or clockwise for Post (appears after the Noise Gate effect).
Boss® OC-2 OctaverTM (octaver) Based on the Boss® OC-2 OctaverTM, this adds two signals to your original guitar signal. The first is one octave below your guitar, and the second is two octaves below your guitar. Each additional signal has its own volume control. Pre/Post Amp - Knob 2 determines where the effect appears in the effects chain. Turn counter-clockwise for Pre (appears before the Distortion effect), or clockwise for Post (appears after the Noise Gate effect).
Reverb Using reverb in recorded program material gives the listener a sense that the material is being performed in an actual room or hall. It is this similarity to actual acoustic spaces that makes reverberation a useful tool in recorded music. The RP1000 features genuine Lexicon® reverbs, whose rich, lush effects have been heard in countless songs, soundtracks, and live performances for decades. Reverb Types Knob 1 selects the Reverb Effect or acoustic space.
Section Four - Other Functions Expression Pedal You can link the Expression Pedal on the RP1000 to control the RP1000’s Volume, Wah, Whammy™,YaYa™, or almost any of the RP1000’s other parameters in real time with your foot. When a parameter has been linked to the Expression Pedal, you can also set the minimum (heel) and maximum (toe) value for the range.
Wah Min/Max You can set the Wah effect’s minimum and maximum values with the Expression row. To do so, follow these steps: 1. 2. 3. 4. Press the Edit button until the Expression row is selected (indicated by the LED lighting on the Expression row). Rotate Knob 1 to select wah pedl. Rotate Knob 3 to adjust the Wah effect’s minimum value. Rotate Knob 4 to adjust the Wah effect’s maximum value.
3. 4. 5. 6. When the Display prompts you with TOE UP, rock the Expression Pedal back (toe up) and press Footswitch 5. The Display now prompts you to calibrate the V-Switch sensitivity (VSWitchxxx), where XXX is the current V-Switch threshold. Rock the Expression Pedal forward and press firmly on the toe once to turn the V-Switch on (WAH ON), and again to turn the V-Switch off (WAH OFF). If the V-Switch is too sensitive, press the Up Footswitch to raise the threshold (range is 0-199).
To use the Looper with a quiet start, follow these steps: 1. 2. 3. 4. 5. 6. 7. 8. Press the Looper button to enable the Looper. The Looper button should now be lit. None of the Record, Play, Overdub LEDs will be lit at this time. To begin looping, press the Down footswitch. The Record LED on the matrix will flash red indicating the Looper is armed and ready to record but not actually recording yet. To begin recording, just start playing.
If using the optional FS3X to control the Looper, follow these steps for on the fly use: 1. 2. 3. 4. 5. 6. 7. Start playing your guitar. To begin looping, press the Down footswitch. The Looper will start recording as soon as you press the Down footswitch, and the Record LED on the matrix will light red after about half a second. To set the loop point, press the Down footswitch again. The loop point will be set and the recorded phrase will now begin playback.
and RP1000 have equal levels) to RP Mix 0% (all that is heard is the USB playback in the outputs, no RP1000 processing). To change the USB Setup options, follow these steps 1. 2. 3. From the preset name display, press the Edit Down button once to enter Edit mode. The Wah row’s LED will be lit. Turn Knob 4 to adjust the USB Playback Mix. Turn Knob 5 to adjust the USB Record Level.
Section Five - RP1000 Effects Descriptions Wahs Wah is an effect controlled by an Expression Pedal making the guitar sound as if it’s saying “Wah.” DigiTech® Wah DigiTech’s Full range Wah sweeps the entire spectrum of audible frequencies giving you the most range of tone from the wah pedal. Dunlop® Crybaby™ Wah: This Wah pedal is the more “traditional” sounding Wah pedal that you will have heard in the 60’s to the 80’s guitar solos. This Wah sweeps the lower to mid range of the audible spectrum.
EQ The RP1000 is equipped with a 3 band semi-parametric EQ which helps shape your tone with Low, Mid, and High controls. 3 Band Semi-Parametric EQ By adjusting the frequency and levels of each band, you can control how much or little of the frequency range of 60 Hz to 8 kHz you want in your overall tone. Chorus Stompbox Models A Chorus adds a short delay to your signal. The delayed signal is modulated in and out of tune and then mixed back with the original signal to create a thicker sound.
DigiTech® Filter Flanger The DigiTech tone team expanded on the traditional flanger by adding a band pass filter in the feedback path of the effect. Because of the filter, the filter flanger’s feedback affects only a set amount of frequencies to generate a different flanger effect.
Boss® OC-2 Octaver Based on the Boss® OC-2 OctaverTM, this adds two signals to your original guitar signal. The first is one octave below your guitar, and the second is two octaves below your guitar. Each additional signal has its own volume control. DigiTech® Detune A Detuner makes a copy of your incoming signal, takes the copied signal slightly out of tune from the original, then mixes the two signals together. The result is a doubling type of effect as if two guitars were playing the same part together.
Vox® Bias Tremolo Another way to achieve a tremolo effect is to alter the bias of the poweramp tubes. This Vox® Bias Tremolo produces the volume and tone effects to create a tone heard on many famous British tunes. Envelope / Special DigiTech® Envelope Filter An envelope filter is also called a “auto-wah” for its wah effect. The amount of wah is dependent of the output volume of your guitar – he harder you play, the more wah you get. A definite BMovie soundtrack tone.
Modulated Delay A modulated delay is a digital delay with chorus added to the delays to produce a wider sounding stereo delay. Pong Delay A pong delay’s repeats jump from side to side and requires a stereo setup. Reverse Delay: The Reverse Delay senses the guitar’s input signal and plays the delayed guitar backwards once it is sampled.
Boss® DS-1™ Distortion A truly classic distortion. A nice, common distortion that ranges in tone from rock to mild metal. Use it to drive a distorted amp! Boss MT-2 Metal Zone® The Metal Zone will produce nearly any metal tone needed from tight, percussive Bay area thrash to deep detuned grind core. Boss OD-1 Overdrive The OD-1 is perfect for just adding a little gain to your tone no matter what type of amp you use. To produce a bluesy tone, use it with a clean combo.
Fulltone® OCD Overdrive Straddling the border of overdrive and distortion, the OCD produces amazing harmonics and drives any amp into oblivion. The overdrive is thicker than most yet clear letting every string and note come through. Guyatone® Overdrive OD-2 The OD-2 is yet a different flavor of overdrive. The OD-2’s is transparent and does not get in the way when playing single notes or chords.
‘65 Fender® Blackface Deluxe Reverb® The single speaker version of its bigger brother, this amp is equally at home for blues, country and rock players. ’59 Gibson® GA-40 A very cool blues/rock amp in the ranks with the Deluxes but with a personality all its own. ‘69 Hiwatt® Custom 100 DR103 This superb rock and roll amp was the staple of Pete Townshend’s tone in the early /70s. A monster that has loads of headroom, this is at its best when cranked up all the way and paired with the Fane 4x12 cab.
’95 Matchless™ Chieftain A beautifully full amp tone with plenty of character. The Chief is a really great amp to use for putting a slightly different color in your musical palette. ‘96 Matchless HC30 The perfect Class A crunch tone with tight responsive low end. This is right at home with country, blues, and rock ’74 Orange™ OR 120 This often overlooked amp from a great British amp company was used by greats like Jimmy and Frank Zappa. No wonder the great Orange is making a comeback.
DigiTech® Crunch The Crunch is just that, a tube head that crunches more than the rest. The crunch has extra gain and cuts through. Perfect for both rhythms and solos. DigiTech Tweedface – Tweed preamp w/Blackface poweramp Imagine combining two of the greatest Fender® amps into a single beast. That’s what we have done with the Tweedface. Take the preamp of the classic Tweed Deluxe™ and combine it with the output stage of the Blackface Twin Reverb® and here is the monster you get.
Direct No amp model Dreadnaught Acoustic Awesome dreadnaught acoustic simulation with an articulate top end. Best suited for middle and neck pickups. Jumbo Acoustic A warmer acoustic model with more midrange. Cabinets 1x8 ‘57 Fender® Tweed Champ® A small speaker but a great way to cut through the mix. 1x12 ‘57 Fender Tweed Deluxe® A bluesman’s delight. Wonderful response with a classic tone when matched with its namesake amp model.
4x12 ‘96 VHT® Slant w/ Celestion® Vintage 30’s A rare matchup from the guys at VHT. Great bite that really cuts through. 4x12 ‘07 Mesa/Boogie Rectifier w/Celestion® Vintage 30’s The ultimate 4x12 for the heaviest tone. Massive bottom end and punchy midrange. 2x12 DigiTech® Bright A particularly bright but full sounding combo cabinet. Great for clean. 4x12 DigiTech Alt Rock The DigiTech Alt Rock is a dirtier cabinet with more sizzle than a standard 4x12 cabinet.
Section Six - Appendix Specifications General Specifications A/D/A Converter: Sampling Frequency: DSP Section: Simultaneous Effects: Preset Memory: Dimensions: Unit Weight: 24-bit high performance audio 44.1 kHz AudioDNA2™ DSP Processor 10 100 User Presets (1-00) / 100 Factory Presets (F1-F00) 19.5˝ Length x 10.75˝ Width x 3.75˝ Height 11.5 lbs.
Windows® Software Requirements Vista Home/Premium, XP Home/Professional (SP2 installed, .NET 2.0 installed*) Pentium®/Athlon™ 1.4GHz or later 512MB RAM (1GB RAM recommended) 180MB hard disk space for application DVD-ROM drive USB Port Internet connection required for Cubase activation *.NET 2.0 will be installed during installation of X-Edit software if required on XP systems Mac® Software Requirements OS 10.4.
DigiTech® 8760 South Sandy Parkway Sandy, Utah 84070 PH (801) 566-8800 FAX (801) 566-7005 http://www.digitech.com DigiTech® is a registered trademark of Harman Copyright - Harman Printed in China RP1000 Owner’s Manual 18-0597V-C Disclaimer: DigiTech, X-Edit, Production Modeling, Grunge, Death Metal, Jimi Hendrix™ Artist Series Pedal, DOD, Gonkulator, DigiTech Whammy, Multi Chorus, Auto Ya, YaYa, Synth Talk, Lexicon, Johnson Amplification and AudioDNA are trademarks of Harman.