
User`s guide


3 - 54 Operating Instructions
DigiGate-700
for Windows
™ ®
Figure 3-112
Figure 3-113
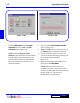
Clear Areas
1. From the
Utility Menu
with the
System
Controller
tab active, Click on the
Clear
Areas
button. Figure 3-112.
NOTE: This routine clears all of the tenants
from the control area you select. This will
remove any tenants that the System Controller
lists as onsite. It will also clear the Graphics
screen of blinking on site tenants if you have the
DigiGraphics option. Also, if you have had
your installer set the
AntiPassBack
option
to Hard, any tenants in the area cleared WILL
NOT be able to use the keypads to open the exit
gate.
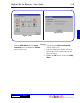
2. This will open the
Clear Control Areas
window. Figure 3-113.
3. All control areas defined in your system setup,
will be listed in the white data area on the
screen. Select (Check) or Deselect (Uncheck)
these control areas as needed.
NOTE: The
All
and
None
buttons on this
screen will Select or Deselect all control areas
respectively.
4. Click on the
OK
button to clear the area or on
the
Cancel
button to abandon the operation.
5. When the operation has been completed, you
will return to the
Utility Menu
.