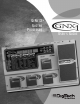
GENETXTM GUITAR PROCESSOR USER’S GUIDE
Warning For your protection, please read the following: Water and Moisture: Appliances should not be used near water (e.g. near a bathtub, washbowl, kitchen sink, laundry tub, in a wet basement, or near a swimming pool, etc.) Care should be taken so that objects do not fall and liquids are not spilled into the enclosure through openings. These symbols are internationally accepted symbols that warn of potential hazards with electrical products.
DECLARATION OF CONFORMITY Manufacturer’s Name: Manufacturer’s Address: DigiTech 8760 S. Sandy Parkway Sandy, Utah 84070, USA declares that the product: Product name: GNX1 Note: Product name may be suffixed by the letters EX, EU, JA, and UK. Product option: all (requires Class II power adapter that conforms to the requirements of EN60065, EN60742, or equivalent.
Table of Contents Safety Information ..................................................................................I Declaration of Conformity ..................................................................II Warranty ..................................................................................................II Section One - Introduction Congratulations ......................................................................................1 Included Items .......................................
SECTION ONE - INTRODUCTION Section One - Introduction Congratulations on purchasing the DigiTech GNX1, the most advanced guitar processor of its kind.There has never been a guitar system as unlimited as the GNX1.Thanks to the highly advanced technology provided by GeNetX™ and the extreme horsepower contained in the Audio DNA™ DSP engine, you now have the capability to literally create the tone of your own guitar amplifier and speaker cabinet.
SECTION ONE - INTRODUCTION Quick Start This Quick Start guide is included for those of you who would rather begin creating now and read about the depths of the GNX1 gene pool later. Making Connections: Connect your instrument to the Input jack on the rear panel. Connect the Left /Right Outputs to the input(s) of your amplifier(s), power amp, or mixer. Apply Power: Turn the Output Knob on the rear panel of the GNX1 all the way down (fully counter clockwise).
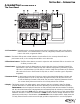
SECTION ONE - INTRODUCTION A Guided Tour of the GNX1 The Front Panel 1.1-3 Footswitches - Depending on the currently selected mode, these 3 footswitches are used to select Presets, access the Tuner, turn individual effects on and off, change Amp Channels, select functions in Learn-A-Lick mode, or bypass the GNX1. 2. Matrix - The Matrix LEDs provide a visual indication of active effects for the currently selected Preset in performance mode, or the currently selected effect row in edit mode. 3.
SECTION ONE - INTRODUCTION 7. Data Up/Down Buttons - These buttons are used to increase and decrease the currently selected Preset in Performance mode, value of currently displayed parameter in edit mode, the value or status of the currently selected Utility or Rhythm function, or the alpha-numeric character in the naming procedure. 8. Mode Buttons - These 6 buttons are used to select various modes in which the GNX1 will function.
SECTION ONE - INTRODUCTION Rear Panel 1. Input Jack - Connect your instrument to this jack. 2. Jam-A-Long Jack - Use an 1/8” stereo plug to connect this jack to the output of a tape or CD player.This allows you to jam along with the music, or to record a musical passage into the Learn-A-Lick phrase recorder. 3. Headphone Output - Connect stereo headphones to this jack.
SECTION ONE - INTRODUCTION Getting Started Making Connections Before connecting the GNX1, make sure that the power to your amplifier is turned off, and that the power switch on the rear panel of the GNX1 is in the off position. There are several different connection options available when using the GNX1.You may run mono into an amp or power amp, stereo into two amps or a stereo power amp, direct into a mixing console, or a combination of these.
SECTION ONE - INTRODUCTION Direct to a Mixing Console The GNX1 can be connected directly to the inputs of a house PA system, or to a recording console. Connect the guitar to the input of the GNX1. Connect from the outputs of the GNX1 to the channel inputs of the mixing console. If the GNX1 is to be used in Stereo mode, set the pan controls of the mixer hard left and right, and select stereo as the output mode in the GNX1’s Utility menu. See page 34 for more information on the output mode.
SECTION ONE - INTRODUCTION Performance Mode When you first apply power to the GNX1, it will power up in Performance mode.This is the top level mode and the mode used while you are performing.While in Performance mode, the Display will show the currently selected Preset’s name and number. The vertical LEDs on the Matrix will indicate the Effects which are active in the selected Preset.
SECTION ONE - INTRODUCTION The Footswitches As explained previously, Preset Mode utilizes Footswitches 1-3 to select Presets, and the same switches will toggle Effects in FX Mode. However, these footswitches are also used to access other functions in the GNX1. Pressing the 1 and 2 Footswitches simultaneously, or pressing the currently lit Footswitch (in Preset mode) will bypass the GNX1. Pressing and holding the 1 and 2 Footswitches simultaneously will access the Tuner mode.
SECTION ONE - INTRODUCTION Jam-A-Long The Jam-A-Long feature allows you to connect a Tape, CD, or MP3 player to the GNX1, and Jam with your favorite artists.The signal from your Tape, CD, or MP3 player is output through the left and right, and headphone outputs of the GNX1. To use the Jam-A-Long feature, connect the headphone output of your Tape, CD, or MP3 player to the Jam-ALong Input on the rear panel of the GNX1 using an 1/8” stereo cable.Then press play on your Tape, CD, or MP3 player.
SECTION ONE - INTRODUCTION Rhythm Trainer The Rhythm Trainer in the GNX1 is a great tool for developing a great sense of timing, rehearsing different musical styles, or just jamming.The Rhythm Trainer plays sampled drum beats in an infinite loop allowing you to select from a variety of patterns, change the tempo, and adjust the volume level.When the Rhythm Trainer is activated, the drum samples are mixed with your guitar signal at the left, right, and headphone outputs of the GNX1.
SECTION TWO - EDITING FUNCTIONS Section Two - Editing Functions Editing/Creating a Preset The GNX1 was designed to make the process of sound creation easy and intuitive. Because the GNX1 provides both Amp Modeling and Effects Processing, the editing functions have been divided into two sections; the Amp/Cabinet Modeling section which provides editing for the Amp and Cabinet Modeling, and the Effects section which provides editing of the extensive Effects library.
SECTION TWO - EDITING FUNCTIONS Selecting Amp/Cabinet Models The first step to editing an Amp Model, Cabinet Type, or creating your own HyperModel™ is to select the Amp and Cabinet types for the Green and Red Amp channels in your Preset.To do this, the GNX1 must be in the Performance mode which is indicated by the LED next to the Status button lighting yellow. Pressing the Exit button will return the GNX1 to Performance mode regardless of the currently selected mode.
SECTION TWO - EDITING FUNCTIONS Cabinet Tuning The resonant frequency of the selected speaker cabinets can also be tuned individually. Cabinet Tuning ranges from -1™0 (one octave below) to 1™0 (one octave above).The procedure for tuning the cabinets is as follows: 1. Press and hold the Status button.
SECTION TWO - EDITING FUNCTIONS 4. Repeat steps 2 and 3 until the desired HyperModel™ name is shown in the Display. 5. Press the Amp Save button again to select one of the 9 User HyperModel™ locations. If the GNX1 has any unused HyperModel™ locations available, the Display will read EMPTY U1.The U1 will be flashing indicating that this is the first available location for your new creation to be stored.
SECTION TWO - EDITING FUNCTIONS Editing the Effects The GNX1 contains a comprehensive library of fully programmable, studio quality Effects. The Effects section is accessed with the Effect Select Up/Down buttons.The Matrix LEDs will light one at a time to indicate the selected Effect row.When you have selected the desired effect row, you have up to 5 Parameters which can be edited. Each effect row has been divided into 6 columns of Parameters.The first column is the on/off control for the selected effect.
SECTION TWO - EDITING FUNCTIONS Storing/Copying a Preset When editing a Preset, the Store LED will light indicating that you have changed a Parameter and need to store the changes. Once you have modified the Amp Models, Cabinet types, and Effect Parameters to your liking, you can store your creation to a User Preset location.The following steps outline the procedure for storing a Preset: 1. Press the Store button once and the GNX1 will enter a naming mode.
SECTION THREE - EFFECTS AND PARAMETERS Section Three - Effects and Parameters About the Effects The GNX1 can be thought of as several different “virtual” amplifiers, and individual, hi-tech stomp boxes.With stomp boxes, the order in which they are connected can make a big difference in how good the overall sound is.Whether the stomp boxes are placed before the amp, or in the amp’s effects loop will also make a difference.The GNX1 has the Effects connected in the most logical, and best sounding order.
SECTION THREE - EFFECTS AND PARAMETERS Threshold - The Number 3 Knob selects the maximum strength the signal is allowed to reach before the compressor begins to work. Low Threshold settings will activate the Compressor with weaker signals. Higher settings will require a stronger signal to activate compression. Ranges from 0 to 99. Gain - The Number 4 Knob adjusts the Output Gain from the Compressor.This parameter should be used to balance the level of the Compressor in order to achieve unity gain.
SECTION THREE - EFFECTS AND PARAMETERS Detuning is similar to a standard pitch shifter with the exception that it shifts the copied signal by less than a semitone resulting in an effect as if two guitars were slightly out of tune and playing in unison. Parameter 1 (Detune) - The Number 2 Knob selects the AMNT (Amount) of detuning applied to the copied pitch in cents (100 cents equals 1 semitone). Ranges from -24 (24 cents below) to +24 (24 cents above).
SECTION THREE - EFFECTS AND PARAMETERS Chorus/Mod Effects The Modulation Effects row is a multi-function module allowing you to select effects such as; Chorus, Flanger, Phaser, Triggered Flanger,Triggered Phaser,Tremolo, Panner,Vibrato, Rotary Speaker, AutoYa™, YaYa™, SynthTalk™, Envelope Filter (auto wah), Detune, and Pitch Shift. Only one of the effects in this row can be used at a time.When the Chorus/Mod row is selected, the Status button is used to turn the Effect module on (EFF ON) and off (EFFOFF).
SECTION THREE - EFFECTS AND PARAMETERS Triggered Phaser (TRGPHA) A Triggered Phaser is the same sound as a regular Phaser but allows you to choose the starting point of the Phaser sweep. In a regular Phaser, the low frequency oscillator (LFO) is continually changing the phase of the signal. This means that when you begin to play, the phaser may be at the any random point of the phase.
SECTION THREE - EFFECTS AND PARAMETERS AutoYa™ (AUTOYA) An AutoYa™ combines the characteristics of a Wah and a Flanger together creating an almost human vowel sound as if the guitar were saying “Yah.” The AutoYa™ automatically provides this animation by modulating the sound at an even rate. Parameter 1 - The Number 2 Knob adjusts the rate (SPEED) of the modulation. Ranges from 1 to 99. Parameter 2 - The Number 3 Knob adjusts the intensity (DEPTH) of the AutoYa™ effect. Ranges from 1 to 99.
SECTION THREE - EFFECTS AND PARAMETERS Pitch Shift (PitCH) A Pitch Shifter copies the incoming signal, then shifts the pitch of the copied note to a different note.The shifted note is then mixed back with the original signal sounding as if two guitars were playing parallel notes. Parameter 1 - The Number 2 Knob adjusts the Amount of Pitch Shift (SHIFT) in intervals of one semi-tone. Ranges from -12 (12 semitones below) to +24 (24 semitones above).
SECTION FOUR - TUTORIAL Section Four - Tutorial A Guided Example Suppose you wanted to create your own HyperModel™ that incorporated the sweet tones of a vintage Tweed with an American 2x12 cabinet, and the ripping distortion of a Rectified Amp with a British 4x12 cabinet.
SECTION FOUR - TUTORIAL Adjust the Green Channel Parameters The Tweed amp that we selected for our Green Channel assignment will initialize with factory default settings for the Gain, EQ, and Level Parameters.These settings may not necessarily suit your personal taste and require some fine tuning.To access these Green Channel Parameters, press the Status button once. All horizontal LEDs will light green indicating that all 5 knobs will now adjust the Green Channel Parameters.
SECTION FOUR - TUTORIAL Warp the Green and Red Channels Together When we have the Amps and Cabinets in our Green and Red Channels dialed in to suit our taste, we can Warp them together to create our new HyperModel™. Make sure your GNX1 is in yellow mode (indicated by the Status LED lighting yellow). If it is not in yellow mode, press the Status or Exit button until yellow mode has been accessed.
SECTION FOUR - TUTORIAL Edit the Preset The next step to creating our example Preset is to enter the Preset Edit mode.To do this, press the Effect Select Down button once. At this point the Matrix LED in the Wah-Pickup row should light.The Display will briefly show EDIT and then cycle between showing the status of the Wah and Pickup simulator Effects. If the Display shows that the Wah is on (WAH ON), press the Status button once to turn it off (since our example is not using a Wah).
SECTION FOUR - TUTORIAL Adjust the EQ The EQ for both the Acoustic Model in the Green channel and our Rectwd HyperModel™ in the Red channel can be adjusted individually.To do so, press the Effect Select Down button again and the LED on the Equalizer row will light. The GNX1 will default to the EQ adjustments for the Red Channel and the Display will briefly read EQ RED (EQ Red).
SECTION FOUR - TUTORIAL Select and Adjust the Chorus Next we wanted to thicken up the sound in our Preset by adding a subtle Chorus effect. Press the Effect Select Down button again and the LED in the Chorus/Mod row will light. If the Display indicates that this module is off (EFFOFF), press the Status button until the Display reads EFF ON (Effect On).Then rotate the Number 1 Knob until the Display shows CHORUS (Chorus) as the effect type. Rotate the Number 2 Knob to set the Chorus Speed to a value of 5.
SECTION FOUR - TUTORIAL Store the Preset The last step that we need to do is to store our changes to a User Preset. If we changed Presets or turned the GNX1 off without storing these settings, it would forget what we had done and revert back to the original Preset. Press the Store button once.The first letter in the Display begins to flash which is asking us to rename the Preset. Since this is an example Preset, let’s name the Preset exampl.
SECTION FIVE - OTHER FUNCTIONS Section Five - Other Functions Expression Pedal The Expression Pedal on the GNX1 can be assigned to control up to 3 Parameters in real time including the Volume, Whammy™,Ya Ya™, or just about any other parameter.. When a parameter has been assigned to the Expression Pedal, the minimum and maximum values the assigned Parameter will reach can also be programmed.The GNX1’s Expression Pedal includes DigiTech’s exclusive V-Switch.
SECTION FIVE - OTHER FUNCTIONS Amp Footswitch From the factory, the Amp Footswitch changes between the Green and the Red Amp Channels. However, the GNX1 allows you to select the function of the Amp Footswitch.The procedure for assigning the function of the Amp Footswitch is as follows: 1. Press the Effect Select button until the Exp Assign row has been selected. 2. Press the Status button until the Display reads AMP FS (Amp Footswitch). 3.
SECTION FIVE - OTHER FUNCTIONS Active Effect Envelope Filter SENSTV RANGE MODBAL MODMIX Detune AMOUNT MODBAL MODLVL Pitch Shift SHIFT MODBAL MODLVL DLYFBK (Delay Feedback) - Controls the amount of Delay Feedback. DUKTHR (Delay Threshold) - Controls the Ducker Threshold for the Delay. DUkATN (Ducker Attenuation) - Controls the attenuation level applied to the Delay signal when the Ducker Threshold is exceeded. DLYLVL (Delay Level) - Controls the Mix Level of the selected Delay Type.
SECTION FIVE - OTHER FUNCTIONS Volume Pedal Update The GNX1 provides the option of selecting the Expression Pedal’s position to be updated after changing Presets when it is linked to the Volume Parameter. This feature allows you to change Presets and retain the same volume level from the previous Preset if the Expression Pedal is assigned to control volume on both Presets. If this feature is disabled, new Presets will initialize at the volume level value stored to the Preset.
SECTION FIVE - OTHER FUNCTIONS Bank Names The GNX1 provides the ability to customize the names of each of the 16 User Banks where the 48 User Presets reside. Customized Bank names aid in quickly identifying the User Bank containing the Presets you may need for a particular song or set.The procedure for naming the User Banks is as follows: 1. Press the Utility button once.The LED in the Utility button will light indicating you are in the Utility section. 2.
SECTION FIVE - OTHER FUNCTIONS 3. Using the FX Mode or Rhythm button, scroll to the left or right until the alpha-numeric Display shows PSTDMP (Preset Dump).The numeric Display will show 1 indicating that the GNX1 is ready to dump Preset number 1. 4. Use the Data Up/Down buttons to select the Preset number you wish to send out. 5. Press the Store button once.The Display reads SND TO which is asking you to select the destination Preset location. 6.
SECTION FIVE - OTHER FUNCTIONS MIDI Merge The MIDI Merge function is used to echo the incoming MIDI data to the MIDI Out port of the GNX1.This is useful when multiple MIDI devices are chained together, and you wish to pass the incoming MIDI Data on to MIDI devices downstream from the GNX1.The procedure for enabling or disabling the MIDI Merge function is as follows: 1. Press the Utility button once.The LED in the Utility button will light indicating you are in the Utility section. 2.
SECTION SIX - APPENDIX Section Six - Appendix Preset List Bank 1 (SHOCAS) 1. HYBRID 2. CLNCHO 3. 2CHUNK Bank 2 (GENETX) 4.WARPME 5. BLKBAS 6. MEAT2X Bank 3 (STARS) 7. ERIC J 8. CARLOS 9. KOBB Bank 4 (AMPS) 10. BASSMN 11. MATCHD 12. VOXTOP Bank 5 (BLUES) 13. BLUDLY 14. BLUBAL 15.TEXBLU Bank 6 (CNTRY) 16. PICKEN 17. PSTEEL 18. A MIXO Bank 7 (ROCK) 19. MO WAH 20. FAZOUT 21.THICKR Bank 8 (CLEAN) 22. ACOUST 23. CMPCLN 24.WRMCLN Bank 9 (METAL) 25. RECTFY 26. SOLO 27.WHAMMY Bank 10 (STUDIO) 28. STACKD 29.
SECTION SIX - APPENDIX MIDI CC List Parameter 40 CC# Parameter CC# Pickup Type/Off CC 1 Wah On/Off Wah Type Wah Minimum Wah Maximum Wah Pedal CC CC CC CC CC 2 3 4 5 6 Amp Morph Cabinet Morph Amp/Cabinet Morph CC 79 CC 80 CC 81 Comp On/Off Comp Attack Comp Threshold Comp Ratio Comp Gain CC CC CC CC CC 8 9 10 11 12 Gate On/Off Gate Type Gate Threshold Gate Attack Gate Pluck CC CC CC CC CC 50 51 52 53 54 IPS On/Off IPS Type IPS Level IPS Param 1 IPS Param 2 IPS Param 3 Whammy Pedal CC CC CC
SECTION SIX - APPENDIX MIDI Implementation Specifications A/D Converter: 24 bit D/A Converter: 24 bit Sampling Frequency: 44.1 kHz DSP Section: Dual Audio DNA™ DSP architecture Connections: Guitar Input and Outputs: 1/4" TS Jam-A-Long/Learn-A-Lick: 1/8" Stereo TRS Headphone: 1/4" Stereo TRS MIDI: In and Out/Thru General: Frequency Response: 20 Hz. – 20 kHz. +0, -3 dB S/N ratio: Greater than 95 dB; ref = max signal, 22kHz measurement bandwidth. Total Harmonic Distortion: Less than 0.04% (1kHz).
DIGITECH 8760 S. SANDY PARKWAY SANDY, UTAH 84070 PH (801) 566-8800 FAX (801) 566-7005 INTERNATIONAL DISTRIBUTION 8760 S. SANDY PARKWAY SANDY, UTAH 84070 USA PH (801) 566-8800 FAX (801) 566-7005 DIGITECH, GENETX,AUDIO DNA, AND GNX1 ARE TRADE MARKS OF THE HARMAN MUSIC GROUP INC. COPYRIGHT THE HARMAN MUSIC GROUP PRINTED IN THE USA 02/2001 MANUFACTURED IN THE USA GNX1 USER’S GUIDE 18-6378-A PLEASE VISIT DIGITECH ON THE WORLD WIDE WEB AT: http://www.digitech.