Owner’s Manual Professional Audio Equipment
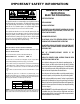
IMPORTANT SAFETY INFORMATION WARNING FOR YOUR PROTECTION READ THE FOLLOWING: KEEP THESE INSTRUCTIONS The symbols shown above are internationally accepted symbols that warn of potential hazards with electrical products. The lightning flash with arrowpoint in an equilateral triangle means that there are dangerous voltages present within the unit. The exclamation point in an equilateral triangle indicates that it is necessary for the user to refer to the owner’s manual.
IMPORTANT SAFETY INFORMATION ELECTROMAGNETIC COMPATIBILITY This device complies with part 15 of the FCC Rules and the Product Specifications noted on the Declaration of Conformity. Operation is subject to the following two conditions: • • t his device may not cause harmful interference, and this device must accept any interference received, including interference that may cause undesired operation. Operation of this unit within significant electromagnetic fields should be avoided.
Warranty We at DigiTech® are very proud of our products and back up each one we sell with the following warranty: 1. The warranty registration card must be mailed within ten days after purchase date to validate this warranty, or you can register via our website (www.digitech.com). 2. DigiTech warrants this product, when used solely within the U.S., to be free from defects in materials and workmanship under normal use and service. 3.
Table of Contents Overview..........................................................................................3 Quick Start......................................................................................4 Guided Tour - Front Panel..............................................................10 Guided Tour - Rear Panel................................................................16 Making Connections.......................................................................19 Selecting a Loop......
Loop / Single Phrases......................................................................46 Rhythm Type....................................................................................48 Rhythm Out.................................................................................................... 49 Deleting Individual Loop Phrases..................................................50 Erase All Loops - Internal Memory...............................................52 Using Optional SD/SDHC Memory Cards...
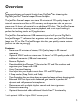
Overview C ongratulations and special thanks from DigiTech® for choosing the DigiTech JamMan® Stereo Looper/Phrase Sampler. The JamMan Stereo Looper can store 35 minutes of CD-quality loops in 99 internal memories and has an SD memory card expansion slot so you can store over 16 hours of material in an additional 99 slots. The JamMan Stereo features true stereo looping, reverse playback, and a mic input making it perfect for backing tracks or DJ applications.
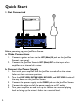
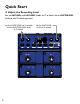
Quick Start 1. Get Connected Before powering up your JamMan® Stereo: a. Make Connections 1. 2. Connect a guitar or bass to the Left (Mono) IN jack on the JamMan Stereo’s rear panel. Connect the JamMan Stereo’s Left (Mono) oUT to the input of an amplifier or a channel of a mixer. b. Connect the Power Supply 1. 2. 3. 4. 5. 4 Start with your amplifier and the JamMan turned off or the mixer faders at their minimum position.
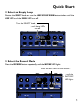
Quick Start 2. Select an Empty Loop Rotate the SELECT knob or use the Loop Up/Loop Down footswitches until the Loop LED and the Single LED are off. Turn the SELECT knob... ...until these LEDs are off. 99 3. Select the Record Mode Press the REC MODE button repeatedly until the INST/MIC LED lights. Press the RECORD MODE button... 99 ...
Quick Start 4. Adjust the Recording Level Set the Inst level and Loop Level knobs to 12 o’clock. Set the rhythm level knob to the 9 o’clock position.
Quick Start 5. Start Recording Press the REC/Play/overdub (lower left) footswitch to start recording. While recording, the Rec/Play/Overdub footswitch and Record LEDs will light red. Press the REC/PLAY/OVERDUB (lower left) footswitch. 99 While recording, the RECORD and REC/PLAY/OVERDUB LEDs light solid red.
Quick Start 6. Start Loop Playback Press the rec/play/overdub (lower left) footswitch while recording to set the loop point and start playing back from the beginning. The Rec/Play/ Overdub footswitch and Play LEDs light green. Adjust the loop level and rhythm level knobs as needed. Press the REC/PLAY/OVERDUB (lower left) footswitch while recording to stop recording and start playback. Adjust the LOOP LEVEL and RHYTHM LEVEL knobs as necessary.
Quick Start 7. Stop Playback/Store the Loop Press the TEMPO/STOP (lower right) footswitch to stop playback, then press the Store button twice to store the loop. First press the TEMPO/STOP (lower right) footswitch to stop playback. 99 Then press the STORE button twice to store the loop.
Guided Tour - Front Panel 1 2 3 4 5 6 7 8 20 19 18 17 9 10 11 12 16 13 15 14 1. Loop Level Controls the playback level of the loop phrase. 2. Rhythm Level Controls the level of the Rhythm guide track. 3. Loop/Single/Card Mem LEDs Loop LED This green LED indicates the current phrase memory is set to playback continuously as a loop when play is initiated.
Guided Tour - Front Panel recorded will be recorded as a loop phrase. Loop phrases can be converted to Single phrases and vice versa. The Loop LED will also flash during processes where the internal memory or optional SD memory is being accessed (loading a loop, Time Stretching, or store/ copy procedure). Single This yellow LED indicates the current phrase memory is set to playback only once when play is initiated. Single phrases can be converted to Loop phrases and vice versa.
Guided Tour - Front Panel 6. Mic Level Knob This knob controls the input signal level from the XLR Mic Input jack. 7. Peak LED This LED lights when Instrument, Mic, or Aux Input signals are detected by the JamMan® Stereo. This LED will light green when a signal is present, yellow when approaching the A/D clipping point, and red when clipping is present. A good practice is to set the Inst Level and Loop Level controls at the 12 o’clock position when using an electric guitar or bass.
Guided Tour - Front Panel Aux Input (Finish) LED This LED indicates the Aux Input is selected for recording (see page 34). When the Shift button is enabled, this LED will light when the “Finish” stop mode is selected for the Loop. Center – (Fade) LED This LED lights when the Aux Input is selected for recording with the Center – (center minus) option applied (see page 34). When the Shift button is enabled, this LED will light when the “Fade” stop mode is selected for the Loop.
Guided Tour - Front Panel Press this button while the Shift button is lit to change the playback status of a recorded phrase. When the Loop LED is lit the phrase will play back in an endless loop. When the Single LED is lit, the phrase will play once and stop. 12. Dry Defeat (Time Signature) Button Press and hold this button to defeat dry signal through the JamMan® Stereo.
Guided Tour - Front Panel 16. Loop Down Footswitch This footswitch selects the next lower loop memory. Press and hold this footswitch to scroll quickly through internal and optional SD card memories. 17. Reverse (Rhythm Type) Button Press this button to make the recorded loop phrase play back in reverse. Press this button while the Shift button is lit to change the Rhythm Type. Turn the Loop Select knob to change the active rhythm guide track.
Guided Tour - Rear Panel 2 1 1. 3 4 5 6 7 8 9 10 Mic Input Connect a microphone here. The mic input accepts low impedance dynamic or self-powered condenser microphones. The mic input is recorded to both left and right channels of a loop recorded in the JamMan® Stereo. 2. Left (Mono) and Right Outputs Connect the Left (Mono) output to the input of a guitar amplifier, mixer channel, another pedal’s input, or amp effects return.
Guided Tour - Rear Panel Connect a second instrument or second output from a previous pedal for stereo operation. Left and Right inputs are processed separately through the looper and then fed to the Left and Right outputs to keep true stereo separation between channels. 4. Headphone Output This is a stereo headphone output that lets the JamMan® Stereo be used without having to connect to an amp or mixer.
Guided Tour - Rear Panel in the JamMan® Stereo before use (see page 55). The JamMan Stereo ships with 35 minutes of internal stereo loop memory. 9. USB Jack The USB jack provides a connection to a Windows or Mac computer for transferring loop files to and from the JamMan Stereo via the downloadable JamManagerTM loop librarian application. 10. Power Jack Connect the included power supply here. The JamMan Stereo can only be powered by using the external adapter.
Making Connections Instrument - Mono Instrument - Stereo 19
Making Connections Mic/Vocal Performance 4 6 4 2 6 4 8 2 0 6 6 0 0 0 +1 -4 Pan Pan Pan +4 -4 Pan +4 -5 +5 Mute Mute Mute Mute Mute Mute L/R L/R L/R L/R L/R L/R L/R +10 +10 +10 +10 +10 +10 +10 +5 +5 +5 +5 +5 +5 +5 0 0 0 0 0 0 0 +10 +5 0 -5 -5 -5 -5 -5 -5 -5 -5 -10 -10 -10 -10 -10 -10 -10 -10 -20 -20 -30 - -30 - -20 -20 -30 - -20 -30 - 2 -20 -30 - 3 -20 -30 - 4 -30 - 5 DJ Setup Aux Return 6 +2 +3 Mute 1 0 +1 -2 L
Making Connections MP3 Player/Headphones 2 Backing Tracks Backing tracks (no rhythm guide track) 4 6 4 2 6 4 8 2 0 6 6 -1 0 0 +1 -2 Pan -1 +2 L/R -1 +2 L/R -1 +2 L/R -1 +2 L/R -1 +2 L/R 8 -1 +2 L/R Pan +3 +10 +10 +10 +10 +10 +10 +5 +5 +5 +5 +5 +5 +5 0 0 0 0 0 0 0 -5 -5 -5 -5 -5 -5 -5 -10 -10 -10 -10 -10 -10 -10 -10 -20 -20 -20 -20 -20 -20 -20 -20 -30 - -30 - -30 - -30 - -30 - -30 - -30 - -30 - 4 5 +5 L/R +10 0 -5 3 Pan
Selecting a Loop The JamMan® Stereo has two banks of loop memory, internal and optional card memory. There are 99 memory locations available in each of these banks for a total of 198 memories when an optional SD/SDHC memory card is installed. The card memory bank is only available when a memory card is installed. To select loops, Press either the Loop Up or Loop Down footswitches or use the LOOP SELECT knob next to the display.
Selecting a Loop Loop Down footswitch Loop Select knob Loop Up footswitch 99 23
Recording a Loop - Inst/Mic Input The JamMan® Stereo is designed to be very simple to use right out of the box. This section explains how to record a phrase and play it back as a continuous loop. You should have an instrument or audio device connected to the 1/4” inputs or a mic connected to the XLR mic input before proceeding. NOTE: The maximum loop time the JamMan Stereo can record or play is 10 minutes. 1. 2. 3. 4. 5. 6.
Recording a Loop - Inst/Mic Input 1 99 3 4 2 5 6 25
Auto Record Mode The JamMan® Stereo’s Auto Record feature lets the JamMan automatically begin recording when you begin playing or when audio is detected at the JamMan Stereo’s inputs. When enabled, Auto Record works globally on all empty loop memories; you cannot use Auto Record with an existing loop.
Auto Record Mode Auto Record button 99 27
Recording a Loop Using Auto Record The JamMan® Stereo has an Auto Record feature that automatically starts recording when signal is detected at any of the JamMan Stereo’s inputs. NOTE: The maximum loop time the JamMan Stereo can record or play is 10 minutes. You can’t auto-record on an existing loop; Auto Record is only available when an empty loop memory is selected. Here is how to use Auto Record when recording a loop. 1.
Recording a Loop Using Auto Record 2 1 99 4 3 5 6 29
Recording Overdubs Once a loop phrase is recorded, you can add overdubs over the top of it. Overdubs can only be recorded to Loop phrases and not to Single phrases. 1. 2. 3. 4. Use the Select knob or the Loop Up/Loop Down footswitches to select a previously recorded Loop phrase, or use a newly recorded phrase that has not yet been stored. The LOOP LED must be lit if a previously recorded phrase is selected. If the CARD MEM LED is lit, you have selected a loop on the optional memory card.
Recording Overdubs 1 99 2 3 4 31
Undo, Redo, and Clear You can undo or redo an overdub anytime you remain in the current memory where the overdub was recorded. You can also use a footswitch to clear all unstored loop phrase audio. Note: Changing loops discards any unstored overdubs. Storing the overdubs will also remove the ability to undo or clear overdubs. Undo an Overdub Press and hold the REc/play/overdub footswitch for two seconds to undo your last overdub.
Undo, Redo, and Clear 99 Press and hold to undo or redo an overdub. Press and hold to clear overdubs and unstored phrases.
Recording a Loop - Aux Input The JamMan® Stereo can record directly from an MP3 or CD player. This feature is useful for learning and practicing new songs as well as creating backing tracks. You should have an audio source connected to the AUX INPUT before proceeding. Select an empty memory location using the SELECT knob or LOOP UP/LOOP DOWN footswitches (the LOOP and SINGLE LEDs will be off). 2. Press the RECORD MODE button and choose one of four AUX INPUT modes: a.
Recording a Loop - Aux Input 2 1 3 2 5 99 4 6 7 35
Stop Modes Loop Phrases can be stopped in three ways after the Tempo/Stop footswitch is pressed: • STOP: Stops the phrase immediately when Stop is pressed. • FINISH: Finishes playing to the end of the phrase and stops after Stop is pressed. • FADE: Fades the phrase volume to 0 and then stops after Stop is pressed. To change Stop Modes, follow these steps: 1. 2. 3. 4. Press the Shift button. It will now be lit.
Using Auto-Quantize Looping There are two ways you can record loops using the JamMan® Stereo, freeform looping or using the JamMan Stereo’s Auto-Quantize feature. Free-form looping (see page 24) is the standard way loopers have been used since their inception. You initiate recording, play, and then set the loop point when you reach the end of your passage. The loop point is set exactly when you press the pedal and the tempo for the loop is then calculated and displayed.
Storing/Copying Phrases Anytime a change is made to a loop memory location (Rhythm Type, Tempo, Time Signature, Record, Overdubs etc.) the Store button will immediately light. This indicates that the changes will be lost unless a store procedure is performed before selecting a new loop memory location, turning off the power. Store Changes to a Loop 1. 2. 3. 4. Stop any recording activity using the TEMPO/STOP footswitch. Press the store button.
Storing/Copying Phrases 2 3 4 Store Changes to a Loop 99 1 3 Copy a Loop to a Different Memory Location 5 2 4 99 1 39
Time Signature The JamMan® Stereo is capable of recording in different Time Signatures. A Time Signature must be set up prior to recording in a memory location. Once a phrase has been recorded, Time Signature cannot be changed. To set the Time Signature, follow these steps: 1. 2. 3. 4. 5. Use the SELECT knob or LOOP UP/DOWN footswitches to select a new memory location. (The Loop LED and Single LED will be off.) Press the Shift button. It will now be lit. Press the Time Signature button.
Time Signature 2 5 3 1 4 99 41
Setting a Loop Tempo for Recording Before you begin recording a phrase, you may want to set a tempo at which you want to record the loop at. Setting the tempo in an empty loop memory location automatically starts playing the rhythm guide track (Rhythm Level must be turned up to hear the guide track). You can use the rhythm guide track as a metronome for recording against to help keep a consistent tempo of your performance. To set the tempo for recording, follow these steps: 1. 2. 3. 4.
Setting a Loop Tempo for Recording 3 1 99 4 2 43
Time Stretching a Loop Once a loop phrase is recorded, you can change the playback tempo which speeds up or slows down the playback of the phrase without changing its pitch (Time Stretch). Time Stretching a loop is a very useful feature in case the band is playing slightly slower or faster than normal or you just want to change the pace of a backing track slightly. You can Time Stretch a loop while stopped or during playback.
Time Stretching a Loop 1 Time Stretch a Loop that is Stopped 99 2 Time Stretch a Loop that is Playing 3 3 99 2 1 45
Loop / Single Phrases Any phrase recorded into the JamMan® Stereo can be played in two ways: Either as a continuous Loop, or as a Single “one-shot” sample. Single phrases are designed to play the recorded phrase only once and stop. All phrases are recorded as loops by default but they can be changed to a Single phrase if desired. You can always change Single phrases back to Loops later without harming the phrase. To change between Single and Loop, follow these steps: 1. 2. 3. 4.
Loop / Single Phrases 1 99 3 2 4 47
Rhythm Type The JamMan® Stereo’s guide track has 9 rhythm types to select from. These range from a simple click metronome to various drum samples as the rhythm guide (a tempo must be defined and the Rhythm Level knob must be turned up to hear the guide track). To change the Rhythm Type, follow these steps: 1. 2. Select a memory location using the Select knob. If the memory location is empty (LOOP and SINGLE LEDs are off), set a tempo using the Tempo/Stop footswitch.
Rhythm Type 3 1 5 99 4 6 7 2 Rhythm Output The Rhythm Output isolates the rhythm guide track from the left and right outputs and provides a mono mix of the JamMan® Stereo’s looped audio. This is useful for someone like a drummer in the band who needs to follow a click track but also wants to hear the looped audio. It also prevents the rhythm guide track from being heard by the audience through an amp or PA system connected to the left and right outputs.
Deleting Individual Loop Phrases The JamMan® Stereo has 99 memory locations and at some time you may need to delete the contents of a memory location so it may be reused or to free up memory. To delete a loop from a memory location, follow these steps: 1. 2. Press the shift button. It will now be lit. Press the DELETE button. The DISPLAY shows EL (Erase Loop). The button will begin flashing waiting for a delete confirmation.
Deleting Individual Loop Phrases 1 99 2 3 4 51
Erase All Loops - Internal Memory The JamMan® Stereo uses both internal memory and optional card memory for the storage of loop files. You can erase all loops from internal memory or from card memory without having to delete them one at a time. To erase all loops from internal memory, follow these steps: 1. 2. 3. 4. 5. 52 Select a loop memory location that does not light the CARD MEM LED. Enable the Shift button.
Erase All Loops - Internal Memory 1 2 99 3 4 5 53
Using Optional SD/SDHC Memory Cards The JamMan® Stereo offers 35 minutes of total built-in loop memory storage. You can increase the loop memory by installing an optional SD/ SDHC memory card in the memory card slot on the rear panel. The JamMan Stereo is compatible with SD/SDHC card sizes up to 32GB for over 16 hours of total loop memory. The first time a memory card is inserted into the JamMan Stereo, it is recommended that you format the card using the JamMan Stereo’s format procedure (see page 55).
Using Optional SD/SDHC Memory Cards Formatting SD Cards A memory card that is inserted into the JamMan® Stereo for the first time should be formatted using the JamMan Stereo’s format procedure. To format an SD/SDHC Card in the JamMan Stereo, follow these steps: 1. 2. 3. Enable the Shift button and then press and hold the Delete button for four seconds. The display will show FO (Format) and this button will begin flashing. Press the Delete button again.
Erase All Loops - Memory Card The following Erase Loops procedure only erases JamMan Stereo loop data from a memory card. All other data and files on the card are left untouched. To erase all loops from an optional SD/SDHC memory card, follow these steps: 1. 2. 3. 4. 5. 6. Install an optional SD/SDHC memory card in the JamMan Stereo’s memory card slot on the rear panel. Select a loop memory location that lights the CARD MEM LED. Enable the Shift button.
Erase All Loops - Memory Card 1 3 2 99 4 5 6 57
Factory Restore This procedure will return the JamMan® Stereo to its original factory settings. All internal loop memories will be reformatted and the original 10 loops that shipped with the JamMan Stereo will be restored. Factory Restore does not affect any loops on the optional external SD memory card. WARNING: The Factory Restore procedure will erase all loops from the JamMan Stereo internal memory and restore it to its factory state. This procedure is permanent and cannot be reversed.
Optional FS3X Footswitch The optional FS3X Footswitch gives you hands-free control over loop selection, tempo, and stop functions. Mode Switch This footswitch is used for immediately undoing and redoing the last recorded overdub. Down Switch This footswitch is used to play the recorded phrase in reverse. Up Switch This footswitch can be used to set the tempo of a new loop or change the tempo (Time Stretch) of a stored loop. Playback Tempo can be changed even while the loop is playing using this footswitch.
JamManagerTM Librarian Software The JamManagerTM loop librarian software is available as a free download from the DigiTech website. This application runs on both Windows XP/ Vista/7 and Mac OS X computer systems, and lets you archive and transfer loops between the JamMan® Stereo and your computer. For more information, visit www.digitech.com.
Specifications Digital A/D/A Conversion: 24-bit Sampling Frequency: 44.1 kHz Loop File Format: 44.1 kHz, 16-bit (stereo), uncompressed WAV file USB: 2.0 High Speed (USB 1.1 compatible) Connector Type: 4-pin Type B Max. Individual Loop Time: 10 minutes Internal Memory Capacity: Over 35 minutes total loop time (up to 99 loops total) External Memory Type: SD/SDHC up to 32GB (optional) External Memory Capacity: Over 16 hours (10.
Specifications Left(Mono)/Right/Rhythm Outputs Connector Type: 1/4” Unbalanced (Tip-Sleeve)/Balanced (Tip-Ring-Sleeve) Output Impedance: 100 Ω Unbalanced/ 200 Ω Balanced Maximum Output Level: 10 dBu DFS Playback Unity Gain: Loop Level knob set to 12 o’clock position Headphone Output: Connector Type: 1/8” Stereo (Tip-Ring-Sleeve) Output Power: 87.
Specifications DigiTech® engineers are constantly working to improve the quality of our products. Specifications are therefore subject to change without notice.
DigiTech® 8760 South Sandy Parkway Sandy, Utah 84070 PH (801) 566-8800 FAX (801) 566-7005 www.digitech.com JamMan® Stereo Owner’s Manual 18-0707V-B Printed in China DigiTech® and JamMan® Stereo are registered trademarks of HARMAN. All other product name and trademarks are the property of their respective owners, which are in no way associated with DigiTech. ©2011 HARMAN.