Integrated Effects Switching System Owner’s Manual 1
Safety Information WARNING FOR YOUR PROTECTION READ THE FOLLOWING: KEEP THESE INSTRUCTIONS The symbols shown above are internationally accepted symbols that warn of potential hazards with electrical products. The lightning flash with arrowpoint in an equilateral triangle means that there are dangerous voltages present within the unit. The exclamation point in an equilateral triangle indicates that it is necessary for the user to refer to the owner’s manual.
Table of Contents Section One - Introduction Getting Acquainted........................................................... 1 Included Items................................................................... 1 About the RP500.............................................................. 1 Pedalboard Mode........................................................... 1 Preset mode and Pedalboard Mode.......................... 1 Bypass Mode...................................................................
Warranty We at DigiTech® are very proud of our products and back up each one we sell with the following warranty: 1. The warranty registration card must be mailed within ten days after purchase date to validate this warranty. 2. DigiTech warrants this product, when used solely within the U.S., to be free from defects in materials and workmanship under normal use and service. 3.
Section 1 - Introduction Getting Acquainted Congratulations on your purchase of the RP500. You now own a very powerful integrated effects switching system allowing you extra control over stompboxes, effects, amplifiers and cabinets. The RP500 combines the simplicity of a stompbox with the control of an effects switching system for control the way you want it.
it is lit, amp/cabinet modeling is globally bypassed in all presets. Amp/Cabinet Bypass can be used in either Preset or Pedalboard modes. Tuner Mode The Tuner in the RP500 allows you to quickly tune or check the tuning on your guitar. Enter Tuner mode by pressing and holding the Bypass Footswitch for 2 seconds. The Display briefly shows tuner indicating that you are in Tuner mode. To begin tuning, play a note on your guitar (a harmonic at the 12th fret usually works best).
Master Level (Knob 6) This knob controls the overall output volume of all of the RP500’s presets and is used to adjust other effect parameters in the matrix. X-EditTM Editor/Librarian You can edit your RP500 with your computer, using the X-EditTM Editor/Librarian, found on the included DVD. Presets Presets are named and numbered locations of programmed sounds which reside in the RP500. Presets are recalled with the Footswitches.
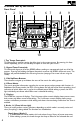
A Guided Tour of the RP500 Front Panel 1 2 34 5 6 7 8 9 10 1.Tap Tempo Footswitch This footswitch is used for setting the delay time in the current preset. By pressing this footswitch repeatedly you can set the delay to repeat in time with your music. 2. Bypass/Tuner Footswitch This footswitch bypasses all of the RP500’s effects sending an unprocessed signal out all of the outputs. Pressing and holding the Bypass footswitch accesses the RP500’s chromatic tuner.
pressing the knob will turn the effect row on or off. When editing an Effect row, press this knob to turn the effect on or off. When editing the Amp/Cabinet row, pressing this knob will switch between editing the amp or the cabinet. 3. When the Expression row is selected, this knob selects the Expression, LFO 1, LFO 2, and Wah parameter links, and pressing this knob has the same effect as turning it. Effects Library (Knob 2) 1.
8. Up/Down Footswitches These Up/Down footswitches select preset banks or they select individual presets when Pedalboard mode is active. 9. Expression Pedal The Expression Pedal provides real-time control of the RP500’s Volume, Wah, or any assigned effect parameter. Almost every parameter is available for Expression Pedal control. The Expression Pedal also turns on and controls the Wah effect when you apply extra pressure to the toe. 10.
Rear Panel 1 2 3 4 56 7 89 1. Input High impedance 1/4” instrument input. 2. Amp/Mixer Switch This switch optimizes the 1/4” Line Outputs for connecting to either a guitar amp system or directly into the inputs of a mixer. 3. 1/4” Line Outputs These 1/4” outputs can be plugged into a guitar amplifier or into inputs of a mixer or recording device. The front panel Master Level controls the level of these outputs. 4. Headphone Output Connect headphones here.
Getting Started Making Connections There are several different connection options available with the RP500. Before connecting the RP500, make sure that the power to your amplifier and the RP500 is turned off. There is no power switch on the RP500. To turn the RP500 on or off, connect or disconnect the included PS0913B power supply from the Power Input jack. Amp/Cabinet Bypass The RP500 lets you bypass its amp and cabinet tones so you can apply its effects to your own amp/cabinet tone.
Stereo Mixer Setup 4 6 4 2 6 4 8 2 0 0 6 -1 0 0 +1 -2 -4 Pan +5 Pan +5 Pan +5 Pan +5 Pan +5 0 +1 -2 0 +1 -2 +2 +3 -3 +5 Pan Aux 2 10 -1 +2 +4 -4 -5 6 8 0 +3 -3 +4 -4 -5 Aux 1 10 4 Aux 2 10 -1 +2 6 8 0 6 8 2 0 0 +1 -2 +3 -3 +4 -4 -5 4 Aux 1 10 4 Aux 2 10 -1 +2 6 8 2 0 6 8 2 0 0 +1 -2 +3 -3 +4 -4 -5 4 Aux 1 10 4 Aux 2 10 -1 +2 6 8 2 0 6 8 2 0 0 +1 -2 +3 -3 +4 -4 -5 4 Aux 1 10 4 Aux 2 10 -1 +2 6 8 2 0 6 8 2 0 0 +1 -2 +3 -3
Applying Power Before applying power to anything, set your amp(s) to a clean tone and set the tone controls to a flat EQ response (on most amps, this should be set to 5 on EQ’s to obtain the amp’s natural voicing.). Then follow the steps listed below. 1. Turn the amp volume all the way down. 2. Connect the plug of the PS0913B power supply to the power jack on the rear panel of the RP500. 3. Connect the other end of the PS0913B power supply to an AC outlet.
Section Two - Editing Functions Editing/Creating Presets The RP500 is designed to make preset editing and creation easy and intuitive. When creating your own sound, you must first start with an existing preset. Note that the preset you begin with doesn’t have to be in the memory location you intend to have it reside, since you can store it to any User preset location during the store procedure. The easiest way to start is by using the Tone Library and Effects Library knobs.
Storing/Copying/Naming a Preset Once the preset has been modified to your liking, you may store your settings to any of the 100 User preset locations (presets 1-00). The following steps outline the procedure for storing changes to a preset or copying a preset to a different location: 1. Press the Store button once. The Store button LED blinks and the first character in the Display flashes, indicating that you can now name your custom creation. 2.
Section Three - Effects and Parameters About the Effects The RP500 can be thought of as an assortment of “virtual” amplifiers and individual, high-tech stompboxes in a single programmable package. With stompboxes, the order in which they are connected affects the overall sound. The RP500 has placed the Amps and Effects in an order for optimum results. The following diagram shows the order in which they are connected.
Distortion The RP500 includes the tones of many popular distortion stompboxes, each of which can be fully dialed in. Distortion - Knob 1 selects a Distortion. Press this knob to turn the selected Distortion on and off.
Amplifier The amplifiers are an assortment of popular vintage and modern amp tones. The amplifiers also include acoustic guitar simulations. Amp - By default, Knob 1 selects one of the classic, modern, and DigiTech custom Amp types. Note that when you select an Amp, the default cabinet is automatically selected. You can, however, change the cabinet after selecting an Amp to achieve different tones. Press this knob and turn it to select a cabinet.
Cabinet - Knob 1 also selects cabinets.
EQ The RP500’s EQ helps further shape your tone with Low, Mid, and High controls. Knob 1 - Press Knob 1 to turn the EQ on and off. Low Level - Knob 2 adjusts the Low EQ level. Ranges from -12dB to 12dB. Mid Frequency - Knob 3 selects the frequency that the Mid parameter adjusts. Range Is from 300 Hz to 4000 Hz. Mid Level - Knob 4 adjusts the Mid EQ level. Range is from -12dB to 12dB. High Frequency - Knob 5 adjusts the High EQ frequency.
Chorus/FX The Chorus/FX row in the RP500 is a multi-function module, allowing you to select Effect types such as Chorus, Flanger, Phaser, Vibrato, Rotary Speaker, Tremolo, Panner, Envelope Filter, Detune, Whammy™, Pitch Shift, Detune, IPS, OC Octaver and more. When the Chorus/FX row is selected, Knob 1 is used to choose the Effect type. Press this knob to turn these Effects on and off. Only one of the effects in this row can be used at a time.
Phaser A phaser splits the incoming signal, and then changes the phasing of the signal. This signal is then taken in and out of phase and mixed back in with the original signal. As the phasing changes, different frequencies get canceled resulting in a warm sort of twisting sound. The RP500 includes the following Phaser types: phaser (the DigiTech Phaser), trigphas (the DigiTech Triggered Phaser), mx phasr (based on an MXR Phase 100), and eh phasr (based on an Electro-Harmonix Small Stone).
VibroPan (vibropan) A vibrato is an effect that modulates the pitch of the incoming signal. This will take the whole signal slightly in and out of tune at a steady pace. The DigiTech® VibroPan also incorporates an automatic panner with the vibrato effect that creates a lush chorus-like sound. Pre/Post Amp - Knob 2 determines where the effect appears in the effects chain. Turn counter-clockwise for Pre (appears before the Distortion effect), or clockwise for Post (appears after the Noise Gate effect).
Envelope Filter (eNvfiltr) The DigiTech Envelope Filter is a dynamic Wah effect that alters your sound based upon how hard you play. Pre/Post Amp - Knob 2 determines where the effect appears in the effects chain. Turn counter-clockwise for Pre (appears before the Distortion effect), or clockwise for Post (appears after the Noise Gate effect). Sensitivity - Knob 3 adjusts the sensitivity or the input signal required to trigger the Wah effect. Ranges from 0 to 99.
SynthTalkTM (synthtlk) SynthTalkTM is another effect exclusive to DigiTech®. It makes your guitar appear to speak based upon the dynamics of your playing style. Pre/Post Amp - Knob 2 determines where the effect appears in the effects chain. Turn counter-clockwise for Pre (appears before the Distortion effect), or clockwise for Post (appears after the Noise Gate effect). Attack - Knob 3 adjusts the attack of the synthesized voice. Ranges from 0 to 99.
DigiTech Whammy® (wHammy) The DigiTech Whammy® is an effect that uses an Expression Pedal to bend the pitch of the incoming signal, or add a bendable harmony with the original signal. As the Pedal is moved, the note bends either up or down. When DigiTech Whammy is selected, it is automatically placed before the internal amplifiers as shown in the block diagram on page 13. Pre/Post Amp - Knob 2 determines where the effect appears in the effects chain.
Harmony Pitch Shifting (harmony) Harmony Pitch Shifting makes a copy of the incoming signal, and then changes the pitch of the copied note to a diatonically correct interval specified by the Amount parameter. A Harmony Pitch Shifter sharpens or flattens the shifted pitch in order to keep the specified interval within the selected key and scale creating a true harmony. Pre/Post Amp - Knob 2 determines where the effect appears in the effects chain.
Knobs 2-6 have the following functions for the various Delay Effects: Knob 2 (Time) Knob 3 (Repeats) Knob 4 (Param. 1) Knob 5 (Param.
Section Four - Other Functions CD/MP3 Input The CD/MP3 Input allows you to connect an MP3 or CD player to the RP500 and jam with your favorite artists. The signal from your MP3 or CD player is output through the left, right, and headphone outputs of the RP500. To use the Aux Input, connect the headphone output of your MP3 or CD player to the CD/MP3 Input on the rear panel of the RP500 using an 1/8" stereo cable, and press play on your MP3 or CD player.
Expression Update The RP500’s Expression pedal has the option to update its position each time a preset change is made. The default behavior for the Expression pedal is to only update its position on a preset change when the Volume Pre or Volume Post parameter is linked within a preset. This lets the Expression pedal behave like a real volume pedal between preset changes.
Section Five - Appendix Specifications General Specifications A/D/A Converter: Sampling Frequency: DSP Section: Simultaneous Effects: Preset Memory: Dimensions: Unit Weight: 24-bit high performance audio 44.1 kHz AudioDNA2™ DSP Processor 10 100 User Presets (1-00) / 100 Factory Presets (F1-F00) 19.5˝ Length x 8.625˝ Width x 2.75˝ Height 6.6 lbs.
Tone Library OVERDRIVE DISTORTION HOT RAT SUSTAINER FUZZOH OVEREASY DIRTY TUBES ROCK 1 ROCK 2 BLUES 1 BLUES 2 METAL 1 METAL 2 COUNTRY 1 COUNTRY 2 WARM DRIVE CRUNCH TEXAS TONE ROCKABILLY SOLO 1 SOLO 2 ROCK WAH CHUNKY SMOOTH HEAVY CLEAN 1 CLEAN 2 BRITISH 1 BRITISH 2 AMERICAN 1 AMERICAN 2 TUBE DRIVE SCOOPED PUNCHY BRIGHT CLEAN BIG PUNCH SUPER GAIN GRINDER BAD BOY LEGACY LEAD SPRING REVERB CHORUS-DELAY CHORUS-DLEAY-REVERB FLANGER-DELAY PHASER-DELAY PHASER-MOD DELAY PHASER-REVERB DIGITAL DELAY-REVERB DELAY-SP
30
31
DigiTech® 8760 South Sandy Parkway Sandy, Utah 84070 PH (801) 566-8800 FAX (801) 566-7005 http://www.digitech.com DigiTech® is a registered trademark of Harman Copyright - Harman Printed in China RP500 Owner’s Manual 18-0710-B Disclaimer: DigiTech®, RP500™, DigiTech Whammy®, MultiChorus®, AutoYa™, YaYa™, SynthTalk™, Grunge®, DOD®, Lexicon®, and AudioDNA® are trademarks of Harman.