Security Festplatte RS128 Benutzerhandbuch User Manual
Das Gerät Anschluss an USB 2.0 Steckplatz Anschluss an USB 1.
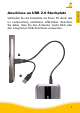
Deutsch Das Gerät Umschalter USB Status-LED Signalempfänger (RFID) Mini-USB Anschluss Stromanschluss 4
Verbinden Sie die Festplatte mit Ihrem PC durch das im Lieferumfang enthaltene USB-Kabel. Beachten Sie dabei, dass Sie den A-Stecker (siehe Bild) oder den integrierten USB-Anschluss verwenden. A B 5 Deutsch Anschluss an USB 2.
Deutsch Anschluss an USB 1.1 Steckplatz Verbinden Sie die Festplatte mit Ihrem PC durch das im Lieferumfang enthaltene USB-Kabel. Beachten Sie dabei, dass A- und B-Stecker angeschlossen sind (siehe Bild). A B Hinweis: Die Festplatte wird erst vom System erkannt, wenn sie eingeschaltet und entsperrt ist. (siehe Kapitel: „Sperren und Entsperren der Festplatte” - S.
Die Festplatte wird automatisch eingeschaltet sobald diese mit Strom versorgt wird, entweder über USB, Mini-USB oder den externen Stromanschluss. Sperren und Entsperren der Festplatte Um unbefugten Zugriff auf Ihre sensiblen Dateien zu verhindern, ist die Festplatte immer im gesperrten Zustand und muss für die Nutzung entsperrt werden Dazu führen Sie einen der beiden beigelegten RFID-Schlüssel über das Empfangssymbol der Festplatte.
Deutsch Hinweis: Die Festplatte kann ebenfalls durch das erneute Auflegen des Schlüssels oder durch das Ausschalten der Festplatte gesperrt werden. Partitionierung / Formatierung der Festplatte unter Windows Es besteht die Möglichkeit, die Festplatte in eine oder mehrere Partitionen einzuteilen. - Gehen Sie in die Systemsteuerung und klicken Sie „Verwaltung“ doppelt an. - Öffnen Sie die „Computerverwaltung“ wählen Sie „Datenträgerverwaltung“.
- Um die Festplatte zu formatieren, wählen Sie den Menüpunkt „Formatieren“. Hinweis: Alle Daten werden unwiderruflich gelöscht und können nach der Formatierung nicht wiederhergestellt werden. Um die Festplatte zu partitionieren, wählen Sie den Punkt „Volumen verkleinern“ aus. - Tragen Sie den gewünschten Speicherplatz (in MB) ein, auf den die Partition verkleinert werden soll. - Es wird jetzt ein nicht zugeordneter Bereich im Verwaltungsbildschirm angezeigt.
Deutsch Es öffnet sich jetzt der Partitionierungsassistent. - Klicken Sie auf „Weiter”.
Deutsch - Tragen Sie die gewünschte Größe der Partition in MB ein und klicken Sie dann auf „Weiter“.
Deutsch - Sie können der Partition einen Laufwerksbuchstaben zuweisen. - Klicken Sie anschließend auf „Weiter“.
- Die Partitionierung wird abgeschlossen, bestätigen Sie diesen Vorgang indem Sie auf „Fertig stellen“ klicken. Hinweis: Der neu partitionierte Bereich wird nun formatiert. Nach Abschluss der Formatierung wird die neue Partition automatisch vom System erkannt. 13 Deutsch - Wählen Sie das gewünschte Dateisystem, die Art der Formatierung und klicken Sie auf „Weiter“.
Deutsch Partitionierung / Formatierung unter MAC OS X Nachfolgend wird beschrieben, wie Sie das Dateisystem und die Partitionsgröße ändern können.
- Wählen Sie anschließend aus der linken Laufwerksübersicht die externe Festplatte aus. - Wählen Sie im Hauptregister „Partitionieren“ aus. die Option 15 Deutsch - Wählen Sie „Festplatten-Dienstprogramm“ aus.
Deutsch - In diesem Menü können Sie die Partitionsgrößen ändern, ganze Partitionen löschen oder neue Partitionen erstellen.
Es besteht die Möglichkeit, die Festplatte in mehrere Partitionen zu teilen. Die dazu nötige Vorgehensweise wird Ihnen hier auf der Basis von YaST von Suse Linux beschrieben. Dieser Vorgang ist unter anderen Linux Distributionen ähnlich. - Öffnen Sie zuerst YaST. Sie werden ggf. dazu aufgefordert sich zu authentifizieren. - Wählen Sie auf der linken Seite “System” und im rechten Feld „Partitionieren” aus.
Deutsch - Aus Sicherheitsgründen öffnet sich ein Fenster und Sie werden gefragt, ob Sie mit der Partitionierung bereits vertraut sind. Bestätigen Sie diese Meldung mit „JA”. - Darauf folgend öffnet sich die Datenträgertabelle Ihres Systems. - Hier können Sie den gewünschten Datenträger auswählen, partitionieren oder bereits vorhandene Partionen bearbeiten bzw. löschen. - Zum Löschen der vorhandenen NTFSPartition wählen Sie diese mit dem Cursor aus und klicken anschließend auf „Löschen”.
Deutsch - Sie werden vom System gefragt, ob Sie die Partition wirklich löschen wollen. Vergewissern Sie sich an diesem Punkt, dass Sie die richtige Partition ausgewählt haben und bestätigen Sie mit dem Klick auf „Ja”. Hinweis: Beim Löschen der Partition werden auch alle auf der Partition befindlichen Dateien unwiderruflich gelöscht. - Zum Erstellen einer neuen Partition auf dem freien Speicher des Datenträgers klicken Sie auf „Erstellen”.
Deutsch - Im nächsten Schritt werden Sie nach der Art der Partition gefragt. Hierbei empfiehlt es sich, in den meisten Fällen die „Primäre Partition” auszuwählen. - In diesem Fenster legen Sie alle Merkmale für die Partition fest. So können Sie zwischen verschiedenen Dateisystemen wählen, die Größe bestimmen und bei Bedarf sogar den Einhängepunkt in Ihr Linux-System festlegen. - Bestätigen Sie abschließend alle Ihre Angaben mit „OK”.
- Setzen Sie anschließend den Haken bei „Formatieren” und wählen Sie ein passendes Dateisystem aus. Bestätigen Sie alle Angaben mit „OK”. - Damit Ihre Änderungen wirksam werden, klicken Sie auf „Anwenden”. 21 Deutsch - Die Formatierung erfolgt ähnlich.
Deutsch - In einem neuen Fenster werden alle Ihre Änderungen aufgelistet. Vergewissern Sie sich erneut, dass alle Änderungen genau Ihrem Wunsch entsprechen und bestätigen Sie Ihre Einstellungen indem Sie auf „Anwenden” klicken. Hinweis: Sollten Sie sich bei der Wahl des richtigen Dateisystems und der jeweiligen Partitionsgröße unsicher sein, empfiehlt es sich, die automatisch eingetragenen Werte zu übernehmen.
FAT32 HFS+ EXT4 Win 98 X L, S X X Win NT, 2000, ME, XP, Vista L, S L, S X X Mac OS X L L, S L, S X Linux L L, S X L, S L - Lesen S - Schreiben X - Keine Kompatibilität Die DIGITTRADE Security Festplatte RS128 ist zum Zeitpunkt der Auslieferung bereits im NTFSDateisystem vorformatiert. In obiger Tabelle sehen Sie die Kompatibilität von NTFS zu Ihrem Betriebssystem.
Deutsch auch möglich, die DIGITTRADE Security Festplatte RS128 mit jedem anderen Dateisystem zu formatieren. Dies beeinflusst die Verschlüsselung der Daten nicht. Wenn Sie die Festplatte unter verschiedenen Betriebssystemen verwenden möchten, können Sie die Festplatte auch partitionieren und den einzelnen Partitionen verschieden Dateisysteme zuweisen. Beachten Sie hierbei auch die für das Dateisystem spezifischen Einschränkungen bzw. Unterschiede.
Kapazität lt. Hersteller 80 GB 160 GB 250 GB 320 GB 500 GB 750 GB 1000 GB verfügbare Kapazität 74,51 GB 149,01 GB 232,83 GB 298,02 GB 465,66 GB 698,49 GB 931,32 GB Es werden ausschließlich Festplatten von führenden Markenherstellern eingebaut. RFID-Transponder RFID (Radio Frequency Indentification) ist die Identifizierung mit Hilfe von elektromagnetischen Wellen. Ein RFID-System besteht aus einem Transponder, der sich an einem Gegenstand befindet und einem Lesegerät zum Auslesen der Transponderkennung.
Deutsch Schutzsysteme RFID-Zugriffskontrolle Der für den Zugriff auf die Festplatte notwendige 128-Bit-Schlüssel ist nach Advanced Encryption Standard (AES) verschlüsselt gespeichert. Datenverschlüsselung Die Daten auf der DIGITTRADE Security Festplatte RS128 werden durch ein integriertes Verschlüsselungsmodul mit 128-Bit nach AES verschlüsselt. Der AES-Verschlüsselungsalgorithmus bietet ein sehr hohes Maß an Sicherheit.
Wir empfehlen Ihnen, die sich auf der DIGITTRADE Security Festplatte RS128 befindenden Daten regelmäßig auf anderen Speichermedien zusätzlich zu sichern. Dies schützt Sie vor einem vollständigen Datenverlust. Die DIGITTRADE GmbH haftet nicht für den Verlust von Daten sowie für die dadurch entstehenden Kosten und Schäden. Aufbewahrung der Schlüssel Zum Lieferumfang der DIGITTRADE Security Festplatte RS128 gehören jeweils zwei RFID-Schlüssel.
Deutsch Des Weiteren ist es notwendig, dass Sie uns Ihr vollständig ausgefülltes Besitzer-Zertifikat zukommen lassen. Nur mit diesem kann ein Missbrauch des Schlüsselnachbaus ausgeschlossen werden. Bitte teilen Sie uns den Verlust bzw. Diebstahl Ihrer Festplatte unverzüglich mit. Dadurch kann der Nachbau der Schlüssel verhindert werden. FAQ - häufig gestellte Fragen Die Festplatte wird nicht vom System erkannt.
Ich habe einen oder beide Schlüssel verloren. Setzen Sie sich bitte umgehend mit unserem Support in Verbindung Tel.: 0345 / 2317353 E-Mail: beratung@digittrade.de Ausführliche Informationen finden Sie in unserem Support-Center auf www.digittrade.de. Ihre Fragen beantworten wir gerne telefonisch unter 0345/2317353 oder per E-Mail beratung@digittrade.de 29 Deutsch Das NFTS-Dateisystem kann nur von WindowsNutzern verwendet werden. (Siehe Kapitel: „Das richtige Dateisystem” - S.
Deutsch Hinweis zum Schutz und Erhalt der Umwelt Gemäß der EG-Richtlinie dürfen Elektro- und Elektronik-Altgeräte nicht mehr als kommunale Abfälle entsorgt werden. Zur Vermeidung der Verbreitung der enthaltenen Bausubstanzen in Ihrer Umgebung und zur Einsparung natürlicher Ressourcen bitten wir Sie, dieses Produkt nach Ablauf seiner Lebensdauer ausschließlich an einer lokalen Altgerätesammelstelle in Ihrer Nähe abzugeben.
English
Contents English The Device Connection to USB 2.0 Port Connection to USB 1.
English The Device USB Switch Signal Receiver Status LED USB Port AC Port 33
Connection to USB 2.0 Port English Connect the DIGITTRADE Security Hard Drive RS128 to your PC using the USB cable included in delivery. Please use therefore the A-plug or the integrated USB port as shown on the picture.
Connect the DIGITTRADE Security Hard Drive RS128 to your PC using the USB-cable included in delivery. Please note that the A- and B - plugs have to be connected as shown on the picture. A B Note: The hard drive will only be identified by the system, if it is turned on and unlocked. (see chapter “Locking and Unlocking of the hard drive”, p.8) 35 English Connection to USB 1.
Internal or external USB Move the USB switch to use either the integrated USB or the external USB. English Locking and Unlocking the Hard Drive To avoid unauthorized access to your sensitive data the DIGITTRADE Security Hard Drive RS128 is always locked and needs to be unlocked for use. Hold one of the two enclosed RFID keys above the reception symbol of the hard drive. The hard drive will be unlocked, if you hear a short acoustic signal and the green LED flashs.
Please follow the instructions to customise the file system, partition size and number of partitions. - Go to “control panel” and double click on “Administrative Tools”. - Open the “Computer Management” and choose “Disk Management”. - Choose with your mouse the external hard drive and open the context menu using the right mouse button.
- choose the menu item “Formatting” to format the hard drive English Note: All data will be deleted irrevocably and cannot be restored after formatting. To partition the hard drive choose the item “Shrink Volume”. - Type in the desired memory capacity (in MB). - An unassigned field will be shown in the administration display. - Mark this unassigned field with the mouse and open the context menu with the right mouse button and choose the item “New Simple Volume”. The partitioning assist will appear.
English - Click on “Next”. - Type in the desired size of the partition in MB and click on “Next”.
English - Choose a drive letter for the partition. - Click on “Next”.
English - Choose the desired file system, the type of formatting and click on “Next”. - The partitioning will be finished now, confirm this action by clicking on “Finish”. Note: The newly partitioned field will be formatted now. After the formatting is completed the new partition will be automatically identified by the system.
Partitioning / Formatting using MAC OS X English Please follow the instructions to customise the file system, partition size and number of partitions. - Select “Utilities” from “Applications”. - Choose “Disk Utility”.
English - Choose from the left drive overview the external hard drive. - Choose from “Partition”.
English - In this menu you can change partition sizes, delete partitions or create new partitions.
It is possible to divide the hard drive in several partitions. The instruction below is described on the base of YaST and Suse Linux. This procedure is similar under other Linux distributions. - First open YaST. If necessary, you will need to authenticate yourself. - Choose from the left side “System” and from the right field “Partitioner”. - For security reasons a window will open and you will be asked whether you are familiar with the partitioning. Confirm this with “Yes”.
- The volume table of your system will appear. English - Now you can choose the desired volume, partition it or edit or delete already existing partitions. - To delete the standard NTFS partition please click on it and afterwards on “Delete”. - You will be asked whether you really want to delete the partition. Make sure you have chosen the correct partition and confirm with a click on “Yes”.
- To create a new partition in the free space of your volume click on “Create”. - Choose a volume to create the new partition. - You will be asked which type of partition you want to create. It is recommended to use “Primary Partition”. 47 English Note: If you delete the partition, you will delete irrevocably all files stored on it.
English - In this window you decide features of the partition. You can choose between different file systems and sizes and if necessary you can configure a mountingpoint for Linux. Confirm your configuration with “OK”. Note: It is possible to encrypt your hard disk here additionally, but this may reduce the performance. - Formatting works similarly. Choose the desired partition and click on “Edit”. - Click on “Formatting” and choose the adequate file system. Confirm your configurations with “OK”.
English - Click on “Apply” that your modifications operate. - All modifications will be shown in a new window. Make sure all the modifications are correct and confirm the configurations by clicking on “Apply”. Note: If you are not sure which file system or partition size to choose, we recommend taking the automatically entered values. The Correct File System - In the table below you can see the compatibility between operating systems and file systems.
English NTFS FAT32 HFS+ EXT4 Win 98 X R, W X X Win NT, 2000, ME, XP, Vista, 7 R, W R, W X X Mac OS X R R, W R, W X Linux R R, W X R, W R - reading W - writing X - no compatibility With additional programs it could be possible to read or write on file systems, on which it usually is not possible. The DIGITTRADE Security Hard Drive RS128 is at the time of delivery already preformatted in the NTFS file system.
Technical Specifications Interface: Capacity: Spindle Speed: Data Transfer Rate: Access Time: Buffer Memory: Acoustic Idle: S-ATA II 150 80 GB - 1TB 5400 - 7200 RPM USB 2.0 max 480 MBits/s USB 1.1 max 12 MBits/s 12 ms 8192 - 16384 KB <24 dBA Computers and hard drive manufacturers convert differently from Byte to KByte, MByte and GByte. Hard drive manufacturers calculate in the metric 51 English DIGITTRADE Security Hard Drive RS128 with every other file system.
English system (1 kByte = 103 Byte = 1000 Byte) and computers use due to their construction the dual system (1 kByte = 210 Byte = 1024 Byte). The outcomes of this are the following differences in the representation of the memory capacity. HDD Manufacturer True Capacity 80 GB 74,51 GB 160 GB 149,01 GB 250 GB 232,83 GB 320 GB 298,02 GB 500 GB 465,66 GB 750 GB 698,49 GB 1000 GB 931,32 GB Only hard drives of leading manufacturers of proprietary goods are assembled.
RFID Access Control The Access to the DIGITTRADE Security Hard Drive RS128 is protected using a 128 bit encryption according to AES by RFID. Data Encryption Data stored on the DIGITTRADE Security Hard Drive RS128 will be encrypted or decrypted automatically by an integrated hardware encryption module. This module is using 128 bit AES algorithm to encrypt or decrypt the data.
Data Security and Disclaimer English We recommend storing continuously the data saved on the DIGITTRADE Security Hard Drive RS128 on other storage media. This will protect you against a total data loss. The DIGITTRADE GmbH is not liable for data loss and thereby emerging costs and damages. Storage of the Keys There are two RFID keys included in delivery of the DIGITTRADE Security Hard Drive RS128. The unlocking of the hard drive is only possible with one of these two keys.
English Please advise us immediately if a loss or theft of your hard drive occurs. Thereby a reproduction of the key can be avoided. FAQ - Frequently Asked Questions The system does not identify the hard drive. Please check whether the hard drive was unlocked by the key enclosed and whether USB switch is in the correct USB state. Please check also whether the USB cable is connected correctly (see chapter: “Connection to USB 2.0/1.1 port”, p.34). I cannot write any files on the hard drive.
For detailed information visit our support center on www.digittrade.de. English We will gladly answer your questions on the telephone: (0049) 345/ 2317353 or by e-mail: beratung@digittrade.de.
According to the EC directive, waste electrical and electronic equipment (WEEE) must not be disposed as municipal wastes. To avoid the spread of the contained fabric components in your environment and to save natural resources we would like to ask you to hand this product after its economic life time only to a collecting point for WEEE in your area. Thanks to these measures, materials of your product can be reused environmentally friendly.
© 2009 DIGITTRADE GmbH English Deutsch Dieses Handbuch ist urheberrechtlich geschützt und darf nicht (auch nicht teilweise) ohne schriftliche Zustimmung der DIGITTRADE GmbH kopiert werden. English This user manual is protected by copyright. No part of this material may be reproduced, transcribed, used or disclosed to any third party in any form or by any means, without the written permission of DIGITTRADE GmbH.