2-PORT POCKET USB KVM SWITCH WITH USB 2.0 HUB User's Manual (DC-11201-1 Rev.
Table of Contents I. II. Introduction…………………………………………………………... 3 1. Features…………………………………………………………………..........3 2. Package Contents…………………………………………………………….. 3 Specifications…………………………………………….….………. 4 1. General……………………………………………………………..……........ 4 2. Connectors………………………………………………………….………… 5 3. LED Indicators…………………………………………………….................. 6 3.1 Host Indicators…………………………………………………................. 6 3.2 USB HUB switch with PC1/PC2 Indicators………….……..……………. 6 3.
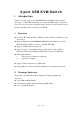
2-port USB KVM Switch I. Introduction Thank you for choosing 2-port USB2.0 KVM Switch with PS/2 keyboard and mouse ports, 3 USB 2.0 downstream ports, 2 upstream USB 2.0 ports, and 3VGA ports. Now, you can operate 2 computers with 1 monitor, 1 keyboard, and 1 mouse and share the USB devices connected to the KVM. 1. Features Controls 2 PCs with one PS/2 or USB keyboard, one PS/2 or USB mouse, and one monitor. Supports Windows 98/98SE/2000/Me/XP/VISTA, Linux Kernel 2.
II. 1. Specifications General Model DC-11201-1 Complies USB revision USB 1.0, 1.1,2.0 Working PC status LED 2 USB upstream port 2 VGA IN port 2 VGA OUT port 1 USB downstream port 3 PS/2 keyboard port 1 PS/2 mouse port 1 Power Jack DC-5V ( Optional for Power adaptor) Reset button 1 Video resolution 2048 X 1536. Hardware supported OS Supported Active PC selection PC/Mac/Sun Micro Windows 98/98SE/ME/2000/XP/Vista, Mac OS9/OSX Linux Kernel 2.
2. Connectors 1 Mini-din for PS/2 keyboard 1 Mini-din for PS/2 mouse 3 USB type A downstream connectors 2 USB type B upstream connectors DC-5V Power Jack Reset button 2 VGA input connectors (HDB15 Male), and one VGA output connector (HDB15 Female). USB 2.0 USB 2.0 USB 2.
Reset Button Side View 3. DC-5V Power Jack LED Indicators 3.1 Host Indicators (RED) ON: When host PC is available and active. Flash: Indicates which Host PC is selected but not power on 3.2HUB Switch with PC1/PC2 Indicators (GREEN) Hub Switch with PC1 ON (Green): All USB downstream HUB connect to PC1 Hub Switch with PC2 ON (Green): All USB downstream HUB connect to PC2 3.3Auto-Switch/Auto-Scan Indicator (GREEN) ON : Auto-Switch mode is active.
PC2 HOST (RED) PC1 HOST (RED) HUB switch with PC1(Green) Auto-Switch/ Auto-Scan ( Green ) HUB switch with PC2 ( Green ) III. 2-port USB KVM Switch installation 1. System requirements: • • Computer: USB port, VGA port Operating System: Windows 98/98SE/2000/ME/XP/Vista, Mac OS9/OSX, Linux Kernel 2.3 or Later, Solaris 8. • VGA Cable: 1 VGA female-to-male cable per computer • USB Cable: 1 USB cable with one Type-A end and one Type-B end per computer • 2. Hardware installation: a.
d. Connect the monitor VGA cable to KVM’s monitor output port. e. Connect PS/2 keyboard and mouse to the KVM’s PS/2 ports or USB keyboard and mouse to the KVM’s USB downstream ports (Except on Windows 98/SE). f. For Window 98/SE users, please go to next chapter for installation. g. Turn on the computers and make sure that the USB port is enabled and working properly.
Window 98/SE installation : For Window 98 and 98/SE system users, you will need a different step of installation. After the hardware installed, please follow up these steps to install the KVM switch : Step 1 : Remove PS/2 mouse and Keyboard devices from USB KVM Switch and plug them into PC Step 2 : Turn ON your PC Step 3 : Use USB KVM Switch push button to switch the screen to the target PC with Windows 98/SE system. Step 4 : Follow up the chapter 4.
4. Driver installation: 4.1 OS without driver installation No driver is needed for 2-port USB KVM Switch for the following operating systems. a. Windows ME/2000/XP b. MAC OS9/OSX c. Linux Kernel 2.3 or above d. Sun Micro Solaris 8 or above 4.2 Windows 98/98SE: After you connect 2-port USB KVM Switch to your PC, Win 98 will automatically detect the device and prompt for the driver installation. Please proceed the installation of driver by following the instructions from Step A-H.
Step B B. Click “Next” to initiate the search for the best driver for your device. Step C C. Click “Next” to start and search.
Step D D. Click “OK” to continue Step E E.
Step F F. Please specify the location of the Windows source disk and Click “OK” to continue. You may use “Browse” to locate the driver. (Ref Figure F) *Note: Your hidclass.sys file might be located in a different directory from the figure above. Step G G.
Step H H. Click “Finish”, Windows has finished installing the USB Human Interface Device driver for PS/2 keyboard & mouse.
5. On-Screen-Display(OSD) utility software installation for windows Place the enclosed CD into your CD-ROM drive. The AutoManual screen will automatically pop up on your monitor. Click the “Install OSD utility” button to proceed. If the AutoManual screen does not present, then please use the file explorer to choose the CDROM driver, and execute the AutoManual.exe. Step A A. Click “Next” to continue the installation Step B B.
Step C C. Click “Yes” to continue Step D D. Click “Start” to continue Step E E.
6. Using the OSD Program 6.
6.2 Interpreting the OSD window The OSD indicates the status of the connections, host PC and the USB device. Port connection status and active host Close Button Hide Button Host PC status There are four different status: A. “No PC Found” indicates no PCs are connected to the Pocket KVM or that connected PCs are off. B. “PC 1 On” indicates the first port has a PC connected to it, the PC is on and the active host. The second port either has NO PC connected to it, or the PC is connected, but not on.
C. “PC 2 On” indicates the second port has a PC connected to it, the PC is on and the active host. The first port either has NO PC connected to it, or the PC is connected, but not on. D. Both ports have PCs connected and on. The red letter and larger numeral indicates the second port is the active host. The green letter and smaller numeral indicates that the first port is NOT the active host, but is available for connection. 6.
6.4 Hiding and closing the OSD program When you click the “Hide” button, OSD program window will hide in Taskbar. When you click the “Close” button, OSD program will exit. If OSD program is hidden in Taskbar, you can right click on the taskbar icon to show or close the program. IV. Operate the 2-port USB KVM Switch 1. Manual Switch by push button 1.1 HOST selection You can switch to the next available active USB host connection by pushing the switch button on the 2-port USB KVM Switch 1.
You can activate Auto Switch Function by pushing the switch button for 3 second. The USB HUB will switch with Host together when Auto switch function is enable. 2.
Pressing any Keys excluding number key [ 1 ], [ 2 ], [ 3 ] and [ 4 ] to turn off the AutoScan Mode and the monitor screen will jump back to the original Host. When you activate the Auto-Scan mode, the USB KVM Switch alternates between the two PCs and displays them on the monitor. Each PC can be displayed at 5, 10, 15, or 20 seconds: 4.3 Auto-Scan Interval [n] *(Available only when Auto-Scan function is ON) You can change the Auto-Scan interval by pressing the appropriate number key or the number pad keys.
5. Sun Micro system Function key emulation : There are 16 special functions on the Sun Micro system keyboard, the USB KVM Switch can emulate these function keys via the PS/2 keyboard ( it won’t work on the USB keyboard ). Here is the mapping table for these function operation. To active these emulation on the PS/2 keyboard, you have to press the LEFT Window KEY first ( this key usually is located between the left [Ctrl] and left [Alt]), then choice the second relative key.
6.
V. Application Notes 1. IMPORTANT: Please select “Safely Remove Hardware” or “Eject” for USB devices connected to any of the 3 downstream USB ports on the 2-port USB KVM Switch before switching between the hosts. Switching hosts is equivalent of removing the USB devices, which may damage your USB devices or data if not removed properly by the OS. 2. The 2-port USB KVM Switch normally derives its own power from host computer.
Disclaimer Information in this document is subject to change without notice. The manufacturer does not make any representations or warranties (implied or otherwise) regarding the accuracy and completeness of this document and shall in no event be liable for any loss of profit or any other commercial damage, including but not limited to special, incidental, consequential, or other damages.