
Specifications


BOTTOM VIEW
1. Sharpness adjust (1~4)
2. Horizontal adjust (5~9)
3. Vertical adjust (10~12)
Installation
1. Turn off the PC and monitor.
2. Connect the VGA male extension cable between the PC
and the “VGA In” port of DC-40200.
3. Connect the DVI male extension cable between the
monitor and the “DVI Out” port of DC-40200.
4. Connect the power cord and turn on the DC-40200.
5. Turn on the PC and digital monitor or projector.
Support VGA mode
Analog Resolution Frequency(Hz)
VGA 640x480 60 / 72 / 75 / 85
VGA 720x400 70 / 85
SVGA 800x600 56 / 60 / 72 / 75 / 85
WVGA 848x480 60
XGA 1024x768 60 / 70 / 75 / 85
SXGA 1152x864 75
SXGA 1280x768 60RB / 75 / 85
WXGA 1280x800 60
SXGA 1280x960 60 / 85
SXGA 1280x1024 60 / 75 / 85
WXGA 1360x768 60
SXGA+ 1400x1050 60RB / 75
WXGA+ 1440x900 60
SXGA+ 1440x1050 60
UXGA 1600x1200 60
WSXGA+ 1680x1050 60
WUXGA 1920x1080 60
WUXGA 1920x1200 60RB
-3-
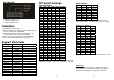
DIP Switch Settings
Horizontal Adjust
SW5 SW6 SW7 SW8 SW9 RESULT
OFF OFF OFF OFF OFF Left+16
OFF OFF OFF OFF
ON
Left+15
OFF OFF OFF
ON
OFF Left+14
OFF OFF OFF
ON ON
Left+13
OFF OFF
ON
OFF OFF Left+12
OFF OFF
ON
OFF
ON
Left+11
OFF OFF
ON ON
OFF Left+10
OFF OFF
ON ON ON
Left+9
OFF
ON
OFF OFF OFF Left+8
OFF
ON
OFF OFF
ON
Left+7
OFF
ON
OFF
ON
OFF Left+6
OFF
ON
OFF
ON ON
Left+5
OFF
ON ON
OFF OFF Left+4
OFF
ON ON
OFF
ON
Left+3
OFF
ON ON ON
OFF Left+2
OFF
ON ON ON ON
Left+1
ON
OFF OFF OFF OFF 0
ON
OFF OFF OFF
ON
Right+1
ON
OFF OFF
ON
OFF Right+2
ON
OFF OFF
ON ON
Right+3
ON
OFF
ON
OFF OFF Right+4
ON
OFF
ON
OFF
ON
Right+5
ON
OFF
ON ON
OFF Right+6
ON
OFF
ON ON ON
Right+7
ON ON
OFF OFF OFF Right+8
ON ON
OFF OFF
ON
Right+9
ON ON
OFF
ON
OFF Right+10
ON ON
OFF
ON ON
Right+11
ON ON ON
OFF OFF Right+12
ON ON ON
OFF
ON
Right+13
ON ON ON ON
OFF Right+14
ON ON ON ON ON
Right+15
Adjust switch “Left + n” when screen position is right slant.
Adjust switch “Right + n” when screen position is left slant.
-4-
Vertical Adjust
SW10 SW11 SW12 RESULT
OFF OFF OFF Down+4
OFF OFF
ON
Down+3
OFF
ON
OFF Down+2
OFF
ON ON
Down+1
ON
OFF OFF 0
ON
OFF
ON
Up+1
ON ON
OFF Up+2
ON ON ON
Up+3
Adjust switch “Up + n” when screen position is lower.
Adjust switch “Down + n” when screen position is upper.
Sharpness Adjust
SW1 SW2 SW3 SW4
OFF OFF OFF OFF
OFF OFF OFF
ON
OFF OFF
ON
OFF
OFF OFF
ON ON
OFF
ON
OFF OFF
OFF
ON
OFF
ON
OFF
ON ON
OFF
OFF
ON ON ON
ON
OFF OFF OFF
ON
OFF OFF
ON
ON
OFF
ON
OFF
ON
OFF
ON ON
ON ON
OFF OFF
ON ON
OFF
ON
ON ON ON
OFF
ON ON ON ON
Adjust switch “Sharpness” To correct flickering text or line.
Trademarks:
All the companies, brand names, and product names
referred to this manual are the trademarks or registered
trademarks belonging to their respective companies.
-5-