
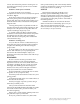
Manual


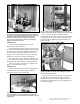

On rifle cases, the die should be adjusted so that the
powder funnel will contact the mouth of the case and
then fully actuate the powder bar, Fig. 20 & 21. These
adjustments are accomplished with a case in the
shellplate and alternately raising and lowering the
operating handle, while adjusting the powder die, Fig.
19. When properly adjusted, the powder bar will be
moved to its full rearward position by the case, Fig. 20
& 21. When you have determined that your
adjustments are correct, tighten the lock ring and the
locking collar.
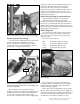
Next, attach the powder measure fail safe rod
assembly to the bellcrank (#17839). Using your thumb
and index finger of your right hand, move the lock-
link down to align the hole with the slot on the
Powder Measure bellcrank (#17839). Then insert the
rod (#97000) through the two holes, Fig. 20. Next,
lower the operating handle (#20636). Insert the powder
measure rod into the slot in the return bracket (#13885)
press the shoulder washer into the slot from the
bottom. Move the operating handle to the priming
position, press the operating handle firmly forward.
Tighten the blue wingnut (#13799) until the top of the
spring (#14033) just touches the underside of the
return bracket (#13885). We’ll come back to filling the
measure with powder and adjusting the bar. The
purpose of the powder measure failsafe rod (#97000) is
to return the powder bar to its closed position.
Station Three
In this station the bullet is seated to its proper
depth. You need to refer to a loading manual for
overall length of the completed round.
Put a case into the shellplate at Station Three. Raise
the platform up and screw the die down until it just
touches the shellplate and back it out two turns. Now,
back your seating stem out.
Place a bullet on the case and operate the handle.
Using a dial caliper or case gage, check for overall
length. Keep screwing the seating stem down in small
increments until the correct overall length is achieved.
Once you are satisfied with the overall length, tighten
the lock ring.
Station Four
The crimping operation is performed at this station.
Insert the crimp die and place an empty case in
Station Four. Raise the platform and screw the
crimping die down until it touches the rim of the case.
Now lower the platform and screw the die down an
additional one-quarter of a turn. Place a round in
Station Four with a seated bullet and cycle the
operating handle.
You will need to refer to a loading manual to get
proper crimp dimensions for the caliber you are
loading. A dial caliper is required to take accurate
measurements from your crimped round.
If more crimp is needed, screw the crimp die down
in small increments until you get the desired crimp,
now tighten the lock ring.
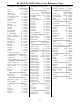
* Indicates a caliber specific part. See the caliber conversion
chart on page 16 for the caliber you are loading for.
12
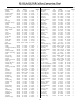
Fig. 20 - This photo shows the large powder bar in its
closed position. (Primer system removed for clarity.)
Fig. 21 - This photo shows the large powder bar in its fully
open position. (Primer system removed for clarity.)