
Project Ideas


Reminders, Recipes, Menus, Memories:
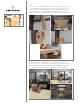
So-Many-Uses Chalkboard with Clips
YOU WILL NEED
1 – 2' x 2' x 1/2" birch project panel
1 – 2’ x 4’ x 3/16” chalkboard
panel
1 – 1-1/8” x 3/8” x 8’ panel cap
moulding
3 – Metal bulldog binder clips
3 – #8 x ½” Truss-head screws/
lath screws
Wood glue
Wood filler (optional)
Picture-hanging hardware
or damage-free picture-
hanging strips
Paint or stain and brushes
FINISHING IS OPTIONAL
TOOLS NEEDED
Tape measure or long ruler
Phillips-head screwdriver
Mitre saw and mitre box
or power miter saw
Let’s get started!
STEP 1
Using a tape measure or a long ruler, measure, mark and cut your
chalkboard to create a 14” x 20” panel. TIP: If the store where you buy
your panel offers complimentary cutting, ask them to cut it for you.
STEP 2
Determine which side of your project panel will be the front, then
measure and mark the location of your chalkboard’s four corners.
These should be 2” inside the top and bottom left corners (as shown
below), and two more 14” to the right.
PROJECT COST
About $35
ESTIMATED TIME
1 hour
DIY PROJECT PLANS
page 1 of 3
NOTE: If you choose to paint or stain your project panel, do so before making your
marks. Just make sure you let each finishing step dry thoroughly before moving to
the next.