
User's Manual


enclosed product against any defect in material or workmanship for a period of one year from
the date of purchase, with the exception of the elements which are warranted to be free from
This Warranty is in lieu of all other warranties or conditions whether expressed or implied
sale of the product, whether in the nature of breach or breach of fundamental term, or of
for any damages resulting from removal or replacement of a Linear Proportional Convector
Warranty
Maintenance
CAUTION:
CAUTION:
however, essential that the Linear Proportional Convector is not operated with an
accumulation of dust or dirt on the element, as this can cause a build up of heat
WARNING:
+ or - button can be pressed to
A. Setting/Temperature Display
Pressing the + or - will increase or decrease the desired temperature for the room
!
NOTE: Pressing the + and -
B. Economy Setting
V
V button and the
icon will
disappear and the
C. Set Back Temperature Setting
V followed by the + or -
D. Comfort Setting
!
NOTE: Either the or icon will always be visible, dependent on the
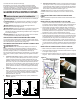
Operation
Figure 5
B
E
F
G
H
I
A
C
D
INSTALLATION WITH NON METALLIC CABLE TYPE NMD
Push cable back into wall as Linear Proportional Convector is being positioned
With Proportional Convector in position, run screws through pre-selected
INSTALLATION WITH RIGID, E.M.T. CONDUIT OR BX CABLE
E. Synchronized Icon
seconds, both the
and
Press the - , + and then V,
!
NOTE: There is a 3 second delay between pressing the last button the wall
!
NOTE: To desynchronize a Linear Proportional Convector from the
Press and hold the V
Press the V, + and then -
F. Lock Icon
Press and hold the V
and
To Enable:2. +, then -, then +, then -
icon
To Disable-, then +, then -, then +
icon
!
NOTE:
2 www.dimplex.com