
User's Manual
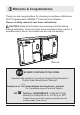
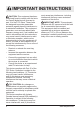


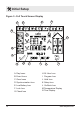
Table Of Contents

9
Installation
which is associated to a back-up
battery to assist with the syn-
chronization of the heaters. It is
recommended that the tab remain
in place until the time of synchro-
nization. (Figure 3)
6. Using the Wall Mounting
Bracket, mark and drill the
holes for the wall anchors.
(Figure 4)
7. Install the screws through the
Wall Mounting Bracket and
into the anchors.
!
NOTE: Ensure that the at
side of the Wall Mounting Bracket
is against the wall and the screws
are installed so that they rest
against the extended portion of
the hole. The space will allow
screws to sit in the mounting
holes correctly.
8. Slide the unit onto the screws.
9. Plug the unit into the wall
receptacle.