A Class Air Source Heat Pump User Guide IMPORTANT – THIS MANUAL MUST BE LEFT WITH THE USER AFTER INSTALLATION 8/60476/0 Issue 1.
Contents 1: Introduction 1 2: How the Heat Pump Works 1 2.1 Tips and advice to follow when using your new heat pump 1 3: Heating System Controller 2 4: Operating the User Interface 2 4.1 Temperature 2 4.2 Home Screen 3 4.3 Space Heating 3 4.3.1 Comfort Levels 4 4.3.2 Operating Modes 5 4.3.4 Setting Time Periods 5 4.4 Domestic Hot Water (DHW) 6 4.5 Information 7 4.5.1 Adjusting Time and Date 8 4.5.2 Information - Message List 8 4.5.3 Changing Outside Off Temperature 8 4.
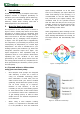
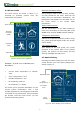
1 space heating switched on at the same time. If, for example, you require both hot water and heating in the morning, it is recommended to use the DHW function first, followed by the space heating. The insulation used on our cylinders ensures that hot water will stay hot for as long as possible, however it generally takes longer to initially heat the DHW than for the space heating to take effect. Introduction Thank you for choosing a Dimplex Heat Pump.
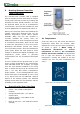
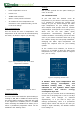
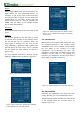
3 Heating System Controller (User Interface) Temperature Display Screensaver The controller/user interface that is supplied with the Dimplex A-Class heat pump is used as a heat pump controller as well as a heating and domestic hot water (DHW) controller. It is also the preferred option for use as a temperature control device. The functions available for each of these applications are explained in section 4.
4.2 Home screen Domestic hot water menu: The home screen, as shown in figure 5, is accessed by pressing confirm from the temperature screensaver. Set the heating mode of the hot water cylinder, set time periods for the timer, boost the hot water and set disinfection parameters. The temperature that appears on the DHW icon on the home screen is the current water temperature.
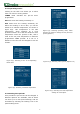
Example: Setting: • Room temperature is 21°C • Heater is on Set up time periods for the space heating to come on and off. • TIMER mode selected 4.3.1 Comfort levels • Option 1 time period is selected • At 9.35am the zone temperature will decrease to 15°C (setback mode), as this is the next change.
4.3.2 Operating modes Clicking on the clock icon allows you to select from one of three running modes: TIMER mode programmes. activates the pre-set timer ON mode turns the heating constantly on. OFF mode turns the heating constantly off. When the heating is set to OFF, you will be asked for a setback temperature, as shown in figure 9(b). This temperature is the OFF temperature, which operates as a frost protection feature.
Pre-set time periods Water temperature: A number of time period have been pre-set to typical heating time periods, to aid in quick and easy initial set up. For example, Option 1 has been set up as follows: This icon shows the set point temperature of the DHW.
Boost: When using TIMER mode, you may want to use DHW before the next scheduled period, for example, if you arrive home from work early and want to take a shower, but the DHW isn’t scheduled to run until later. In this case, the Boost function can be used to override the TIMER until the water in the cylinder reaches the set point temperature. Disinfect: Enable disinfection and set the time when it will occur.
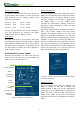
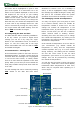
described in section 4.5.1. If a message is active, it will be highlighted orange. Selecting the message (by middle clicking the rotary dial) will open a list of details about the system operation the moment the message occurred. The icons will be highlighted in green if that part of the system is on and white if it is off. Some of the symbols displayed on this screen will depend on the set up of your heating system, therefore some icons may not be visible.
4.6 Temporary modes 4.6.2 Home Early A number of temporary modes can be set which override the running mode settings, as shown in figure 17. This can be used, for example, if you have set up your heat pump so that it comes on during set hours on weekdays and different set hours during weekends, but would like to turn your heating on at a different time than usual without affecting your day to day settings. This mode turns ON your space heating until the next scheduled OFF time, when in TIMER mode.
5 Safety • Installation and any service work on the heat pump may only be performed by authorised and qualified installer and after -sales service technicians. • This device is not suitable for operation with an electrical generator and any attempt to do so will void warranty. • If the heat pump may be disconnected from power supply for prolonged periods of time or where power supplies are susceptible to failure, antifreeze must be added to the system.
11