INSTRUCTION MANUAL 12L Dehumidifier I 12L Dehumidifier w/ Purifier Models: DC12DE & DC12DEPUR For domestic household use only.
IMPORTANT THESE INSTRUCTIONS SHOULD BE READ CAREFULLY AND RETAINED FOR FUTURE REFERENCE. Note also the information presented on the appliance DETAILS OF TYPE AND RATING OF FUSES : T; 3.15A; 250VAC. CAUTION: FAILURE TO FOLLOW THESE INSTRUCTIONS MAY CAUSE INJURY AND/ OR DAMAGE AND MAY INVALIDATE YOUR WARRANTY Please read the operating instructions carefully before using your dehumidifier for the first time and keep them in a safe place. WARNING – This appliance must not be used in a bathroom.
from traffic areas and where it will not be a tripping hazard. NOT COVER. Never cover or obstruct in any way the outlet at the top of the dehumidifier or the air inlet slots at the rear of the dehumidifier. • Only operate this appliance with a minimum of 50cm clearance all around i.e. away from walls, furniture and overhanging objects such as curtains or a shelf. • To prevent spillage, empty the water tank before lifting or relocating the appliance.
WARNING: For using R290 refrigerant. ThIs symbol shows that this appliance uses a flammable refrigerant. If the refrigerant is leaked and exposed to an external ignition source, there is a risk of fire. CAUTION: RISK OF FIRE/FLAMMABLE MATERIALS. THE APPLIANCE MUST BE INSTALLED, USED & STORED IN AN AREA THAT IS GREATER THAN 4m2. NB: These symbols on your device mean: • This appliance is filled with Propane gas R290.
1. Transport of equipment containing flammable refrigerants - see transport regulations 2. Marking of equipment using signs - see local regulations 3. Disposal of equipment using flammable refrigerants - see national regulations. 4. Storage of equipment/appliances - The storage of equipment should be in accordance with the manufacturer's instructions. 5.
• • • • • 6 Checks to the refrigeration equipment Where electrical components are being changed, they shall be fit for the purpose and to the correct specification. At all times the manufacturer's maintenance and service guidelines shall be followed. If in doubt consult the manufacturer's technical department for assistance.
• • • • • Repair to intrinsically safe components Do not apply any permanent inductive or capacitance loads to the circuit without ensuring that this will not exceed the permissible voltage and current permitted for the equipment in use. Intrinsically safe components are the only types that can be worked on while live in the presence of a flammable atmosphere. The test apparatus shall be at the correct rating. Replace components only with parts specified by the manufacturer.
• • • 8 Charging procedures In addition to conventional charging procedures, the following requirements shall be followed. Ensure that contamination of different refrigerants does not occur when using charging equipment. Hoses or lines shall be as short as possible to minimise the amount of refrigerant contained in them. Cylinders shall be kept upright. Ensure that the refrigeration system is earthed prior to charging the system with refrigerant.
• Recovery When removing refrigerant from a system, either for servicing or decommissioning, it is recommended good practice that all refrigerants are removed safely. When transferring refrigerant into cylinders, ensure that only appropriate refrigerant recovery cylinders are employed. Ensure that the correct number of cylinders for holding the total system charge is available. All cylinders to be used are designated for the recovered refrigerant and labelled for that refrigerant (i.e.
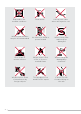
Exposed to the weather outdoors 10 Near water If the power cable wires are frayed or cut Where small children may be left unattended No extension leads or power boards Where the power cable may be damaged On a slope or uneven surface Where there is risk of fire or close to a naked flame Where it may be damaged by chemicals Where there is a risk of interference by foreign objects This product is not made for DIY repair If there is a risk of water falling on the unit
Specification Model no. DC12DE Power supply DC12DEPUR 220-240V~, 50Hz Dehumidification capacity at 32°C, 80% RH 12L Operating Temperature 5-32°C Modes 4 Refrigerant R290 Water Tank 1.5L Timer Air Purification Filter Size (WxDxH) mm N.W. kg 24 hours N Y Dust Dust & HEPA & Active Carbon 195 x 280 x 386mm 9.7kg Note. When the dehumidifier is in operation, the running compressor will produce heat, this is normal and may potentially raise the room temperature.
How It Works This product is a dehumidifier. It controls relative humidity by passing the air through the unit, forcing the excess moisture to condensate over the cooling elements. Contact with this cold surface causes the moisture in the air to condense. This condensed water then drains safely into the water tank. The dried air then passes through the condenser where it is slightly warmed and re-enters the room at a slightly elevated temperature.
Parts 1 Control Panel 2 Air Outlet 3 Water Tank 4 Water Level 5 Handle 6 Castor 7 Air Inlet 8 Power Cord 9 Drainage Port 13
Accessories Note: Before use, please ensure to remove the water tank from the appliance, take out the plug and any other accesories and then place the tank back into the slot. Accessories - x1 Plug - x1 Drain Pipe 1. Remove the water tank from the slot and then remove all accessories from inside it. 2. Install the chip onto the water tank as per below. Note: The plug is used to cover the hole left after taking out the power cord when unpacking.
Control Panels DC12DE Decrease Increase On/Off DC12DEPUR Decrease Increase On/Off Purification 15
Operation 1. Press the ON/OFF button to control the start up or shut down of the unit. When using this button to shit down the unit, please note that the fan will keep running for another 3 minutes, in order for the unit to blow dry itself and prevent mold from forming. 2. The INCREASE and DECREASE buttons are used to select your desired indoor humidity level or set the time on timer mode. These buttons will increase or decrease the humidity or time in increments of 1. 3.
Purification Note: The following function is only applicable to the DC12DEPUR model. WARNING: The DC12DEPUR model contains a UV-C lamp. Please ensure to read the maintanence instructions before opening the appliance. If the UV-C lamp has an error, please contact a service professional to fix. The appliance must be disconnected from the power supply before replacing the UV-C lamp.
Drainage Water Tank Full Alarm When the water tank is full, the compressor will shut off, the fan will stop and the unit will begin to make a 'beeping' noise. The 'TANK FULL' indicator light will begin to flash. Note: Please ensure to hold the water tank with both hands when emptying. Note: The unit will not run again until the water tank is emptied and properly placed back into the unit. The tank should be cleaned every week to prevent the growth of mold, mildew and bacteria.
Drainage Continuous Drainage Connect the drain pipe onto the back of the unit. 1. 2. 3. 4. Place the unit on level flooring and unscrew the cap on the back of the unit. Install the connector chip of the drain and gasket. Install the drain pipe onto the connector chip. Press the ON/OFF button to run the unit. Note: If you do not require the function of the continuous drainage any longer, install the cap on the drain hole on the back of the unit and the water will begin to flow back into the tank.
Automatic Defrost Automatic Defrost Function When frost builds up on the evaporator coils, the compressor will stop and the fan will continue to run until the frost disappears. When the coils are completely defrosted, the compressor will automatically restart and the dehumidifying will resume. Cleaning Before cleaning or maintanence, turn the appliance off by pressing the ON/OFF button on the control panel. Wait a few minutes, then unplug the cord from the mains socket.
Cleaning Note: If you do not plan on using the device for an extended period of time, ensure to: • Unplug the device from the mains socket. • Empty the water tank and remove the cap. • Clean the filter and dry thoroughly before putting back. • Cover the appliance to prevent dust. • Store the appliance upright in a dry location. Note: After an extended period of time, when you plan on using the device again, ensure to: • Check the power cord and plug are both undamaged and the earth system is efficient.
Trouble shooting THE UNIT DOES NOT OPERATE: • Is the unit plugged in? • Is the fuse blown or circuit breaker tripped? • Is the water tank full or has the dehumidifer reached its present level? • Is the water tank in the proper position? • Has the unit experienced a power failure? • Ensure the dehumidifier's plug is pushed completely into the outlet. • Check the house fuse/circuit breaker box and replace fuse or reset breaker.
Trouble shooting ERROR CODES: • EH - Humidity Sensor Failure • E2 - Temperature Sensor Failure Recycling: Do not dispose of electrical appliances as unsorted municipal waste. Use separate collection facilities. Contact your local government for information regarding the collection systems available. If electrical appliances are disposed of in landfills or dumps, hazardous substances can leak into the ground water, polluting the food chain and damaging health and well-being.
Customer Care: 1300 556 816 customercare@glendimplex.com.au www.dimplex.com.au Supplied by Glen Dimplex Australia 1340 Ferntree Gully Road, Scoresby, Victoria, 3179 © Glen Dimplex Australia. All rights reserved. Material contained in this publication may not be reproduced in whole or in part, without prior permission in writing of Glen Dimplex Australia.