MODEL:DCB09(2.6kW Cooling / 2.4kW Heating) DCB14(4.1kW Cooling / 3.6kW Heating) IMPORTANT Please read this owner’s manual carefully and thoroughly before installing and operating your room air conditioner. Please retain this owner’s manual for future reference after reading it thoroughly.
Table of Contents Page Introduction 2 Operating Instructions 4 Electrical Specifications 5 Installation Instructions 6 Care and Maintenance 9 Trouble Shooting Guide 10 -1-
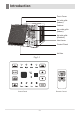
Introduction Front Cover Air inlet grille (Indoor) Cabinet Air outlet grille (Indoor) Air inlet grille (Outdoor) Vent Lever Control Panel Air filter Fig.
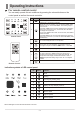
Operating Instructions For remote control model You can easily operate this air conditioner by pressing the relevant buttons on the control panel as well as the remote controller. No. Button Used to set or cancel timer operation. When the unit is in operation, you can set OFF TIMER. When the unit is off, you can set ON TIMER. Timer setting range is 0 to 24 hours.
Operating Instructions Remote control No. Button Function 1 (TEMP UP) Increase the temperature or time by 1 degree 2 (TEMP DN) Decrease the temperature or time by 1 degree 3 ON/OFF 4 FAN 5 TIMER To set automatic switching-on/off 6 SLEEP To activate the function ¡° SLEEP¡± 8 MODE To select the mode of operation 9 SWING To activate or deactivate of the movement of the¡° DEFLECTORS¡± . To switch the conditioner on and off.
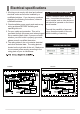
Electrical specifications 1. All wiring must comply with local and national electrical codes and must be installed by a qualified electrician. If you have any questions regarding the following instructions, contact a qualified electrician. 2. Check available power supply and resolve any wiring problems BEFORE installing and operating this unit. 3. For your safety and protection. This unit is grounded through the power cord when plugged into a matching wall outlet.
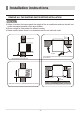
Installation instructions REMOVE ALL THE SHIPPING PARTS BEFORE INSTALLATION LOCATION Less than 210 Select a location that can support the weight of the air conditioner and one that will not cause increased operation noise and vibration. Direct sunlight is unfavorable for efficient cooling. Select a place where there is no obstacles near the air inlet and outlet. Less than 210 45 More than 55 Scrape lf the wall thickness is more than 210 scrape the wall as shown above.
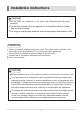
Installation instructions CAUTION Do not install air conditioner in the place where flammable gas leaks are a possibility. The minimum clearance from the appliance to combustible surfaces is 100mm; (Only for electric heating) The range of external static pressures at which the appliance was tested is 0-5Pa OPERATION Check the capacity of wiring and power outlet. The power outlet should be used exclusively for the air conditioner. Do not use it with other appliances.
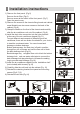
Installation instructions 1) Remove the front panel. (Fig.5) Remove the air filter. (Fig.6) Remove screw at the botton of the front panel. (Fig.7) Open the panel cover. 2) Remove the screws fix the chassis-fixing board and cabinet. some Models have two more screws on the back of the cabinet. (Fig.8) 3) Grasp the handle on the front of the chassis and carefully slide the air conditioner unit out of the cabinet. (Fig.
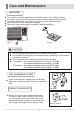
Care and Maintenance AIR FILTER The air filter should be washed at least once a month. lf the air filter remains full of dust, the air flow will decrease and the cooling capacity will be reduced. The filter is behind the cover and to be pulled out from right hand side. Wash the air filter with water and detergent. Rinse with clean water and dry completely before reinstalling. Fig.16 Fig.15 CAUTION Do not use hot water above 40 C f or washing t he air f ilter.
Troubleshooting Guide Never use hot water above 50 ,benzine,gasoline,acid,thinner or brush to wipe off dirt because they will damage the plastic surface and the coating. LONG OFF PERIOD MAINTENANCE Operate the fan alone ("LOW FAN"or"HIGH FAN") for half a day to dry out the inside of the unit. Turn off power and remove plug from wall socket.
CONTACT DETAILS Glen Dimplex Australia Pty Ltd 1340 Ferntree Gully Road Scoresby VIC 3179 Australia Ph: 1300 556 816 Web: www.dimplex.com.au Glen Dimplex New Zealand Ltd 38 Harris Road East Tamaki, Auckland New Zealand Ph: 09 274 8265 Web: www.dimplex.co.