INSTRUCTION MANUAL 6L Evaporative Cooler Model: DCEVP6BW For domestic household use only.
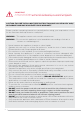
IMPORTANT THESE INSTRUCTIONS SHOULD BE READ CAREFULLY AND RETAINED FOR FUTURE REFERENCE. Note also the information presented on the appliance CAUTION: FAILURE TO FOLLOW THESE INSTRUCTIONS MAY CAUSE INJURY AND/ OR DAMAGE AND MAY INVALIDATE YOUR WARRANTY Please read the operating instructions carefully before using your evaporative cooler for the first time and keep them in a safe place. WARNING – This appliance must not be used in a bathroom.
• • • • • • • • • • This appliance is not intended for use by persons (including children) with reduced physical, sensory or mental capabilities, or lack of experience and knowledge, unless they have been given supervision or instruction concerning use of the appliance by a person responsible for their safety. Children should be supervised to ensure they do not play with the appliance. To prevent spillage, empty the water tank before lifting or relocating the appliance.
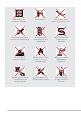
Exposed to the weather outdoors 4 Near water If the power cable wires are frayed or cut Where small children may be left unattended If an extension lead may become overloaded Where the power cable may be damaged On a slope or uneven surface Where there is risk of fire or close to a naked flame Where it may be damaged by chemicals Where there is a risk of interference by foreign objects This product is not made for DIY repair If there is a risk of water falling on the unit
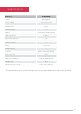
Specification Model no. DCEVP6BW Colour Black/White Power supply 220-240V~50Hz Rated power 60W Speed settings Modes Turbo air speed Water tank capacity Remote control Timer Swing function Controls Max. room size Water consumption Weight (net) Dimensions (w x d x h) 3 3 (natural, normal & sleep) 6.78m/s 5.5L Y 0-9 hours Y Button with LED display 20m2 0.95L/h (high speed) 6kg 290 x 290 x 910mm • For greater precision, please always refer to the rating label placed on the product.
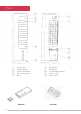
Parts (1) (2) (3) (4) (5) Front panel Display panel Horizontal blade Decorative panel Base Remote 6 (6) (7) (8) (9) (10) Rear panel Rear grille Cord winding frame Power cord Water tank Ice pack
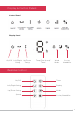
Display & Control Panels Control Panel Display Panel On/Off Left/Right Up/Down Swing Swing Temp/Fan Speed/ Timer Wind Mode Cooler/ Humidifier Remote Control On/Off Left/Right Swing Up/Down Swing Speed Timer Display Mode Cooler/Humidifier 7
Functions Note: The buzzer beeps twice when the power supply is first turned on. The unit is in ‘standby’ until the On/Off button is pressed. The horizontal louvres need to be opend manually by hand. ON/OFF Press the ON/OFF button to turn the unit ON. The default settings when first turned on are low fan speed, normal wind mode, and no timer. When turning the unit back on after powering it off, the state upon turning it off will be memorised, excluding the timer setting.
Functions MODE The default mode after turning “On” is normal. Press this button to select modes in this sequence: normal > natural > sleep. The MODE indicator light will illuminate accordingly. There is no indicator for the normal wind mode. Normal: The fan runs at a fixed speed for the wind speed selected, without any change. Natural: Changing wind speeds (the indicator lights only show the initial wind speed when the speed changes, and other changes are not indicated).
Other Functions Environmental protection function: In the power on state, if there is no operation of any key (including the remote control) for 1 minute all LEDs will dim to 30% of their original brightness. Press the key again to restore the brightness and perform the corresponding operation. Water level protection function: When the cooling function is first turned on, the water pump works for 50 seconds. If low water is detected, the pump will stop working and a buzzer alarm beeps 10 times.
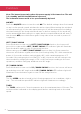
Operation & Set Up 1. Remove the unit from its packaging 2. To begin using the COOLER/HUMIDIFIER function, rotate the Cord winding frame clips 90° and remove the water tank located at the back of the unit and fill to the MAX fill line. Replace the water tank and secure the clips. 3. For extra cooling power, place an ice pack (supplied) into the water tank. 4. Open the horizontal louvres. 5. Plug into a power supply and press the ON/OFF button to start the appliance. 6.
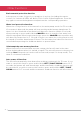
Cleaning Your unit is designed to remove dirt and other atmospheric impurities by drawing air through the wet curtain. DO NOT block the air filter, as this will impair the efficiency of the unit. Wet Curtain • This is easily accessible by removing the two screws with a Phillips head screwdriver (not supplied) and remove the rear screen and wet curtain. • In a smoky or dusty environment, this wet curtain will become grey in colour after one to two months. • Disconnect the unit from the main supply.
Storage If not using the unit for an extended period of time. After cleaning please: • Turn the unit off, unplug and take care of the mains lead & plug. • Cover the unit and store it upright in a location where it will not receive direct sunlight. NB- Prolonged exposure to direct sunlight will discolour the enclosure. Maintenance If the unit fails to operate efficiently, is broken or other problems arise, unplug and do not operate.
D Customer Care: 1300 556 816 customer.care@glendimplex.com.au www.dimplex.com.au Supplied by Glen Dimplex Australia 8 Lakeview Drive, Scoresby, Victoria, 3179 © Glen Dimplex Australia. All rights reserved. Material contained in this publication may not be reproduced in whole or in part, without prior permission in writing of Glen Dimplex Australia.