
Service manual


12 www.dimplex.com
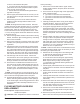
One lead of the power cord is a “Piggy-Back” connec-9.
tion at the 3-Position switch, which connects 2 wires on
to one prong on the switch.
Separate the orange wire from the “Piggy-back” con-10.
nector on the white wire from the power cord.
Disconnect the wire nut connected to the other half of 11.
the power cord with the group of white “neutral” wires.
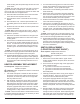
With a pair of needle nose pliers, squeeze the strain 12.
relief bushing that holds the power cord in place onto
the back panel remove the cord.
Feed the new power cord through the back panel and 13.
squeeze the new strain relief in place on the cord and
then onto the back panel.
Re-connect wires at the “ON/OFF” switch and the wire 14.
nut.
Push all of the mountable wire ties back into the cor-15.
rect holes on the housing panels making sure they are
secure. You will have to move the panel up closer into
the upper cavity. This will greatly reduce the amount
of lead or give in the wires and the workspace, on the
unit.
!
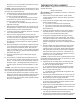
NOTE: If the wire ties are not securing properly, use a
at instrument to slightly spread the tabs farther apart and
then re-insert into the appropriate holes in the panel.
Re-assemble the rebox and cabinet in reverse order, 16.
taking care that the wires are guided through the cutout
openings on the left and right of the housing panels
and no wires are touching the heater assembly blower/
fan once re-assembled.