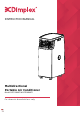
INSTRUCTION MANUAL Multidirectional Portable Air Conditioner Model: DCP11MULTI & DCP14MULTI For domestic household use only.
IMPORTANT THESE INSTRUCTIONS SHOULD BE READ CAREFULLY AND RETAINED FOR FUTURE REFERENCE. Note also the information presented on the appliance CAUTION: FAILURE TO FOLLOW THESE INSTRUCTIONS MAY CAUSE INJURY AND/OR DAMAGE AND MAY INVALIDATE YOUR WARRANTY • Please read the operating instructions carefully before using your Portable Air Conditioner for the first time and keep them in a safe place. • WARNING – This appliance must not be used in a bathroom.
Specification Model no. Exposed to the weather outdoors Near water If the power cable wires are frayed or cut DCP11MULTI Colour White/Black Power supply Where small children may be left unattended If an extension lead may become overloaded Where the power cable may be damaged 220-240V~, 50Hz Operating temperature 5-43°C Thermostat range 17-30°C Rated Input Power 1.28kW 1.6kW Cooling Capacity 3.
Parts (1) (2) (3) (4) (5) Control Panel Control panel Remote control receiver Hose adaptor Exhaust hose Upper drainage hole (6) (7) (8) (9) (10) (1) (2) (3) (4) (5) Cool air inlet Cool air filter Hot air inlet Hot air filter Lower drain hole Power button Function button Temp increase (+) button Temp decrease (-) button LED display screen (6) (7) (8) (9) Speed button Timer button Sleep button Swing button Indicator lights: 1 x Exhaust hose 1 x Window slider kit (with hole) *heating not applicable
Installation PREPARATION NOTE: All the illustrations in the manual are for explanatory purposes only. Your machine may be slightly different. The unit can be controlled by the control panel or with the remote control. EXHAUST HOSE The exhaust hose and adaptor must be installed or removed in accordance with the set FUNCTION. For COOL & DRY functions, the exhaust hose must be installed. For FAN only - the exhaust hose should be removed. Installation EXHAUST HOSE INSTALLATION 1.
Installation Functions WINDOW KIT INSTALLATION POWER Press the POWER button to turn the unit ON or OFF. The window slider kit has been designed to fit most standard vertical and horizontal window applications, however it may be necessary for you to modify some aspects of the installation procedures for certain types of windows. The window slider kit can be fastened with screws (not supplied) if required. Refer to Fig. 1 & Fig.
Functions SWING Press the SWING button to begin the automatic swing function. Press again to turn the SWING function off. ERROR CODES SETTING THE TIMER A timer can be set to automatically turn the appliance ON or automatically turn it OFF. E2 - Indicates open circuit or short circuit in temperature sensor, copper tube and PCB. To set the unit to automatically turn ON, follow the below instructions: 1. While the unit is OFF press the TIMER button to set the desired time.
Remote Control Remote Control The remote control can be used to perform all functions. Refer to the below diagram and button description • • • • • • • • • AUTO HI MID LOW TEMP FUNC TIMER SLEEP SWING = Automatic fan speed = High fan speed = Medium fan speed = Low fan speed = Increases / decreases set temperature = Function (mode) selector = Hourly programming = Sleep/night mode = turns swing On/Off • POWER = On/Off Using the Remote Control 1.
Cleaning SAFETY PRECAUTIONS • Always unplug the unit before cleaning or servicing. • DO NOT use flammable liquids or chemicals to clean the unit. • DO NOT wash the unit under running water. Doing so causes electrical danger. • DO NOT operate the machine if the power supply was damaged during cleaning. A damaged power cord must be replaced with a new cord from the manufacturer. AIR FILTERS CAUTION: Never operate the unit without a filter in place.
Customer Care: 1300 556 816 customer.care@glendimplex.com.au www.dimplex.com.au Supplied by Glen Dimplex Australia 8 Lakeview Drive, Scoresby, Victoria, 3179 © Glen Dimplex Australia. All rights reserved. prior permission in writing of Glen Dimplex Australia.