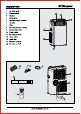
L Simplex’ DCPAC12C & DCPACI14C Portable Air Conditioner with Dehumidifier INSTRUCTION MANUAL PLEASE READ THE INSTRUCTION MANUAL CAREFULLY BEFORE USING THE UNIT. www.dimplex.com.
CONTENT Important Safeguards PINCUSHION Preparing For Use Description Of The Control Panel Operating From The Control Panel™ = oo s e Description Of The Remote Control recent Using The Re mots Control Unit Se-diagnosis TIPS FO COMB UBS Cleaning Start End Of Season Operations oo TROUBLESHOOTING e Technical & Reference Data www.dimplex.com.
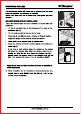
IMPORTANT SAFEGUARDS Dimple’ « This appliance can be used by children aged from 8 years and above and persons with reduced physical, sensory or mental capabilities or lack of experience and knowledge if they have been given supervision or instruction concerning use of the appliance in a safe way and understand the hazards Involved « Children shall not play with the appliance * Cleaning and user maintenance shall not be made by children without supervision « Disconnect the appliances from Its power source du
IMPORTANT SAFEGUARDS Dimple’ Do not press the buttons on the control pane! with anything other than your wet or damp fingers. Do not use hazardous chemicals to clean or come into contact with the unit. To prevent damage to the surface finish, use only a soft cloth to clean the appliance. Do not use wax, thinner, ora strong detergent. Do not use the uniting the presence of inflammable substance or vapor such as alcohol, Insecticides, gasoline, etc.
Important information for correct disposal of the product in accordance with EC Directive 2012/18/EU. At the end of its working life, the product must ot be disposed of as urban waste. It must be taken to a special local authority differentiated waste collection center or to a dealer providing this service.
DESCRIPTION 1 Air outlet grille 2 Control panel 3 Castors 4 Intake grille 5 Remote control receiver 6 Handles 7 Filter 8 Air exhaust hose housing 9 Condensates drain 10 Power cable 11 Air exhaust hose 12 Hose outlet 13 Hose Inst 14 Window bracket 16 Remote control 4 www.dimplex.com.
PREPARING FOR USE The Instructions below will enable you to prepare your alr conk toner for operation as efficiently as possible. Before use, make sure the air intake and outlet grilles are unobstructed. AIR-CONDITIONING WITHOUT INSTALLATION Just a few simple steps and your comfort Is ensured with your appliances: » Fit the air exhaust hose in the housing at the back of the appliance (fig.A). ® Fit the window outlet to the end of the hose. # Place the alr conditioner near a window or French window.
DESCRIPTION OF THE CONTROL PANEL Dimple’ e—1—o ON/OFF button MODE selection button FAN speed selection button Programmed operation increase temperature Programmed operation decrease temperature COOL mode light DEHUMIDIFYING modes light FAN mode light Display Auto-speed fan mode light Low-speed fan mods light Mid-speed fan mode light High-speed fan mode light OPERATING FROM THE CONTROL PANEL The control panel enables you to manage all the main functions of the appliance, but to use the unit fo its full poten
DESCRIPTION OF THE CONTROL PANEL Dimple’ Operation TURNING THE APPLIANCE ON Plug into the mains socket. Two lines appear on the display indicating that the appliance is in standby mode. Press the button (A). When turned on, the air conditioner starts operating in the same mode as when it was turned off. Press the MODE button (B} until the light corresponding to the required = = mods lights up.
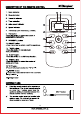
DESCRIPTION OF THE REMOTE CONTROL . Mode indicator . Sleep Indicator Powerful indicator . Timer selection . Auto-speed Indicator . Speed indicator Increase(+ } and decreases( ) button. 8. FAN button -Press this button to select fan speed of HIGH/MED/LOW/AUTO. 9. POWERFUL button 10. ON/OFF button -Less this button to switch on/off the appliance. 11. TIMER button -Press this button to set automatic startup/shutdawn. 12. SLEEP button -Press this button to on/off sleep function. 13.
DESCRIPTION OF THE REMOTE CONTROL Dimple’ INSERTING OR REPLACING THE BATTERIES * Remove the cover on tha rear of the remits control; + Insert iwo RO3 "AAA" 1.5V batteries in the correct position (see instructions inside the battery compartment); « Replace the cover. If the remote control unit is replaced or disposed of, the batteries must be removed and discarded in accordance with current legislation as they are harmful fo the environment.
DESCRIPTION OF THE REMOTE CONTROL Dimple’ POWERFUL FUNCTION a -Ideal for the summer to cool rooms rapidly. -Activate by simply pressing the POWERFUL button. -The appliance operates in cool mode at maximum fan speed. while this function Is selected, It Is not possible to set the temperatures or change fan sped. SLEEP FUNCTION =This function Is useful for the night as It gradually reduces operation of the appliance. To set this function correctly: -Select the operating ) as described above.
DESCRIPTION OF THE REMOTE CONTROL Dimple’ PROGRAMMED START UP ~Press “ON/OFF” button to switch into STANDBY. ~Press the ~ (9 * button twice, the time Is displayed and * gz “symbol. -Set the time when you want the appliance to switch off using the ” % * buttons (from 30 minutes to hours) -During the first ten hours you can select half Intervals. For times longer than ten hours, one hour intervals can be selected.
TIPS FOR CORRECT USE To get the best from your alr conditioner, follow these recommendations: * Close windows and doors In the room to be alr conditioned {fig.1 ). When installing the air conditioner semi-permanently, you should leave a door slightly open {as lit is guarantee correct ventilation. & Protect the room from direct exposure to the sun by partially closing curtains and/or blinds. This will mask the appliance much more economical to run (fig.
INTERMITTENT DRAINAGE(fig. 4 and fig. 5 ) simplex » Tum the air conditioner ff, then drain the water tank by unplugging the drain cap and allowing the water to flow onto the drain pan. The drain pan will not hold the full contents of the water tank. A number of fells of the drain pan are required. It may be leaser (after 3 or 4 pans have been drained In order to avoid accidental spillage when moving the alr conditioner) to wheal the unit outside, remove the drain cap and drain the water onto the ground .
CLEANING Dimple’ Before cleaning or maintenance, tum the appliance off by pressing the button on the control panel or remote control, wait for a few minutes then unplug from the mains socket. CLEANING THE CABINET You should clean the appliance with a slightly damp cloth then dry with a dry cloth. « Never wash the alr conditioner with water. It could be dangerous. « Never use petrol, alcohol or solvents to clean the appliance. « Never spray insecticide liquids or similar.
START END OF SEASON OPERATIONS START OF SEASON CHECKS Make sirs the power cable and plug are undamaged and the earth system is efficient. Follow the installation instructions precisely. END OF SEASON OPERATIONS To empty the internal circuit completely of water, remove the cap (fig. 12). Drain all water . When all the water has been drained, put the cap back In place. Clean the filter and dry thoroughly before replacing SIZE OF APPLIANCE Width 435mm Height 716mm Depth 350mm 15 www.dimplex.com.
TROUBLESHOOTING Dimple’ =Y CAUSE Fat e The air conditioner » there is no current * wait does not replacing on The alr conditioner works for a short time only The alr conditioner works, but doss not cool the rem During operation, there is an unpleasant smell In the roam The alr conditioner does not operate for about three minutes after restarting It The following message appears on the display: LE / PF/FE » iris not plugged into the mains « the Internal safety device has tripped * here are bends In the alr e
TECHNICAL & REFERENCE DATA L Simplex’ MAINTENANCE If the: unit fails to operate efficiently, is broken or other problems arise, unplug and do not operate. Ask for advice by calling your local after sales service agent or the Customer Care Center on 1300 556 816 (AU). _—W Cosmetician s many e e e Fahd b A AR Moog napping Ko sooty et e Bob Icebound Penney Pt g e Gwen Savoy WARRANTY The warranty period is 24 months from the date of purchases.