Owner’s Manual Model DF2690 6904411000 IMPORTANT SAFETY INFORMATION: Always read this manual first before attempting to install or use this fireplace. For your safety, always comply with all warnings and safety instructions contained in this manual to prevent personal injury or property damage. To view the full line of Dimplex products, please visit www.dimplex.
Table of Contents Welcome & Congratulations. . . . . . . . . . . . . . . . . . . 3 IMPORTANT INSTRUCTIONS. . . . . . . . . . . . . . . . . 4 Fireplace Installation . . . . . . . . . . . . . . . . . . . . . . . . 7 Operation. . . . . . . . . . . . . . . . . . . . . . . . . . . . . . . . . 11 Maintenance. . . . . . . . . . . . . . . . . . . . . . . . . . . . . . 14 Warranty. . . . . . . . . . . . . . . . . . . . . . . . . . . . . . . . . 17 Replacement Parts . . . . . . . . . . . . . . . . . . . . . . . . .
Welcome & Congratulations Thank you and congratulations for choosing to purchase an electric fireplace from Dimplex, the world leader in electric fireplaces. Please carefully read and save these instructions. CAUTION: Read all instructions and warnings carefully before starting installation. Failure to follow these instructions may result in a possible electric shock, fire hazard and will void the warranty.
IMPORTANT INSTRUCTIONS When using electrical appliances, basic precautions should always be followed to reduce the risk of fire, electric shock, and injury to persons, including the following: ① Read all instructions before using the electric fireplace. ② The heater is hot when in use. To avoid burns, do not let bare skin touch hot surfaces. The trim around the heater outlet becomes hot during heater operation.
IMPORTANT INSTRUCTIONS ⑮ Do not modify the electric fireplace. Use it only as described in this manual. Any other use not recommended by the manufacturer may cause fire, electric shock or injury to persons. ⑯ Always plug heaters directly into a wall outlet/receptacle. Never use with an extension cord or relocatable power tap (outlet/ power strip). ⑰ Do not burn wood or other materials in the electric fireplace. ⑱ Do not strike the fireplace glass.
IMPORTANT INSTRUCTIONS ! NOTE: This equipment has been tested and found to comply with the limits for Class B digital device, pursuant to part 15 of the FCC Rules. These limits are designed to provide reasonable protection against harmful interference in a residential installation. This equipment generates, uses and can radiate radio frequency energy and, if not installed and used in accordance with the instructions, may cause harmful interference to radio communications.
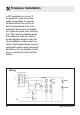
Fireplace Installation WARNING: Ensure the power cord is not installed so that it is pinched or against a sharp edge and ensure that the power cord is stored or secured to avoid tripping or snagging to reduce the risk of fire, electric shock or injury to persons. WARNING: Construction and electrical outlet wiring must comply with local building codes and other applicable regulations to reduce the risk of fire, electric shock and injury to persons.
Fireplace Installation Fireplace Assembly Depending on the unit, the front glass will come packaged separately or installed in the firebox. 1. Remove fireplace and glass (if not already installed) carefully from the carton, discard the plastic bag and foam packaging. 2. Remove the right hand side trim by removing four Phillips screws at the side of the fireplace. (Figure 3) 3. Remove the front glass, if necessary 4. Remove the foam block from within the fireplace (Figure 2). 5.
Fireplace Installation 23⅛” (587mm) Figure 4 9” (229 mm) 26 ¾” (679 mm) must be installed in an enclosure with the following MINIMUM dimensions (Figure 4). New Wall Construction 8. Mark the desired location on the floor. 9. Use studs to frame an opening of 26 ¾" (679 mm) wide X 23 ⅛" (587 mm) high X 9" (229 mm) deep. 10. Plug the unit into a 15 Amp, 120 Volt outlet. Option #1: The power cord can be run from behind the trim and along the wall to an outlet near the fireplace.
Fireplace Installation a GFI receptacle or circuit. If receptacle is used it must be readily accessible. To prevent electrical shock this unit is an electrical appliance that is not watertight and must be installed as to prevent water from entering unit. This must be installed away from showers, tubs, etc. Never locate fireplace where it may fall into a bathtub or other water container. High temperatures may be generated under certain abnormal conditions.
Operation Figure 5 A B C WARNING: This electric firebox must be properly installed before it is used. Manual Controls To access the controls, flip open the control panel cover towards the bottom of the fireplace. (Figure 5) A. On/Off Switch The On/Off Switch supplies power to all fireplace functions (Heater/ Flame). B. Flame Action Control Turn the Flame Action Control knob to adjust the flame speed to the desired level. C.
Operation not change just the amount of heat being emitted. F. 3-Position Switch Pressing the switch up "I" toggles sequentially through the three levels of the fireplace. Level 1: The flame effect is turned on and the first red indicator light flashes momentarily. Level 2: The flame effect remains on, the heater is activated to the low heat setting, and the first and second red indicator lights flash momentarily.
Operation hundreds of independent frequencies to prevent interference with other units. ! NOTE: Before attempting any operation with the remote control, pull the plastic insulator strip out from between the remote casing and battery cover. Remote Control Initialization/ Reprogramming This procedure is required every time there is a loss of power to the remote control in the fireplace. (i.e. power failure, breaker tripped, On/Off switch is turned off.) 1.
Maintenance WARNING: Disconnect power before attempting any maintenance or cleaning to reduce the risk of fire, electric shock or damage to persons. ! NOTE: The fireplace should not be operated with an accumulation of dust or dirt on or in the unit, as this can cause a build up of heat and eventual damage. For this reason the heater must be inspected regularly, depending upon conditions and at least at yearly intervals.
Maintenance 1. Slide fireplace out of mantel. 2. Lay unit on it’s back for safe removal of front glass. 3. Remove four Phillips screws from the right side of trim. 4. Slide glass to right side of fireplace to remove (Figure 7). 5. Pull the front edge of the plastic ember bed or plastic grate up and forward until the rear tab releases from the ledge located at the bottom of the partially reflective glass (Figure 8). 6.
Maintenance 6. 7. 8. 9. 10. 11. the fireplace to remove. Upper bulbs located in the upper left and upper right corners of fireplace. Remove upper light block by removing the four (4) mounting screws. Unscrew bulbs counter clockwise. Insert new bulbs. Re-install upper light bracket. Lay unit on it’s back slide front glass back into position and attach trim. Glass Cleaning The glass is cleaned in the factory during the assembly operation. During shipment, installation, handling, etc.
Warranty Products to which this limited warranty applies This limited warranty applies to your newly purchased Dimplex electric fireplace. This limited warranty applies only to purchases made in any province of Canada except for Yukon Territory, Nunavut, or Northwest Territories or in any of the 50 States of the USA (and the District of Columbia) except for Hawaii and Alaska. This limited warranty applies to the original purchaser of the product only and is not transferable.
Warranty ingly, Dimplex will be responsible for all labour and transportation costs associated with the repair or replacement of the product or part except as follows: (i) charges may be levied for travel costs incurred to travel to the purchaser’s site where the product is located if the purchaser’s site is beyond 30 miles (48 km) from the closest service depot of Dimplex’s dealer or service agent; and (ii) the purchaser is solely responsible for providing clear access to all serviceable parts of the produ
Warranty first purchase, Dimplex will in its sole discretion either repair or replace such defective surrounds (mantels) and trims or part thereof without charge. If Dimplex is unable to repair or replace such product or part, or if repair or replacement is not commercially practicable or cannot be timely made, Dimplex may, in lieu of repair or replacement, choose to refund the purchase price for such product or part. The purchaser shall not be entitled to on-site or inhouse services.
Replacement Parts Log set. . . . . . . . . . . . . . . . . . . . . . . . . . . . . . . . . . . . . . Flicker Motor. . . . . . . . . . . . . . . . . . . . . . . . . . . . . . . . . Flicker Rod . . . . . . . . . . . . . . . . . . . . . . . . . . . . . . . . . . Heater Assembly (with Cutout) . . . . . . . . . . . . . . . . . . . Thermostat . . . . . . . . . . . . . . . . . . . . . . . . . . . . . . . . . . On/Off Switch . . . . . . . . . . . . . . . . . . . . . . . . . . . . . . . . 3-Position Switch. . . . .