Owner’s Manual Model DFR2551L DFR2551G 6908922359 6908922459 IMPORTANT SAFETY INFORMATION: Always read this manual first before attempting to install or use this fireplace. For your safety, always comply with all warnings and safety instructions contained in this manual to prevent personal injury or property damage. To view the full line of Dimplex products, please visit www.dimplex.
Table of Contents Welcome & Congratulations. . . . . . . . . . . . . . . . . . . . 3 IMPORTANT INSTRUCTIONS. . . . . . . . . . . . . . . . . . 4 Fireplace Installation . . . . . . . . . . . . . . . . . . . . . . . . . 6 Operation. . . . . . . . . . . . . . . . . . . . . . . . . . . . . . . . . . . 9 Maintenance. . . . . . . . . . . . . . . . . . . . . . . . . . . . . . . . 13 Warranty . . . . . . . . . . . . . . . . . . . . . . . . . . . . . . . . . . 14 Technical Support. . . . . . . . . . . . . . . . . .
Welcome & Congratulations Thank you and congratulations for purchasing an electric fireplace from Dimplex. Please use our convenient online registration page to record your model and serial numbers for future reference at www.dimplex.com/register Rating Label with Model Number Serial Number Label Please carefully read and save these instructions. CAUTION: Read all instructions and warnings carefully before starting installation.
IMPORTANT INSTRUCTIONS When using electrical appliances, basic precautions should always be followed to reduce the risk of fire, electric shock, and injury to persons, including the following: ① Read all instructions before using this heater. ② This heater is hot when in use. To avoid burns, do not let bare skin touch hot surfaces. The trim around the heater outlet becomes hot during heater operation. ARNING: High temperaW tures may be generated under certain abnormal conditions.
IMPORTANT INSTRUCTIONS other). This plug will fit in a polarized outlet only one way. If the plug does not fit fully in the outlet, reverse the plug. If it still does not fit, contact a qualified electrician to install the proper outlet. Do not change the plug in any way. Always plug heaters directly into a wall outlet/receptacle. Never use with an extension cord or relocatable power tap (outlet/power strip). ⑮ Do not burn wood or other materials in the fireplace. ⑯ Do not strike the front glass.
Fireplace Installation WARNING: Ensure the power cord is not installed so that it is pinched or against a sharp edge and ensure that the power cord is stored or secured to avoid tripping or snagging to reduce the risk of fire, electric shock or injury to persons. WARNING: Construction and electrical outlet wiring must comply with local building codes and other applicable regulations to reduce the risk of fire, electric shock and injury to persons.
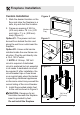
Fireplace Installation 1. Mark the desired location on the floor and store the fireplace in a safe, dry and dust free location. 2. Frame an opening of 24.0 in. (610 mm) wide x 18 ½ in. (470 mm) high x 7 ⅞ in. (200 mm) deep (Figure 4). Option #1 - The power cord can be lead from behind the trim and along the wall to an outlet near the fireplace. Option #2 - A new outlet can be installed inside the new frame construction. Plug the unit directly into a 15 A, 120 V outlet.
Fireplace Installation insert directly on carpet or similar surfaces which may restrict air circulation. CAUTION: If installing the fireplace in a carpeted area, place a one-piece, solid, flat surface under the fireplace. Ensure that all of the feet rest securely on this surface. 4. The firebox is to be installed from the front of the mantel and inserted so that the flanges are flush against the front surface of the mantel.
Operation Figure 6 Figure 7 A C D E F A B C D E F G H Floating DisplayTM WARNING: This electric firebox must be properly installed before it is used. The unit can be controlled by either the manual controls which are located on the upper right of the fireplace or the remote (Figure 6 & 7). The fireplace is supplied with an IR multifunction remote control. This remote control has a range of approximately 16 ft (5 m).
Operation C. Heat ON/OFF Cycles the unit sequentially through the 3 settings: Low Heat, High Heat and Off. → Activated by pressing the button on the unit or the remote. • Indicated by the (low heat) or the (high heat) icon and the intake temperature being displayed on the On Screen Display, for 5 seconds before turning off. ! NOTE: After the heater is switched off, there is a 60 second fan delay, where the fan will continue running before turning off. ! NOTE: The unit can be operated in Heat Only Mode.
Operation and enable the heater. ! NOTE: When the heater has been disabled and either the or the is pressed the On Screen Display will indicate "--". F. Color Themes Different presets of ambient lighting color combinations contained in the unit. → Changed by repeatedly pressing the corresponding button on the remote or the unit. • Cycles through the different preset ambient lighting settings of the unit, this includes different combinations of colours of the flame and media lighting (if applicable).
Operation Resetting the Temperature Cutoff Switch Should the heater overheat, an automatic cut out will turn the heater off and it will not come back on without being reset. It can be reset by unplugging the unit and waiting 5 minutes before plugging the unit back in. CAUTION: If you need to continuously reset the heater, unplug the unit and call technical support at 1-888-346-7539. Remote Control Battery Replacement To replace the battery: 1.
Maintenance WARNING: Disconnect power before attempting any maintenance or cleaning to reduce the risk of fire, electric shock or damage to persons. Glass Cleaning The glass is cleaned in the factory during the assembly operation. During shipment, installation, handling, etc., the front glass panel may collect dust particles; these can be removed by dusting lightly with a clean dry cloth. To remove fingerprints or other marks, the front glass panel can be cleaned with a damp cloth.
Warranty One Year Limited Warranty Products to which this limited warranty applies This limited warranty applies to your newly purchased Dimplex electric fireplace. This limited warranty applies only to purchases made in any province of Canada except for Yukon Territory, Nunavut, or Northwest Territories or in any of the 50 States of the USA (and the District of Columbia) except for Hawaii and Alaska. This limited warranty applies to the original purchaser of the product only and is not transferable.
Warranty • Dimplex will in its sole discretion either repair or replace such defective product or part without charge. If Dimplex is unable to repair or replace such product or part, or if repair or replacement is not commercially practicable or cannot be timely made, Dimplex may, in lieu of repair or replacement, choose to refund the purchase price for such product or part.
Technical Support Technical and troubleshooting support, as well as a list of replacement parts can be found on www.dimplex.com/customer_support. Dimplex North America Limited 1367 Industrial Road Cambridge ON Canada N3H 4W3 © 2016 Dimplex North America Limited 16 www.dimplex.