
Use and Care Manual


7202450001R11
Electric Unit Heaters
EUH-B Series
WARNING: Wiring procedures and connections should be in ac-
cordance with the National Electric code (NEC) and local codes.
WARNING: To reduce the risk of re, do not store or use gasoline
or other ammable vapors or liquids in the vicinity of the heater.
FOR HORIZONTAL OR VERTICAL AIRFLOW
PERMANENT OR SUPPLEMENTARY ELECTRIC FORCED AIR
HEATING FROM THE SAME VERSATILE UNIT
These heavy-duty heaters provide spot heating for hard to heat ar-
eas, or they can be used as the primary source of heat for areas not
reached by an existing heating system.
The fan and motor are carefully matched to insure quiet, trouble-free
operation and fan blades are precision balanced before installation.
Heaters in all capacities (3, 5, 7½, 10 or 12kw) have the same di-
mensions, and use the same mounting brackets. All components and
controls, including thermostat, transformers, relays, and switches are
enclosed inside the case. Wiring is simple and all heaters can oper-
ate from a single power source.
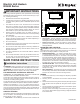
HEATER LOCATION
Unit heaters should be located along outside walls to provide perim-
eter air circulation. The discharge air should wipe the walls without
blowing directly on them. (Figure 1)
• Small rooms - can be heated by one or two units. Locate the unit
Installation Instructions
IMPORTANT INSTRUCTIONS
When using electrical appliances, basic precautions should always
be followed to reduce the risk of re, electric shock and injury to per-
son, including the following:
1. Read all instructions before using this heater.
2. A heater has hot and arcing or sparking parts inside. Do not use
it in areas where gasoline, paint or ammable liquids are used
or stored.
3. The heater is hot when in use. To avoid burns, do not let bare
skin touch hot surfaces. The trim around the heater outlet be-
comes hot during heater operation. Keep combustible materials,
such as furniture, pillows, bedding, papers, clothes, etc. and cur-
tains at least 3 ft. (0.9m) from the front of the heater.
4. Extreme caution is necessary when any heater is used by or
near children or invalids and whenever the unit is left operating
and unattended.
5. Do not operate any heater after it malfunctions. Disconnect
power at the service panel and have the heater inspected by a
reputable electrician before reusing.
6. Do not use outdoors.
7. To disconnect the unit, turn the controls off, and trun off power to
heater circuit at main disconnect panel.
8. Do not insert or allow foreign objects to enter any ventilation or
exhaust opening as this may cause an electric shock or re, or
damage to the heater.
9. To prevent a possible re, do not block air intake or exhaust in
any manner.
10. Do not modify this heater. Use it only as described in this man-
ual. Any other use not recommended by the manufacturer may
cause re, electric shock or injury to persons.
SAVE THESE INSTRUCTIONS
heater(s) to provide circular air movement within the space.
• Large rooms - requiring multiple unit installations. Units should
be located so that the discharge air from one unit supports the
discharge from another unit and provides a circular air movement.
• Remote thermostats - should be located on interior walls or
posts away from heat sources, cold drafts, and away from heater
discharge streams.
MOUNTING UNIT HEATER(S)
CAUTION: Heater must be mounted a minimum of 10 in. (25.4cm)
from walls and 6 ft (183 cm) above oor (8 ft (244 cm) for vertical air
ow) with the discharge parallel to or away from wall.
• MOUNTING BRACKET - The heater is shipped with a mount-
ing bracket packed separately in the carton. Secure the bracket
to threaded attachment points on the sides of the heater with
two bolts (provided). Select desired angle of tilt (Horizontal, 15,
30, 45, 60, 75, or Vertical), remove corresponding knockouts on
sides of the heater, then screw the remaining two bolts into the
threaded holes in the bracket so that the bolts pass through the
knockout holes. The unit is now ready for hanging.
• CEILING MOUNTING - Fasten the heater securely to the ceiling
using the center hole in the bracket or the two holes on either side
of the center hole. The Unit mounting bracket may be attached
directly to the ceiling.
• WALL MOUNTING - The heater may also be mounted to a wall
with accessory wall bracket, Part # EUHWB. The wall bracket at-
taches to the center hole of the unit mounting bracket.
WIRING
1. Connect the heater only to the voltage and frequency specied
on the nameplate.
2. All wiring to be in accordance with local and national electric
codes.
3. Remove two screws securing the access door (See Figure 2) and
swing the door down to expose the wiring and control compart-
ment.
4. Three knockouts are provided at the back of the heater for power
and control wiring. (See Figure 2)
5. Rough-in branch circuit wiring to the heater using wire rated for
167°F (75°C). Wire heater supply according to diagram attached
to the access door.
SMALL ROOM
LARGE ROOM
EXPOSED OUTSIDE WALL
EXPOSED OUTSIDE
WALL
EXPOSED OUTSIDE WALL
Figure 1